
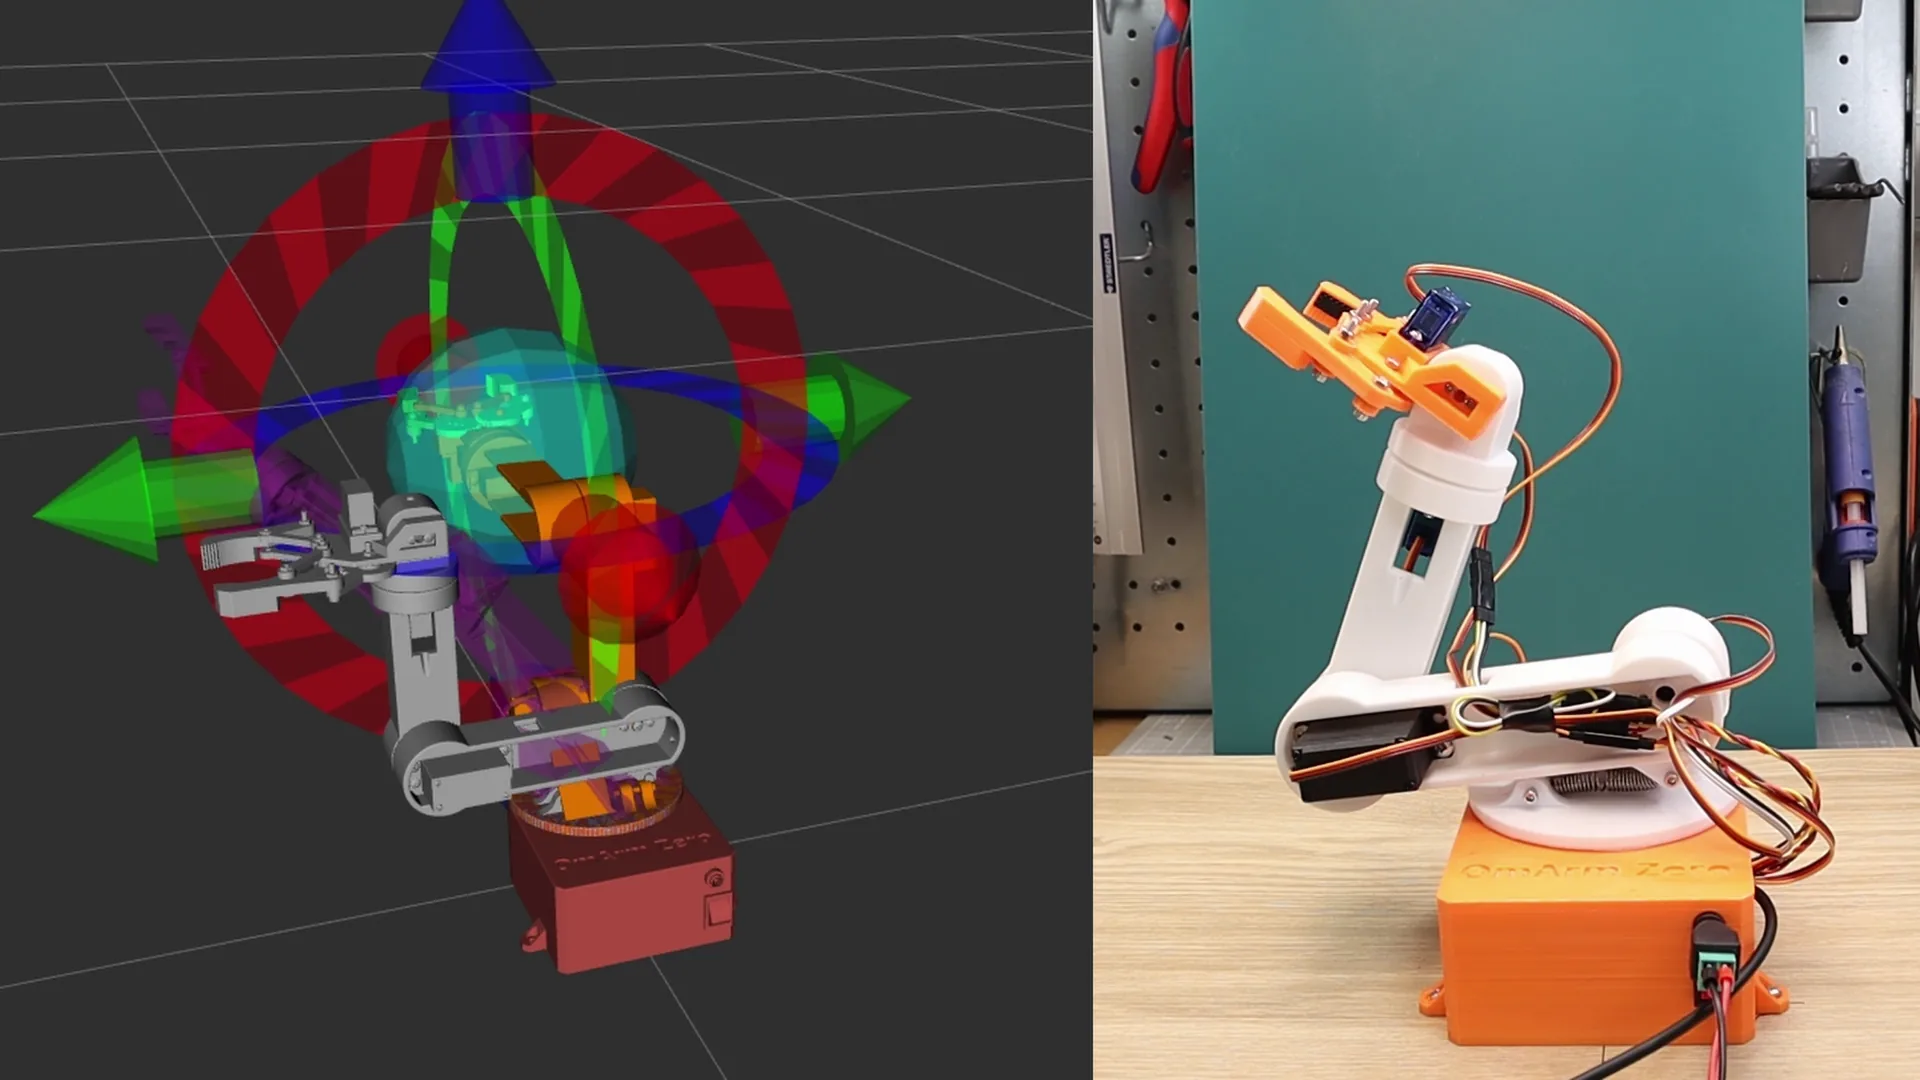
OmArm Zero Series
Part 1: Build · Part 2: URDF + RViz + Gazebo · Part 3: MoveIt 2 (this post) · Part 4: Computer Vision Pick-and-Place
The video loads from YouTube (Google), which may set cookies. Privacy policy
At a glance
What you’ll build: A MoveIt 2 configuration for the OmArm Zero. It covers inverse kinematics, collision-free planning in RViz, execution in Gazebo, and a Python bridge that drives the real servos over serial or WiFi.
Prerequisites: Completed Part 2 (URDF, RViz, Gazebo working). You should be able to launch the Gazebo simulation and see the arm respond to joint trajectory commands.
Software: Ubuntu 24.04, ROS 2 Jazzy, Gazebo Harmonic, MoveIt 2.
Time: 3-5 hours (config, calibration, real hardware testing).
Difficulty: Intermediate to advanced.
Files: Full ROS 2 workspace in the shop (OmArm Zero ROS 2 workspace package, 29 €; link at the end).
1. From joint sliders to motion planning
In Part 2 I built the digital twin of the OmArm Zero in URDF, the XML format for links and joints, and ran it in RViz and Gazebo. You could move every joint with a slider and send joint trajectory commands. That is enough for testing single joints. Real tasks start from the other end: you know where the gripper must go and need the joint angles.
Every new motion I tried with the sliders in Part 2 either ran the arm into itself or missed the target by about 3 cm. I was guessing joint angles.
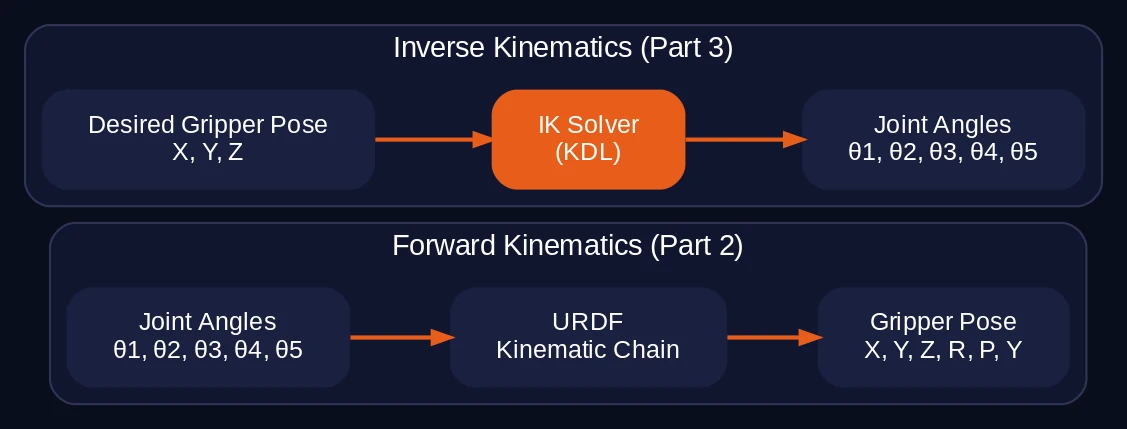
With the sliders, you picked joint angles and watched where the gripper ended up. That is forward kinematics (FK): joint angles in, gripper position out. To pick up a cup, you specify where the gripper must go: the cup’s X, Y, Z position and the gripper’s orientation. Computing the joint angles is the robot’s job.
Part 2 worked in joint space: a list of joint angles. Part 3 works in task space: the gripper’s position and orientation in the room. MoveIt 2 translates between the two.
2. Inverse kinematics
Forward kinematics is the easy direction. You have the joint angles and the URDF (link lengths, joint axes, offsets). Apply each joint rotation along the chain and you get the gripper pose, its position plus orientation. One input, one output, always solvable. Part 2 showed this when robot_state_publisher computed the TF tree (the tree of coordinate frames) from the joint states.
Inverse kinematics (IK) is the opposite: given a target gripper pose, find the joint angles that reach it.
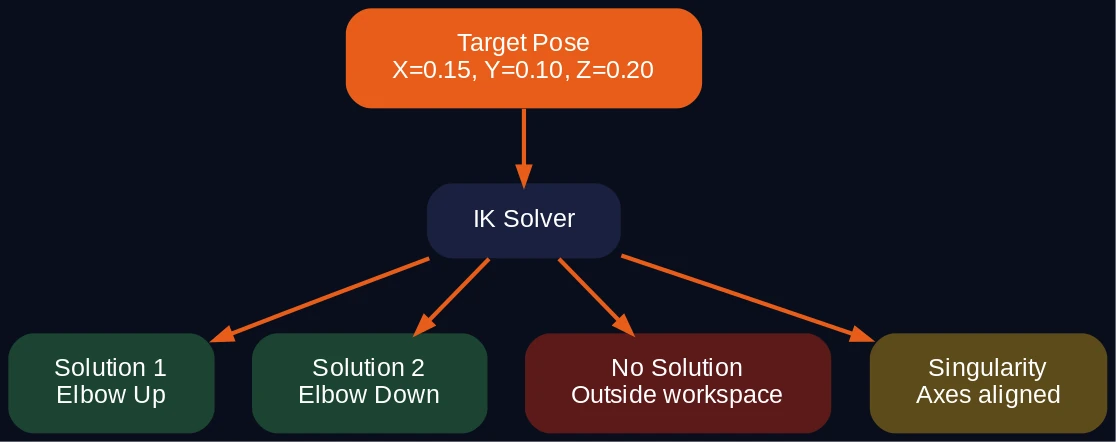
IK is harder than FK for three reasons.
Multiple solutions. For most reachable gripper poses there are several valid joint configurations. Think of touching your nose. Your elbow could point left, right, up or down: same fingertip position, different arm configurations. A general six-joint industrial arm can have up to 16 IK solutions for one gripper pose. In this series the OmArm Zero counts as a 6-DOF arm, with six degrees of freedom (DOF, independent directions of motion): five arm joints plus a gripper, driven by six servos. Its five arm joints can still reach many targets in more than one way, for example elbow up or elbow down.
No solution. If the target lies outside the workspace (the volume the gripper can reach), or the joint limits rule out the required orientation, there is no answer. The solver has to recognize this and report failure instead of returning an invalid result.
Singularities. In some configurations two joint axes line up and the arm loses a degree of freedom. Near a singularity, tiny changes in the target cause large jumps in the joint angles, and the solver becomes numerically unstable.
For simple arms you can solve IK analytically, by working through the trigonometry by hand. For a six-joint arm with arbitrary link lengths and offsets, the closed-form equations become long and hard to derive. That is why numerical solvers exist.
MoveIt 2 uses the KDL solver (Kinematics and Dynamics Library) for the OmArm Zero. KDL reads the URDF and builds the kinematic chain, the sequence of links and joints from the base to the gripper. It then uses the Newton-Raphson method: it starts from a guess, measures how far the gripper is from the target and corrects the joint angles step by step until the error is small enough. You do not implement IK yourself; KDL computes the joint angles from the URDF.
# kinematics.yaml -- the entire IK configuration
arm:
  kinematics_solver: kdl_kinematics_plugin/KDLKinematicsPlugin
  position_only_ik: true
  kinematics_solver_search_resolution: 0.005
  kinematics_solver_timeout: 0.2
  kinematics_solver_attempts: 10
position_only_ik: true means the solver matches only the gripper’s X, Y, Z position and ignores its orientation. The arm group has five revolute joints (rotary joints), including the forearm rotation; the gripper is a separate group. Five joints cannot satisfy all six pose values (X, Y, Z and three rotations) at once, so the solver would fail on most targets. kinematics_solver_timeout limits each attempt to 0.2 s.
3. Trajectory planning: the path to the goal
IK gives the joint angles for the goal. The planner decides how the arm gets there. If every joint drove straight to its target angle at the same time, the arm might collide with itself, hit the table or exceed its velocity limits. The motion needs to be planned.

A trajectory planner works in three stages.
Path planning. Find a collision-free path through joint space from the current configuration to the goal. This is a search problem. The arm group has five joints, so the search space is 5-dimensional. The planner samples random configurations, checks them against the collision model (the URDF plus any obstacles you add to the scene), and connects valid samples into a path. MoveIt uses OMPL (Open Motion Planning Library) for this. The default algorithm is RRTConnect (Rapidly-exploring Random Tree): it grows two random trees, one from the start and one from the goal, and connects them. It is fast and reliable for arms with a moderate number of DOF.
Trajectory smoothing. The raw path from RRTConnect is a sequence of waypoints (intermediate joint configurations) with sharp corners. At a sharp corner the velocity would have to change instantly, which makes servos jerk. MoveIt applies TimeOptimalParameterization to round the path and add timing information. The result respects the joint velocity and acceleration limits from joint_limits.yaml.
Collision checking. Every sampled configuration is checked against the robot’s self-collision model (from the SRDF, section 6) and against any scene objects. If you add a table as a collision object, the planner avoids it.
The output is a JointTrajectory message: a list of waypoints, each with joint positions, velocities and a timestamp. This is what the controller executes.
4. What MoveIt 2 does
MoveIt 2 turns a gripper goal into a timed sequence of joint angles. Its central node is move_group: it receives planning requests, plans the motion and sends the result to the controller. MoveIt combines IK (section 2) and motion planning (section 3) with execution: it sends the planned trajectory to a controller through the FollowJointTrajectory action and reports success or failure. A ROS 2 action is a request with a goal, progress feedback and a final result, suited to motions that take time.
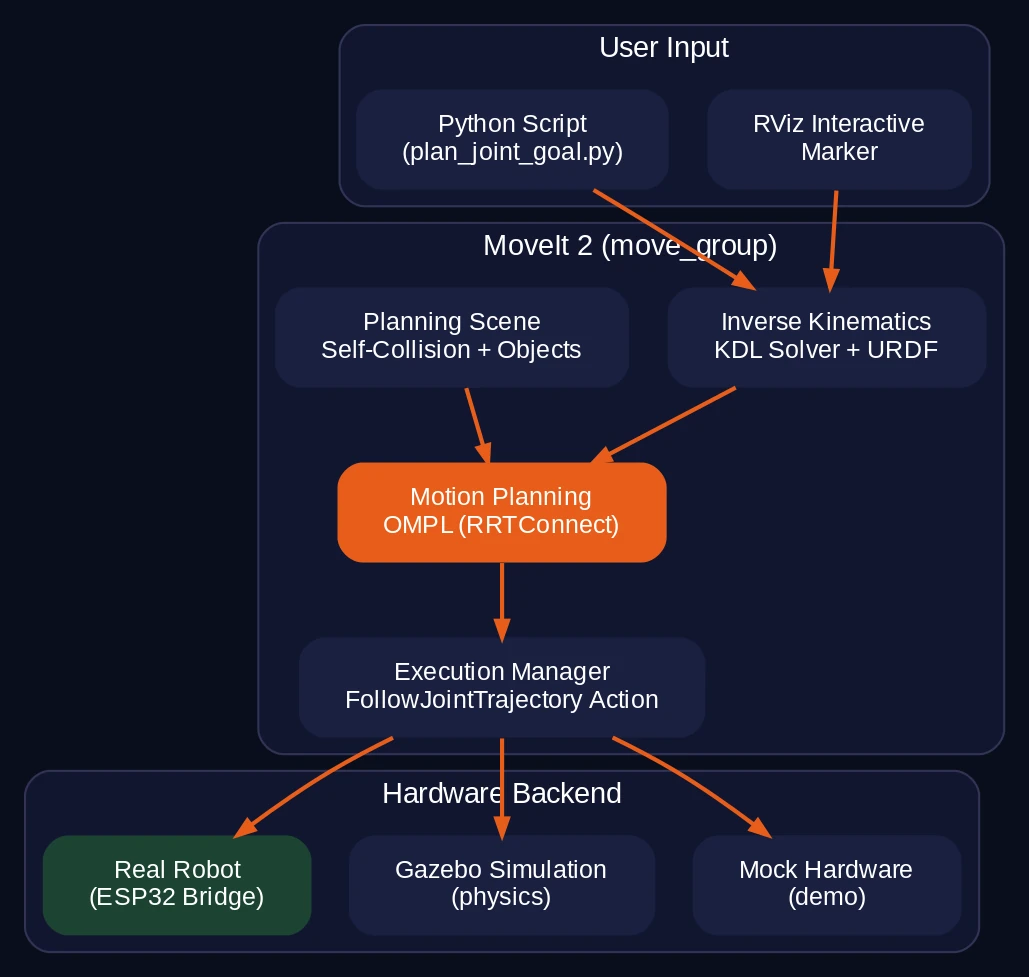
MoveIt also manages the planning scene (collision objects such as tables, walls or other robots) and the planning groups (sets of joints you plan for separately, here arm and gripper). Its RViz plugin lets you drag the gripper to a target pose and click Plan & Execute.
MoveIt works the same way with any system behind the controller interface: a Gazebo simulation, mock hardware or a real robot. As long as something answers FollowJointTrajectory goals, MoveIt plans and sends trajectories to it. This is what lets me use the same planning configuration for simulation and real hardware.
5. MoveIt Setup Assistant: configuring your robot
The MoveIt Setup Assistant is a graphical tool that reads your URDF and generates a complete MoveIt configuration package. Instead of writing YAML files by hand, you click through a wizard. These are the settings used for the omarm_zero_moveit_config package.
Prerequisites
Install MoveIt 2 and the Setup Assistant:
sudo apt install ros-jazzy-moveit ros-jazzy-moveit-setup-assistant -yStep 1: Launch the Setup Assistant
source /opt/ros/jazzy/setup.bash
source ~/omarm_zero_ws/install/setup.bash
ros2 launch moveit_setup_assistant setup_assistant.launch.py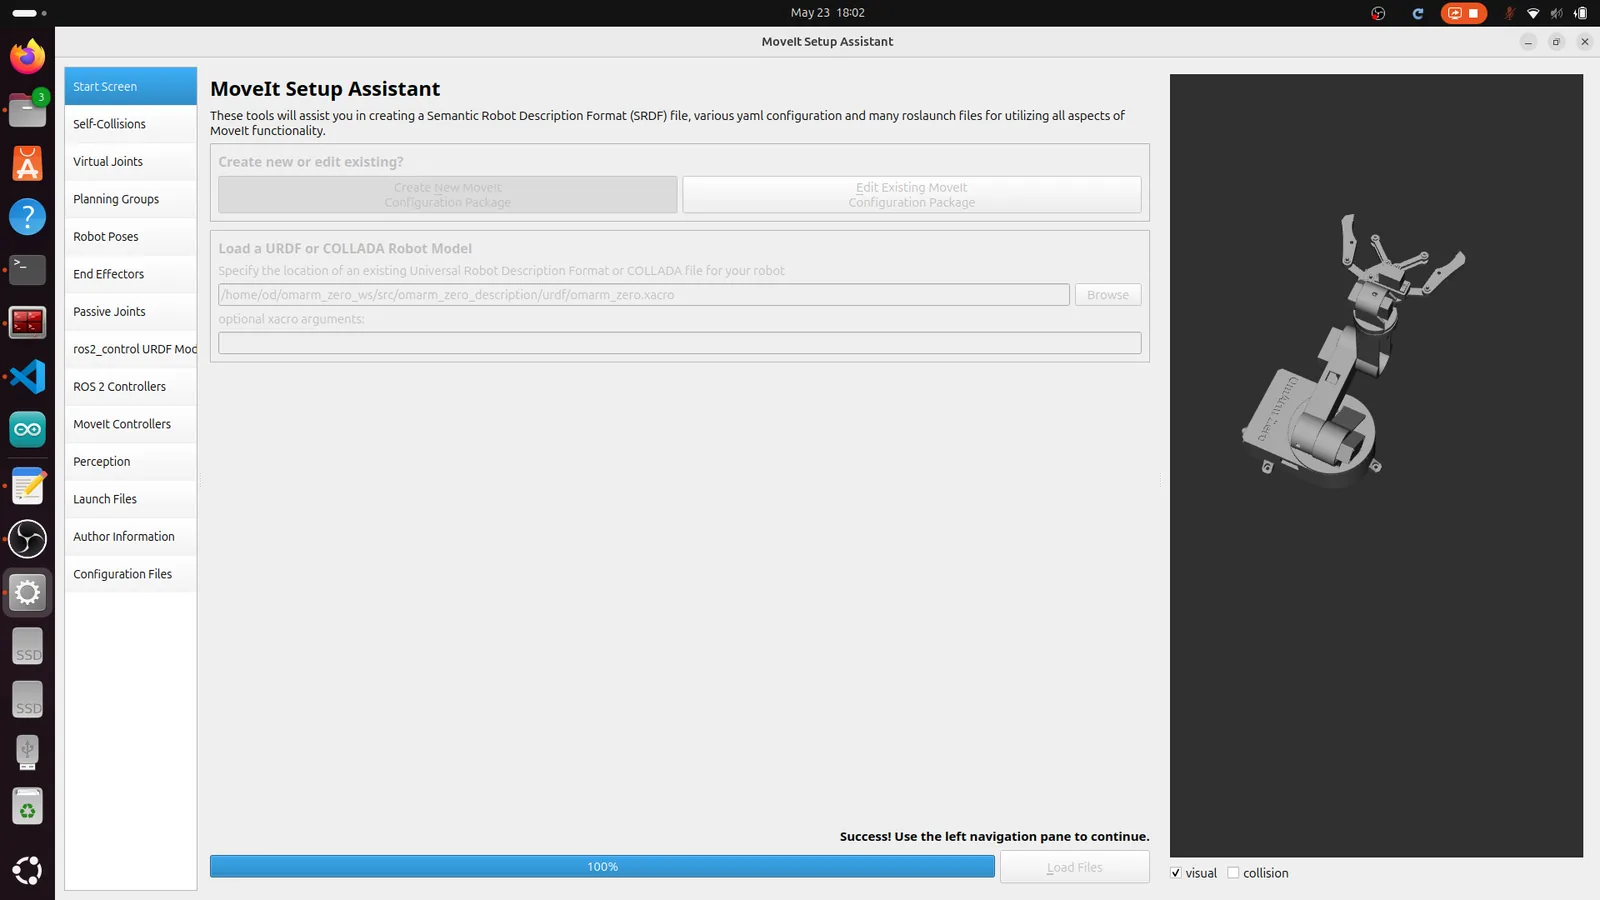
Click Create New MoveIt Configuration Package. Browse to your URDF/Xacro file (Xacro is the macro format from Part 2 that generates the URDF):
~/omarm_zero_ws/src/omarm_zero_description/urdf/omarm_zero.xacro
Click Load Files. The robot model appears in the 3D view. If it is all white or meshes are missing, check that omarm_zero_description is built and sourced.
Step 2: Self-Collision Matrix
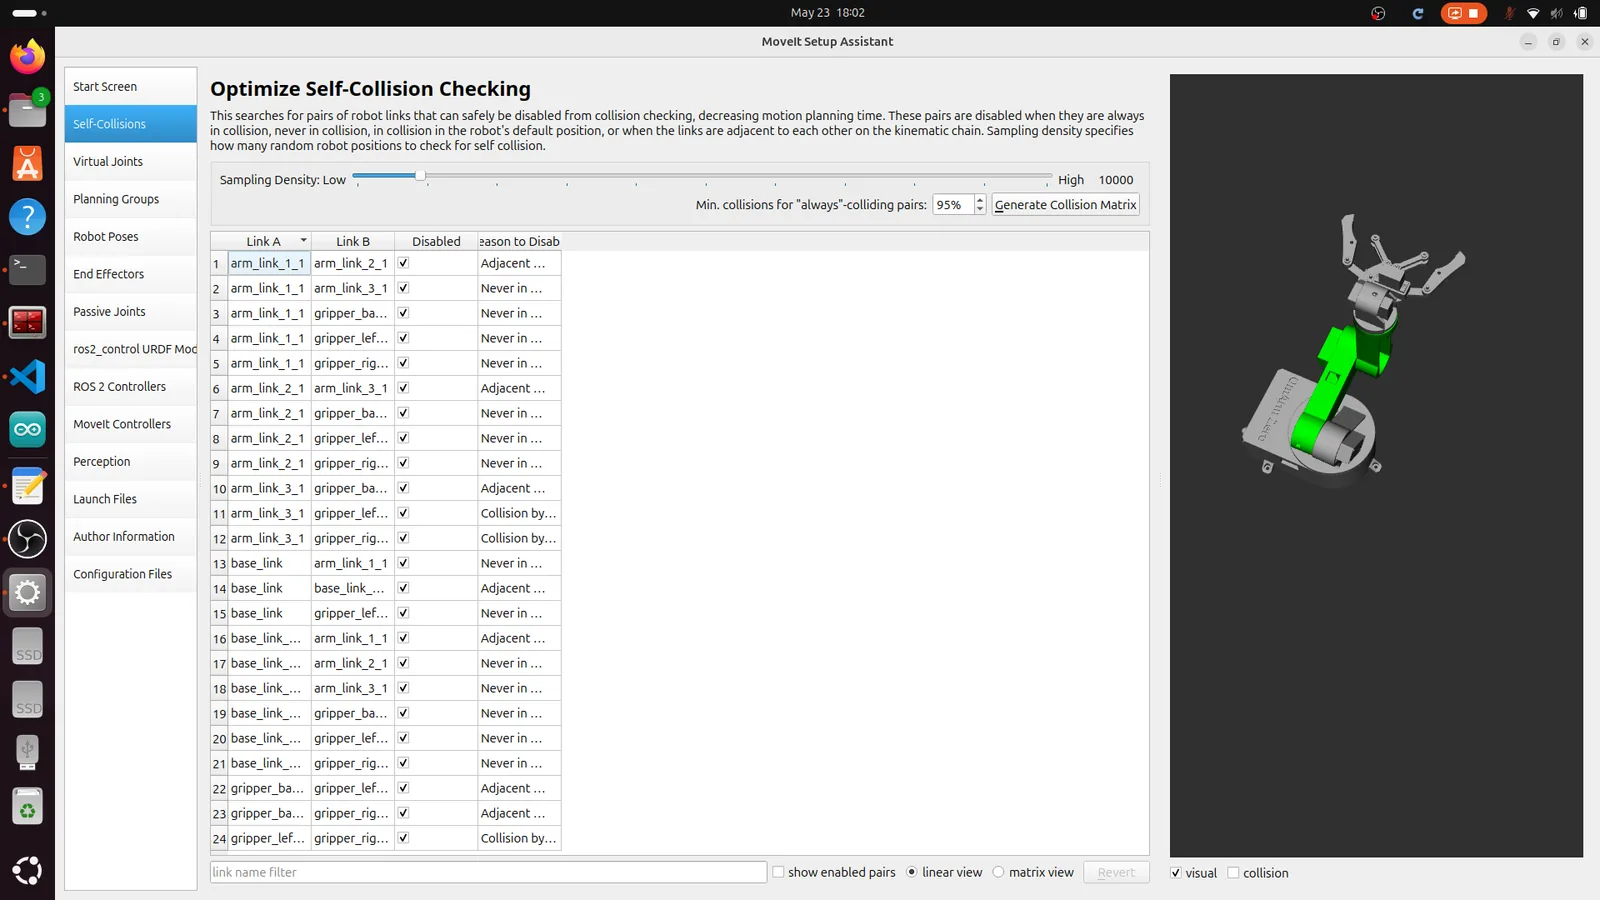
Click Self-Collisions in the left panel, then Generate Collision Matrix. The assistant samples thousands of random joint configurations and checks which link pairs can never collide. These pairs are disabled to speed up planning. For the OmArm Zero, 10 collision pairs are disabled:
- Adjacent links (base and upper base, upper base and arm link 1, and so on).
- Gripper fingers that never reach certain arm links.
- The two gripper fingers against each other (they are meant to be close).
Step 3: Virtual Joint
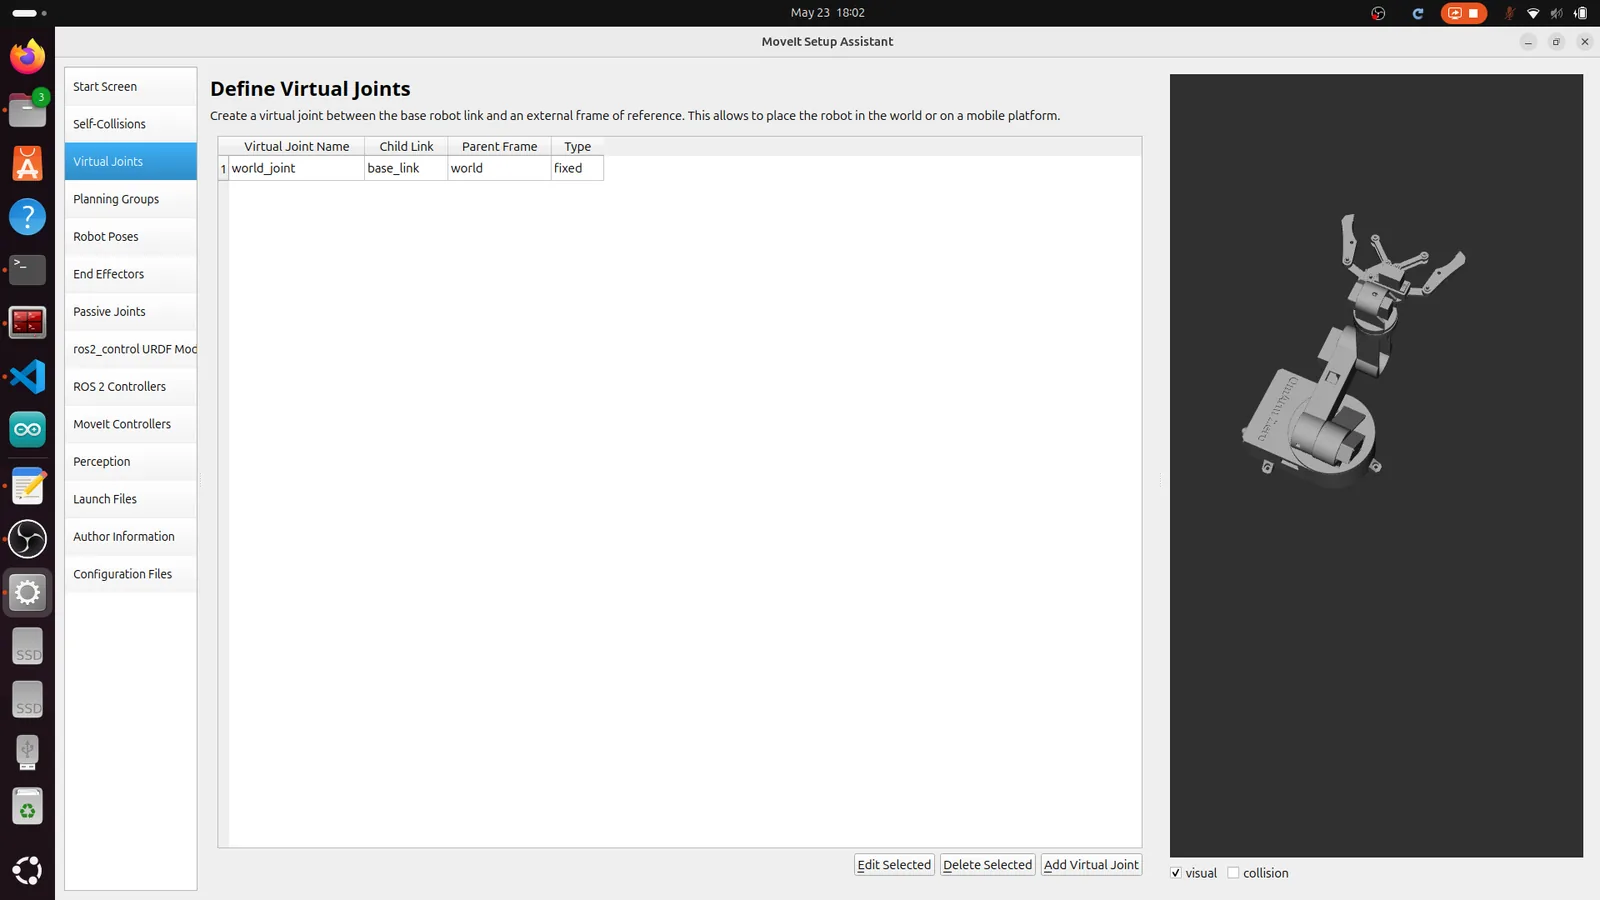
Click Virtual Joints and add one:
| Field | Value |
|---|---|
| Name | world_joint |
| Child Link | base_link |
| Parent Frame | world |
| Type | fixed |
This anchors the robot to the world frame. Without it, MoveIt does not know where the base is.
Step 4: Planning Groups
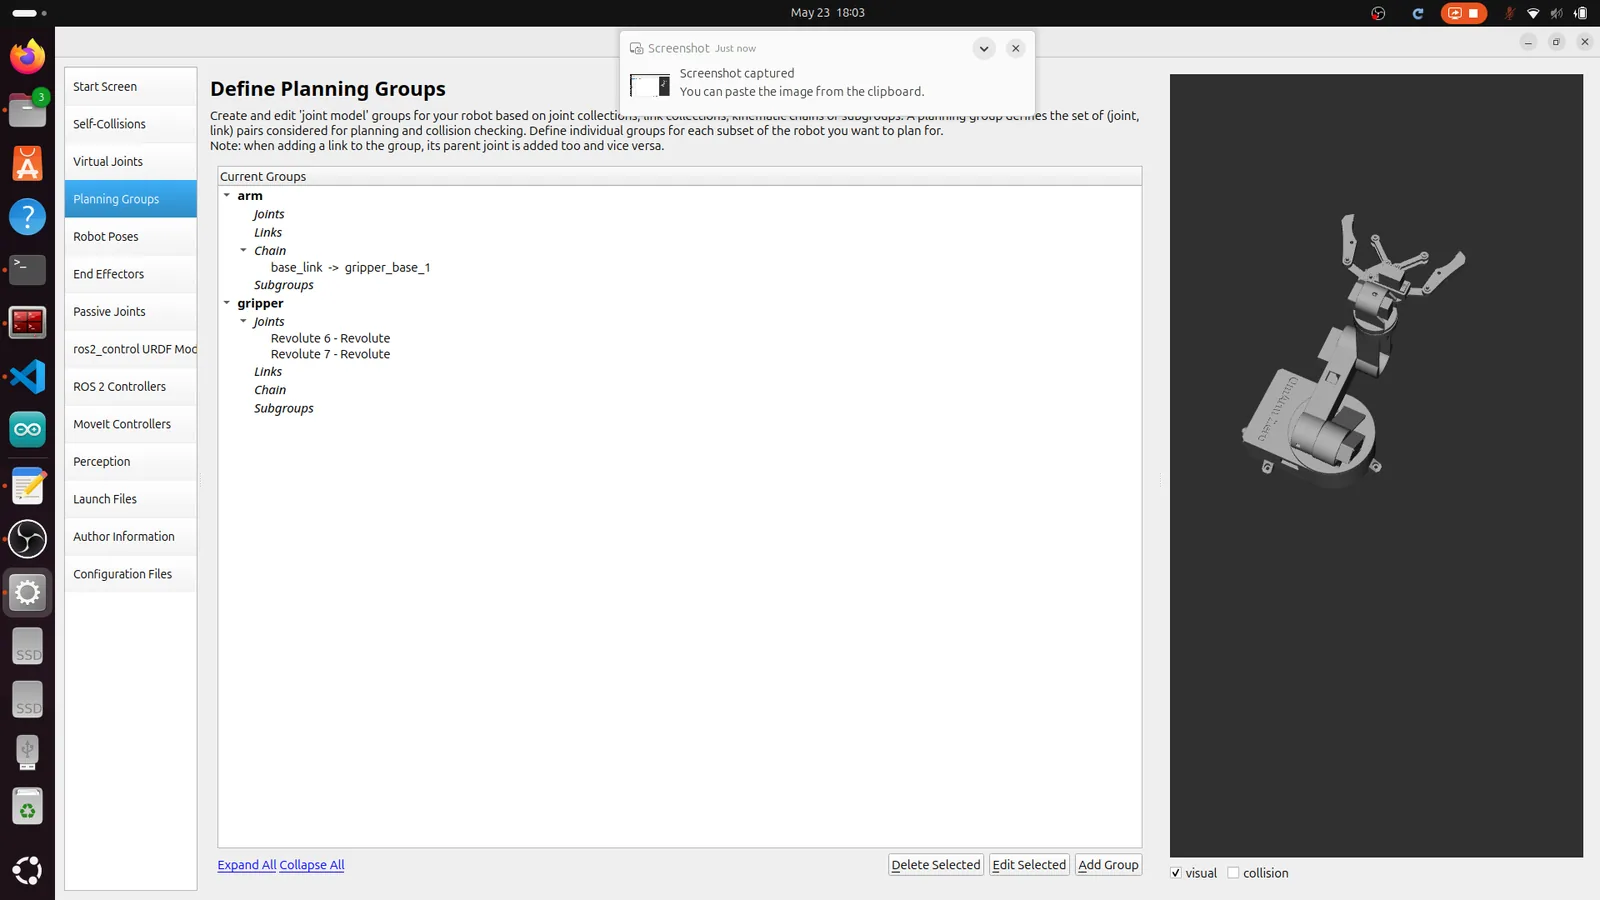
Click Planning Groups and create two groups. I got this step wrong twice before it worked.
Group “arm”:
| Field | Value |
|---|---|
| Name | arm |
| Kinematic Solver | kdl_kinematics_plugin/KDLKinematicsPlugin |
| Group Default Planner | RRTConnect |
| Definition | Kinematic Chain |
| Base Link | base_link |
| Tip Link | gripper_base_1 |
This creates a chain through Revolute 1 to 5. The names Revolute 1 to 7 and gripper_base_1 come from the Fusion 360 URDF export in Part 2. Because the joint names contain a space, the YAML files put them in quotes (“Revolute 1”). Revolute 1 is the base rotation, Revolute 2 the shoulder, Revolute 3 the elbow, Revolute 4 the forearm rotation, Revolute 5 the wrist tilt, and Revolute 6 and 7 the gripper fingers. The chain stops at gripper_base_1, where the arm ends and the gripper begins.
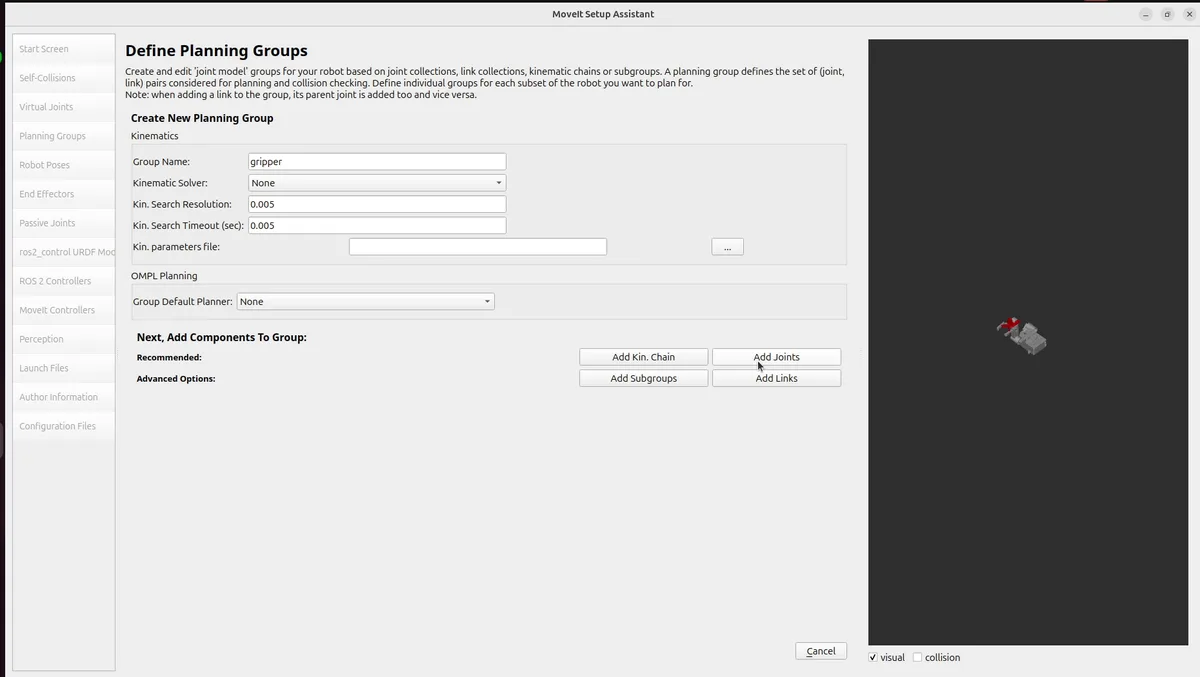
Group “gripper”:
| Field | Value |
|---|---|
| Name | gripper |
| Definition | Joints |
| Joints | Revolute 6, Revolute 7 |
The gripper is defined as a list of joints instead of a chain: both fingers sit side by side on gripper_base_1, and neither finger is mounted on the other.
Step 5: Robot Poses
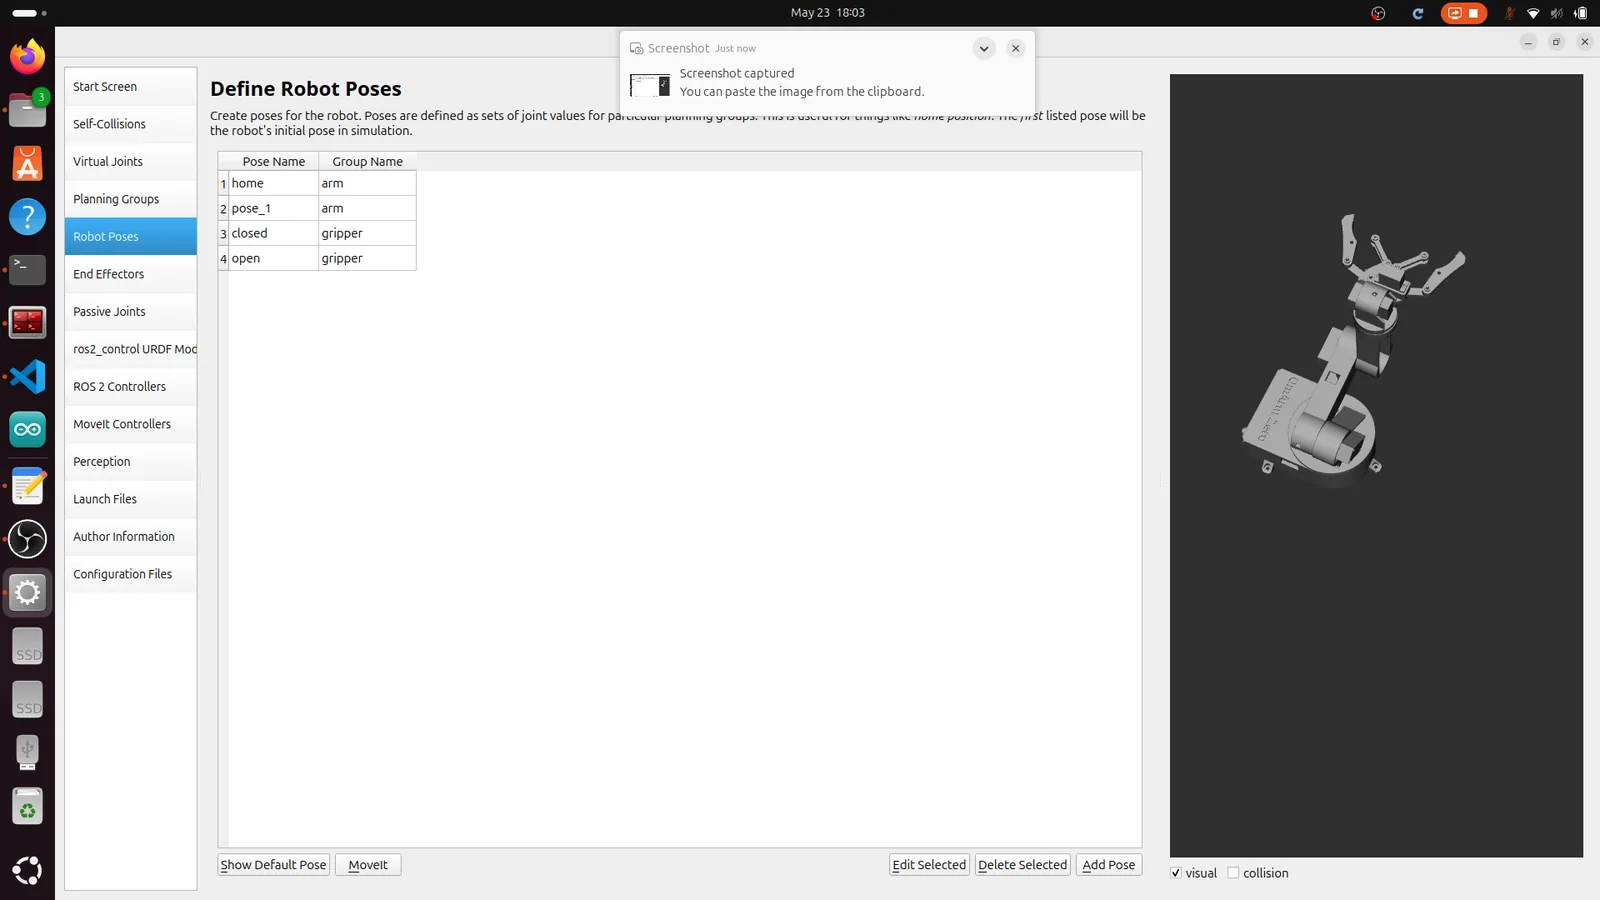
Click Robot Poses and define named configurations that you can recall later.
“home” (group: arm):
| Joint | Value (rad) |
|---|---|
| Revolute 1 | 0.8 |
| Revolute 2 | -0.8 |
| Revolute 3 | -1.2 |
| Revolute 4 | -0.8 |
| Revolute 5 | -2.6 |
“open” (group: gripper):
| Joint | Value (rad) |
|---|---|
| Revolute 6 | -1.57 |
| Revolute 7 | -1.57 |
“closed” (group: gripper):
| Joint | Value (rad) |
|---|---|
| Revolute 6 | 1.57 |
| Revolute 7 | 1.57 |
Use the sliders to find poses that suit your arm. “home” should be a safe resting position with no joint at its limit.
Step 6: End Effector
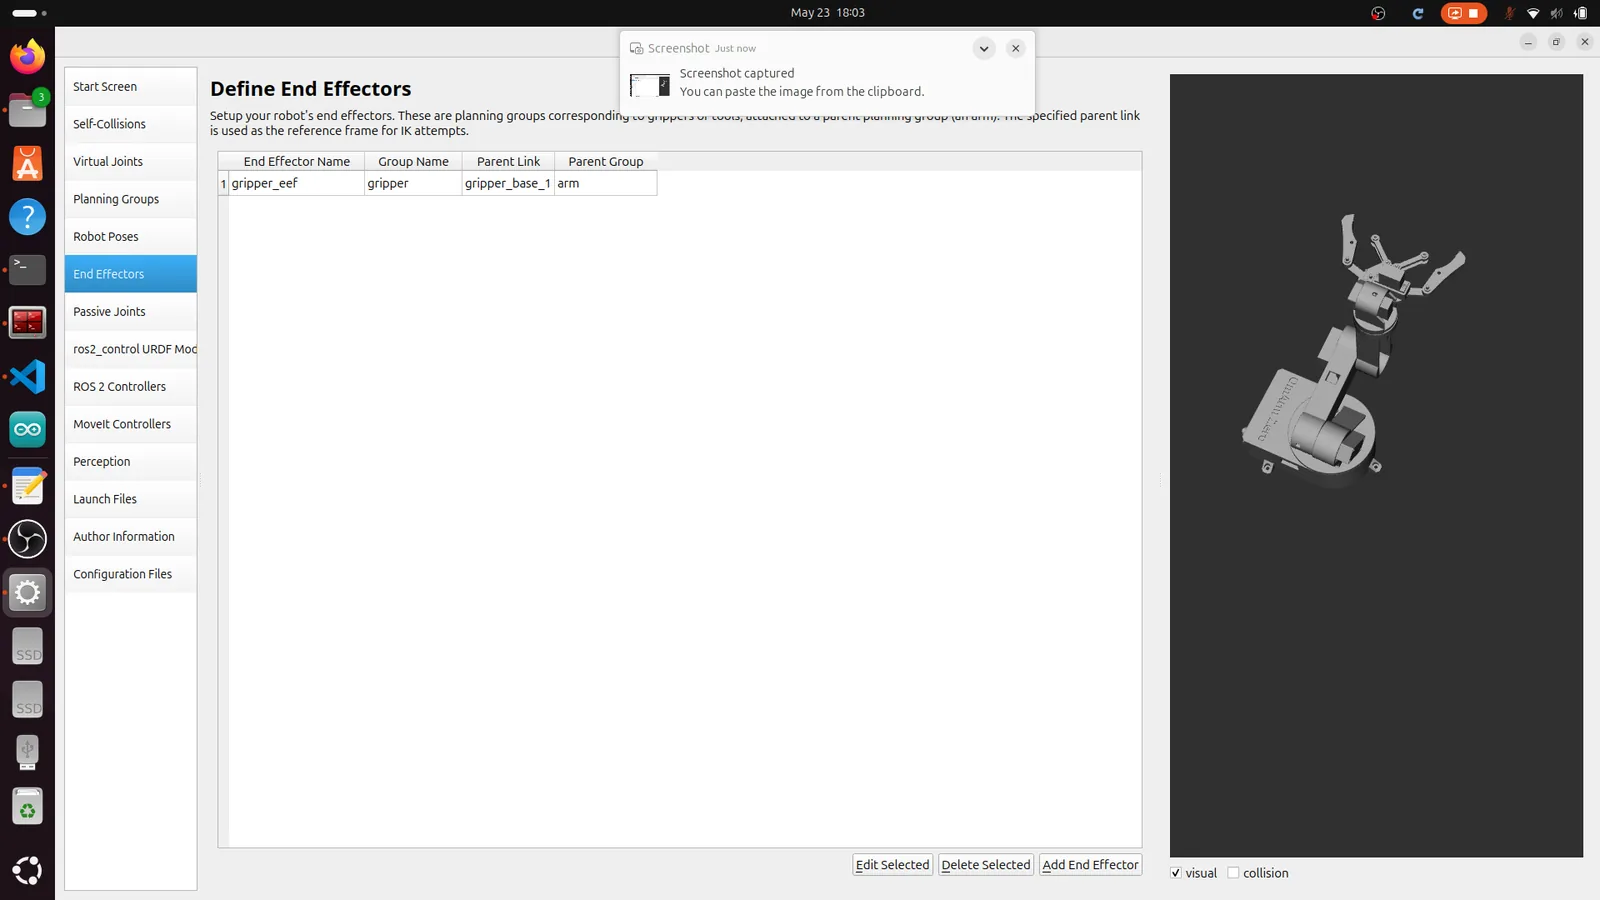
Click End Effectors and add one:
| Field | Value |
|---|---|
| Name | gripper_eef |
| End Effector Group | gripper |
| Parent Link | gripper_base_1 |
| Parent Group | arm |
This tells MoveIt that the gripper is the end-effector of the arm chain, the tool at its end. When you plan for the arm group, MoveIt moves the gripper along with it.
Step 7: Passive Joints
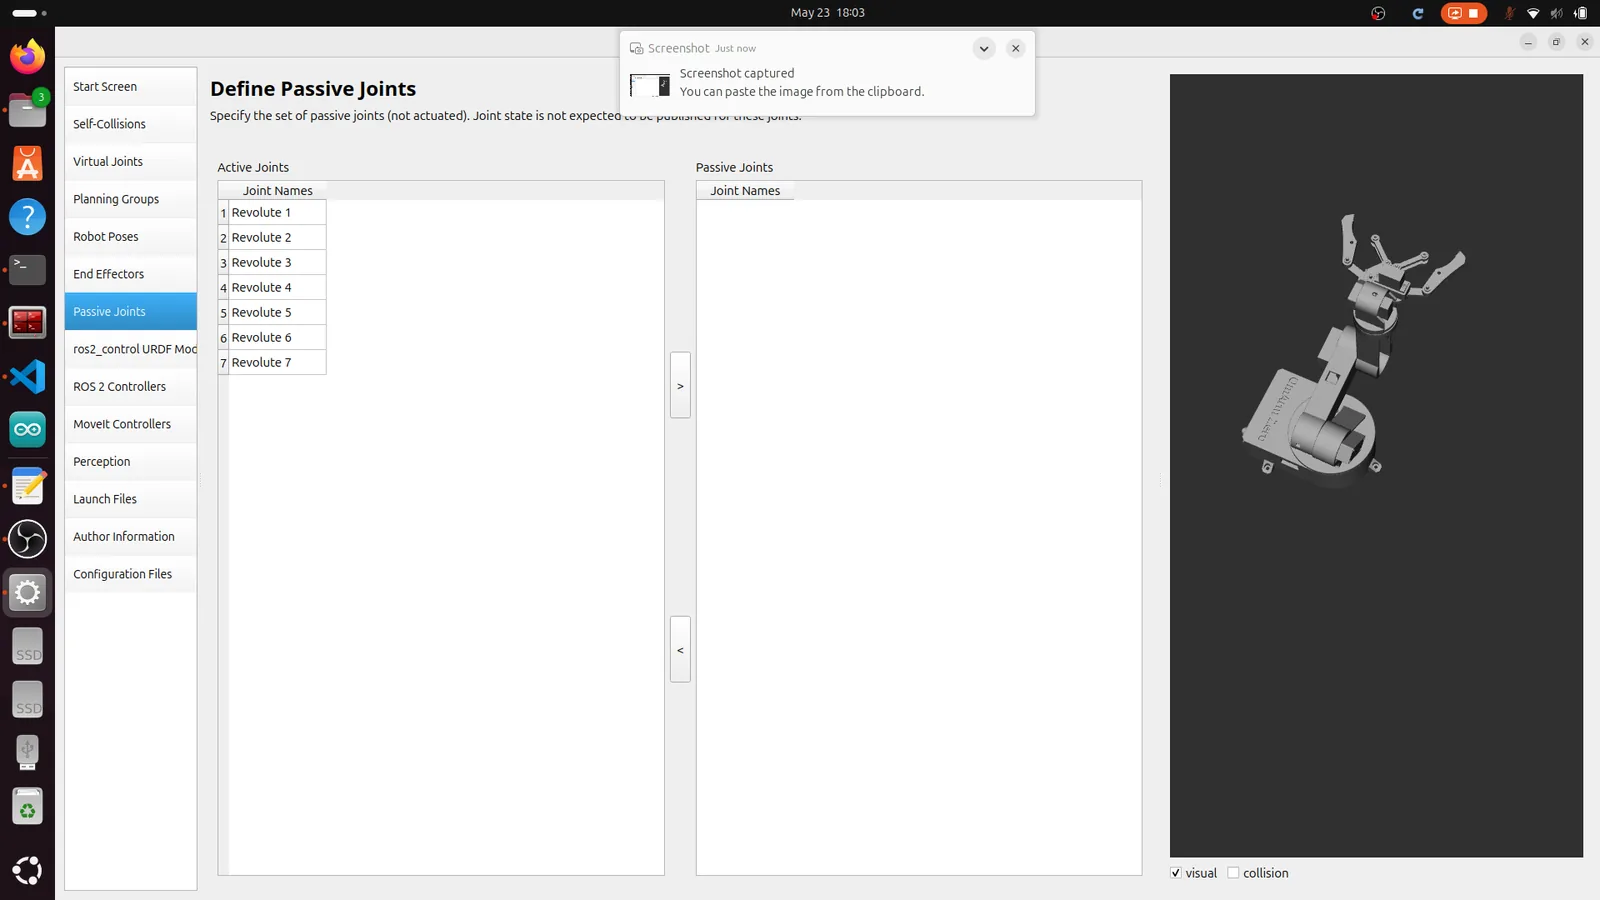
Click Passive Joints. This screen lets you mark joints without their own actuator (motor): joints that move freely or are driven by other joints, like a caster wheel. On the OmArm Zero, six of the seven Revolute joints have their own servo; Revolute 7 (the second finger) follows Revolute 6 through the gripper gears. Leave all seven in the Active Joints column anyway, because the coupling is handled in software (section 8). Do not move anything to the Passive Joints side.
Step 8: ros2_control URDF Modifications
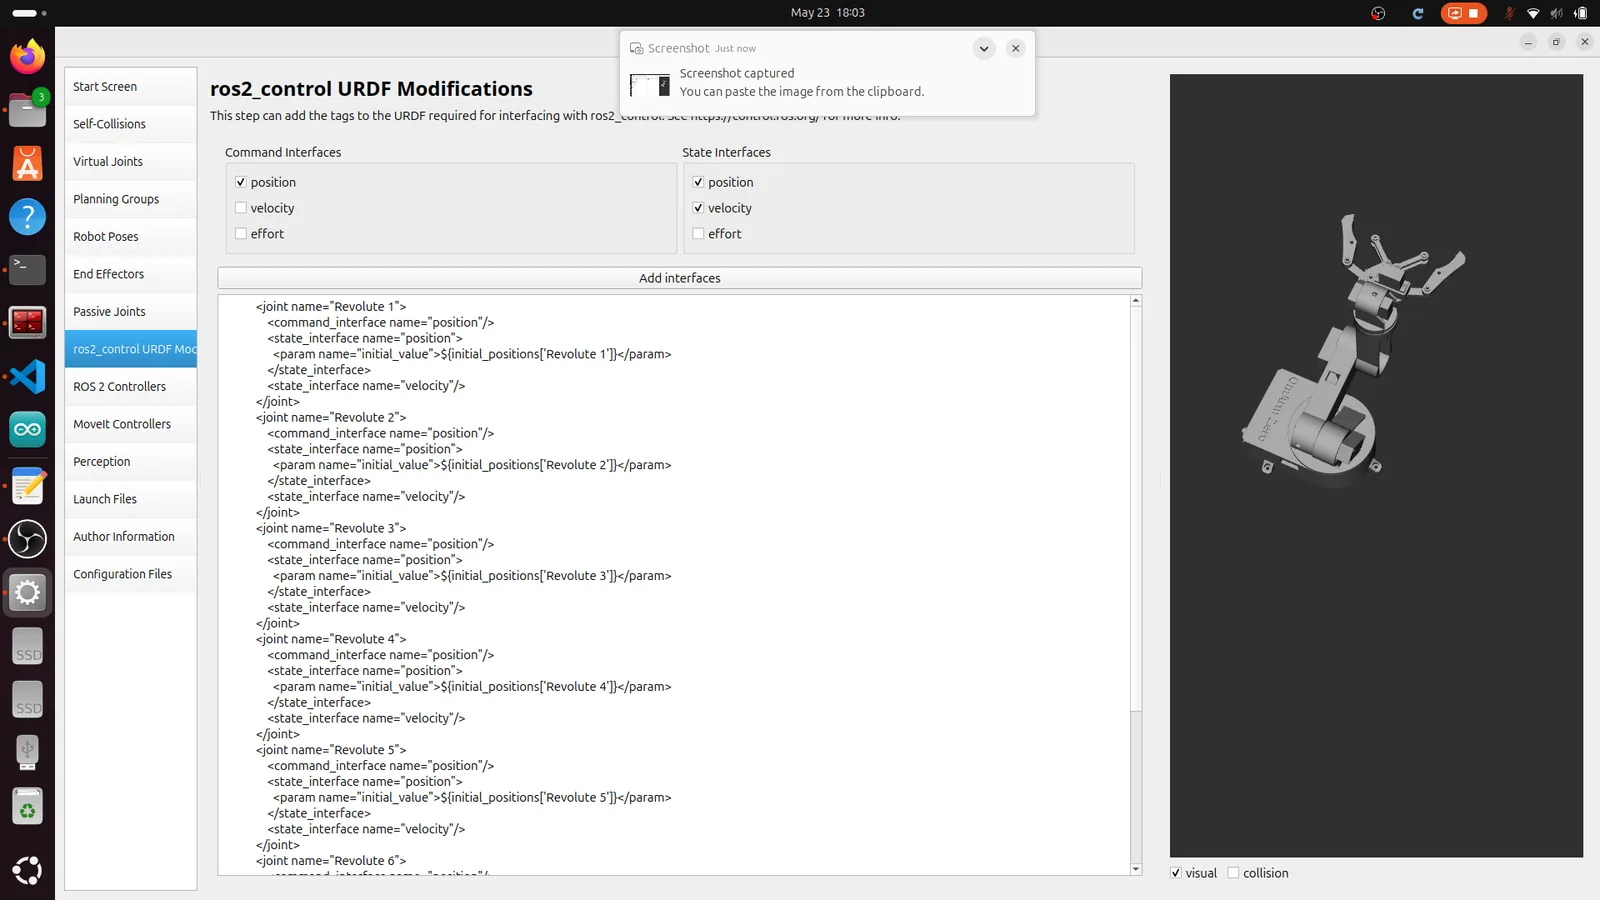
Click ros2_control URDF Mod. This step adds a <ros2_control> tag to the URDF, which declares the hardware interface (the command and state signals) for each joint. Select:
| Field | Value |
|---|---|
| Command Interfaces | position (checked) |
| State Interfaces | position (checked), velocity (checked) |
The assistant generates XML with a position command interface and position plus velocity state interfaces for every joint. This matches the JointTrajectoryController configuration: you send position commands, and the controller reads back position and velocity.
The finished OmArm Zero package keeps no file from this step. MoveIt falls back to the Part 2 Xacro named in the package’s hidden .setup_assistant file. That Xacro already contains a <ros2_control> block for Gazebo; section 9 shows how demo.launch.py swaps its hardware plugin.
Step 9: ROS 2 Controllers
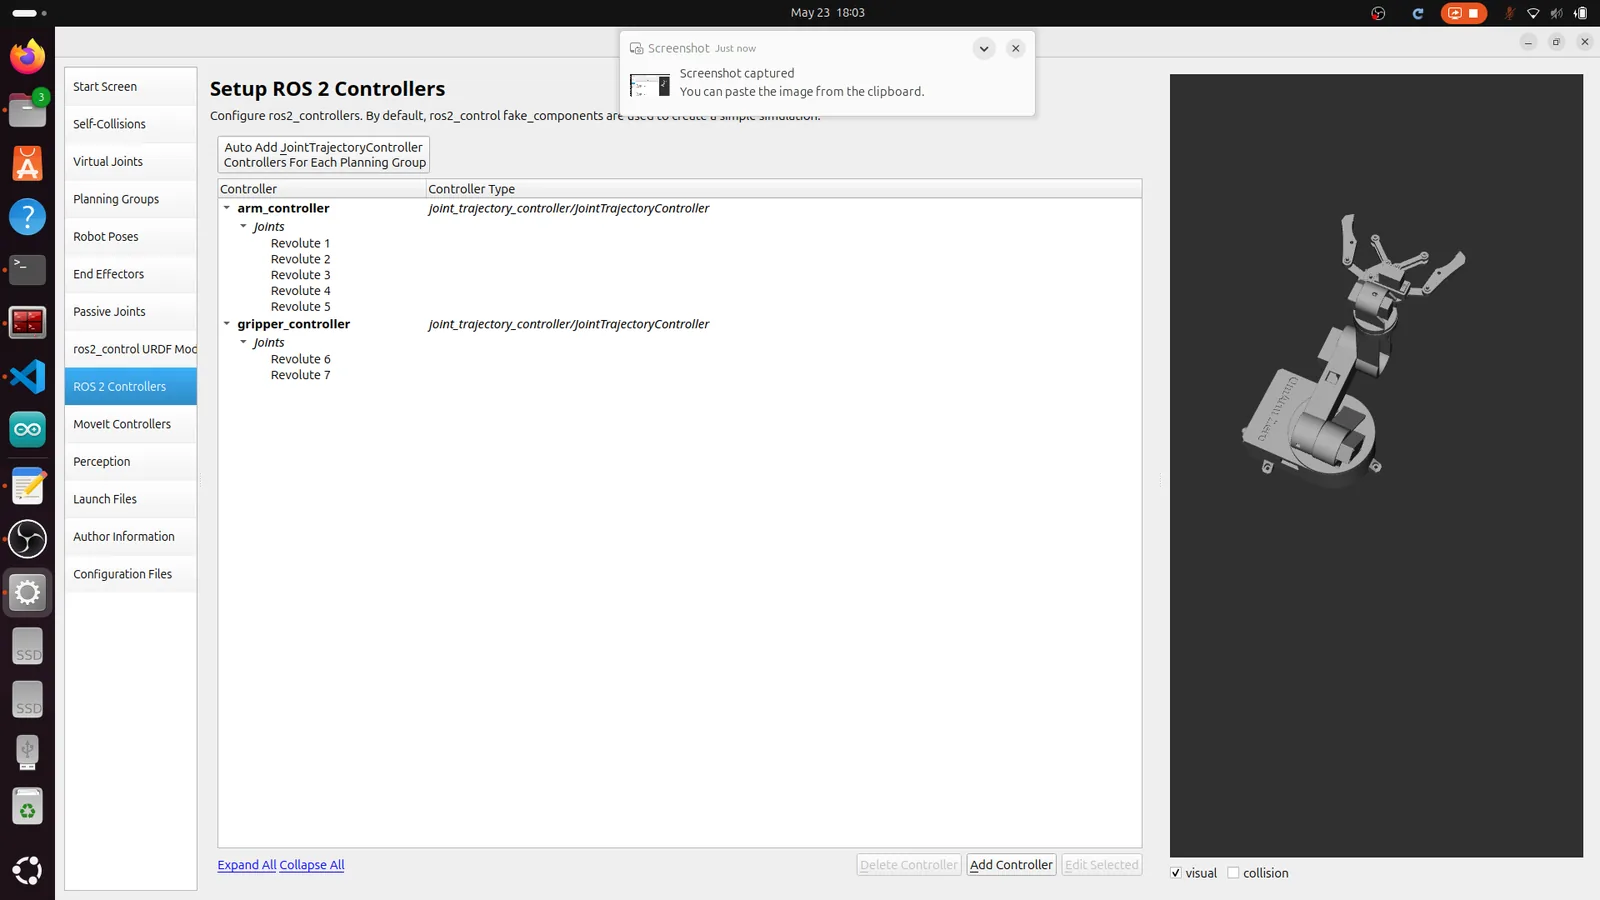
Click ROS 2 Controllers. Create two controllers:
arm_controller:
| Field | Value |
|---|---|
| Name | arm_controller |
| Type | joint_trajectory_controller/JointTrajectoryController |
| Joints | Revolute 1, Revolute 2, Revolute 3, Revolute 4, Revolute 5 |
gripper_controller:
| Field | Value |
|---|---|
| Name | gripper_controller |
| Type | joint_trajectory_controller/JointTrajectoryController |
| Joints | Revolute 6, Revolute 7 |
Both use JointTrajectoryController, which accepts trajectory messages and interpolates between waypoints. The Setup Assistant proposes separate arm and gripper controllers. The OmArm Zero package uses one joint_trajectory_controller for all seven joints instead; allow_partial_joints_goal (section 7) still lets you move the arm alone.
Step 10: MoveIt Controllers
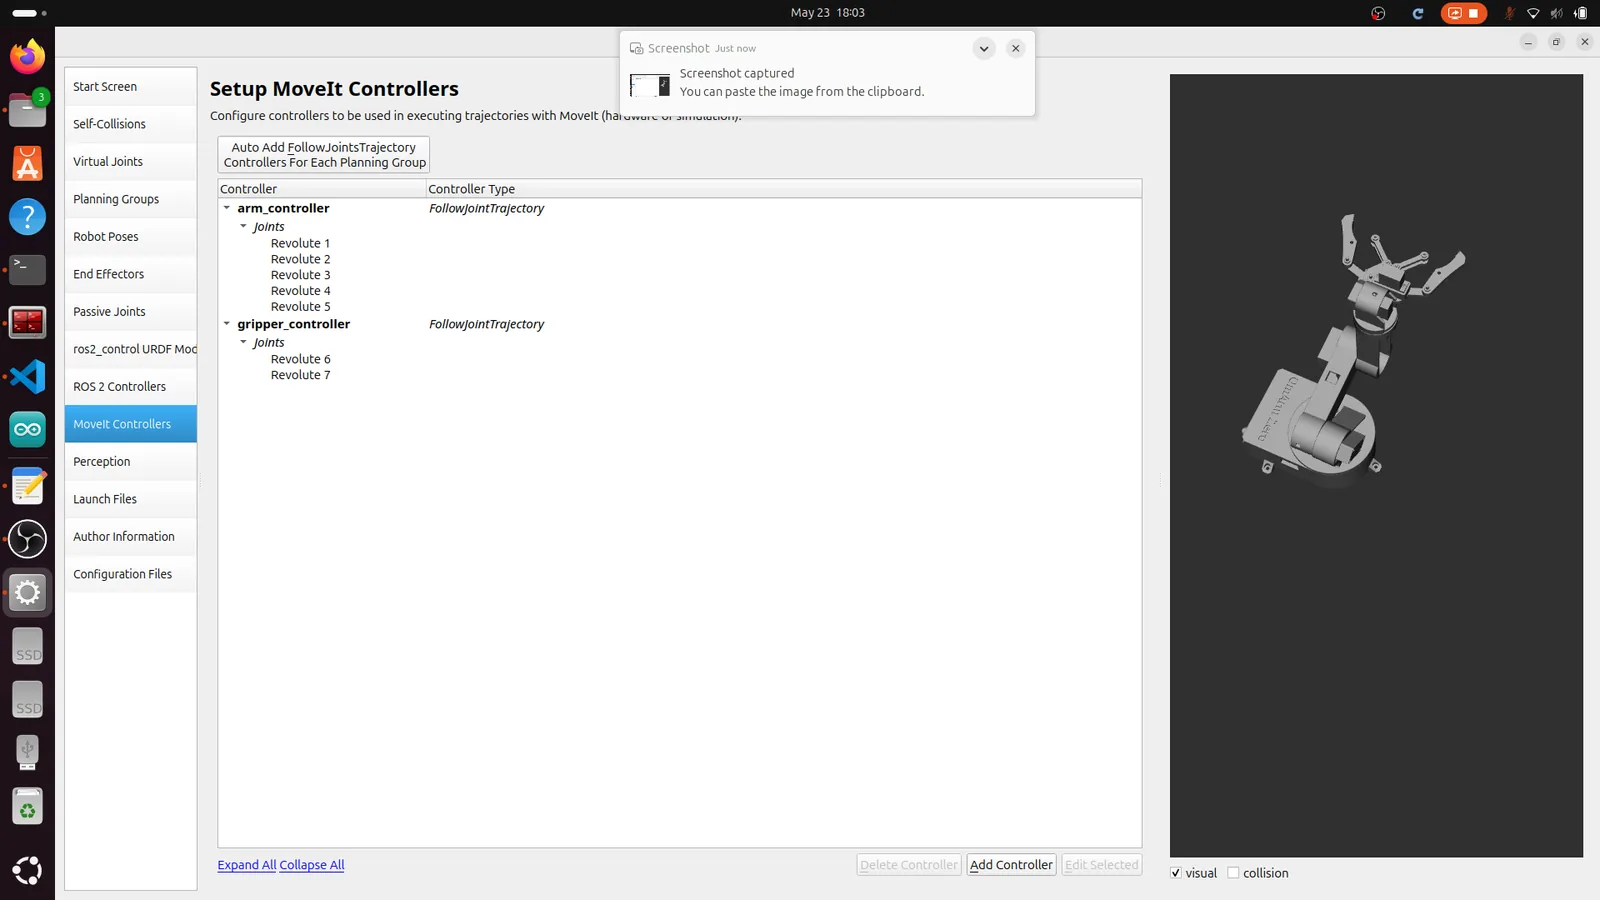
Click MoveIt Controllers. This maps MoveIt’s planning output to the ROS 2 controllers from Step 9. Create two entries:
arm_controller:
| Field | Value |
|---|---|
| Name | arm_controller |
| Action Type | FollowJointTrajectory |
| Joints | Revolute 1 through Revolute 5 |
gripper_controller:
| Field | Value |
|---|---|
| Name | gripper_controller |
| Action Type | FollowJointTrajectory |
| Joints | Revolute 6, Revolute 7 |
When MoveIt plans a trajectory, it sends a FollowJointTrajectory action goal to the matching controller. The controller executes the trajectory and reports success or failure. The package’s moveit_controllers.yaml again lists the single joint_trajectory_controller (section 7).
Step 11: Perception
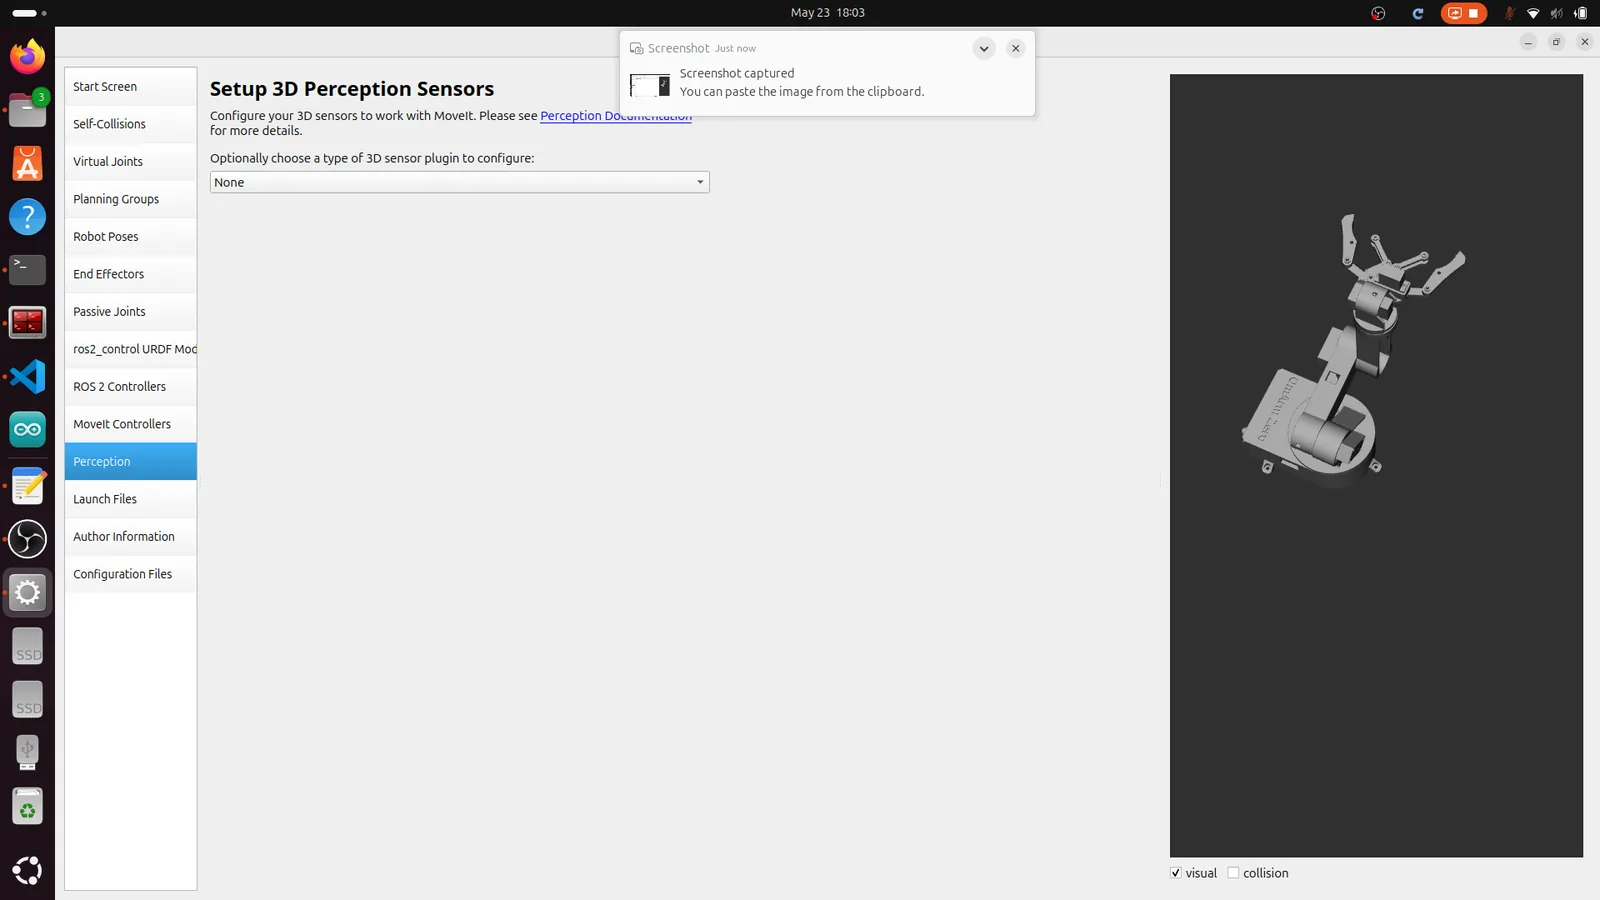
Click Perception. This configures 3D sensors (depth cameras or point cloud sensors) for collision avoidance during planning. The OmArm Zero has no 3D sensor yet; the camera comes in Part 4. Set the dropdown to None.
Step 12: Launch Files
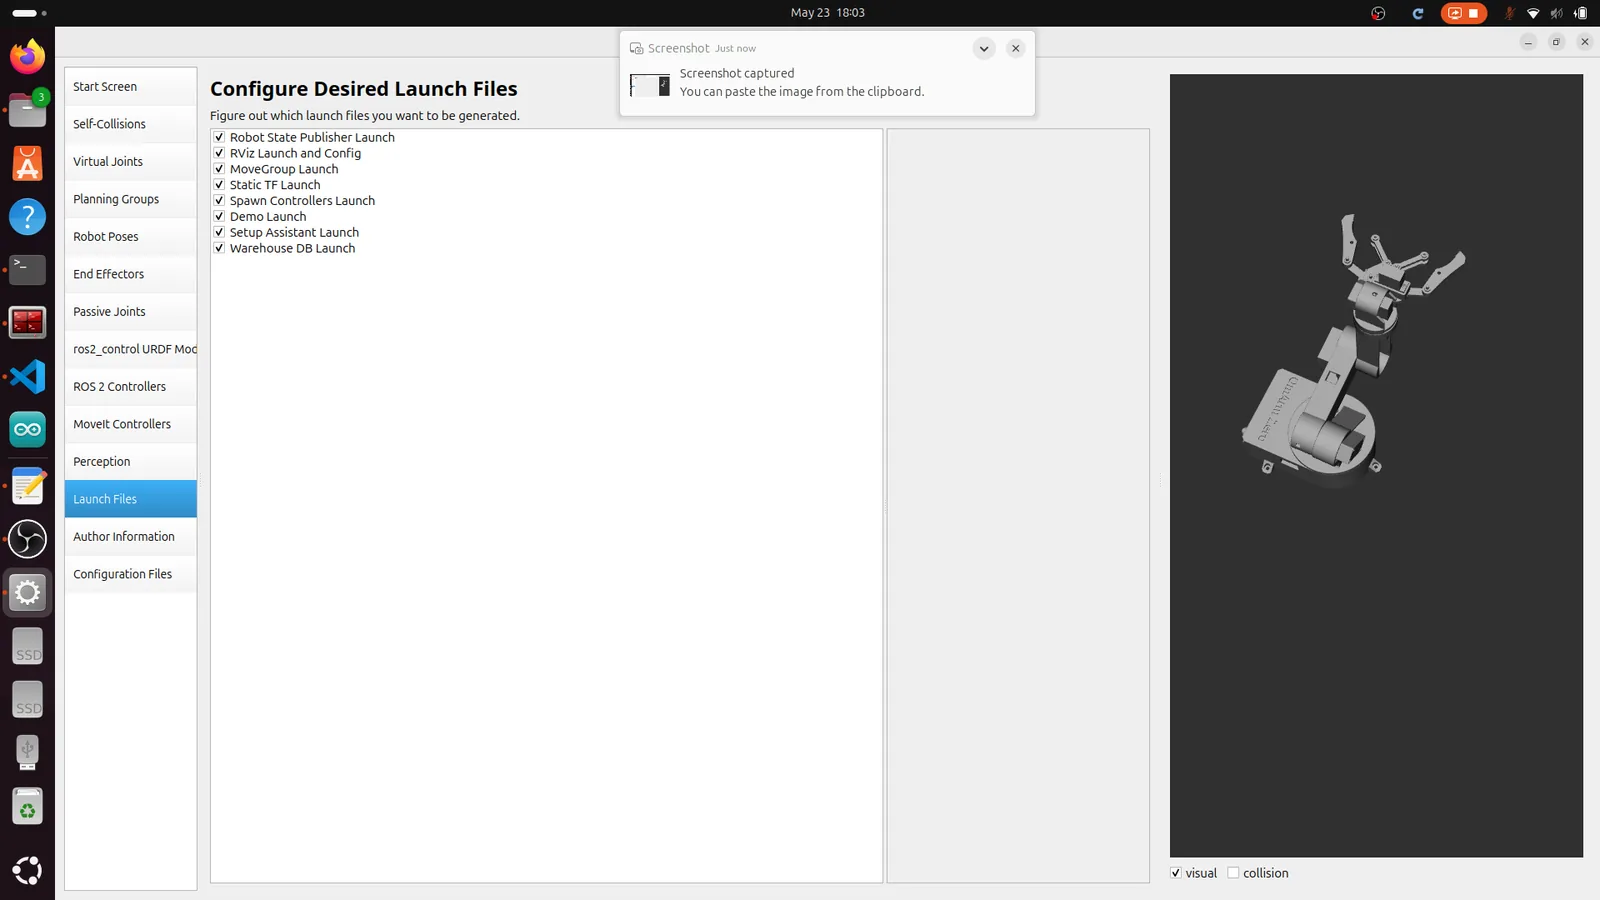
Click Launch Files. All eight launch files should be checked:
- Robot State Publisher Launch.
- RViz Launch and Config.
- MoveGroup Launch.
- Static TF Launch.
- Spawn Controllers Launch.
- Demo Launch.
- Setup Assistant Launch.
- Warehouse DB Launch.
demo.launch.py runs MoveIt with mock hardware (simulated motors, section 9), and setup_assistant.launch.py reopens the assistant for changes. The Gazebo and real-robot launch files (sections 10 and 14) were added to the package by hand.
Step 13: Author Information
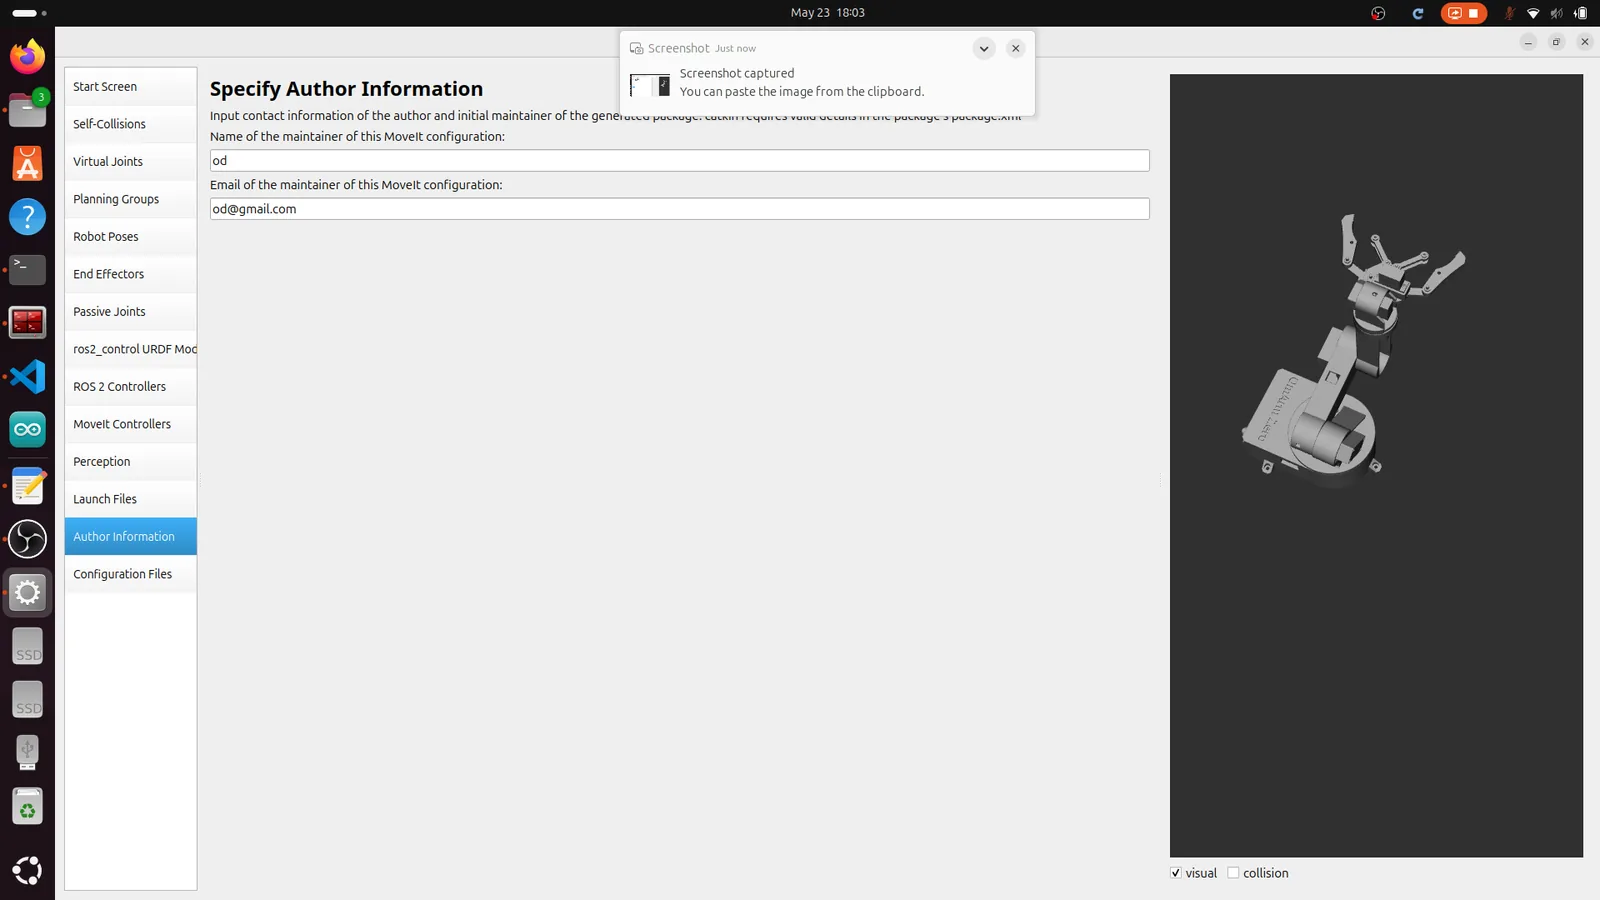
Click Author Information and enter your name and email. They are written into package.xml as the package maintainer.
Step 14: Generate the Package
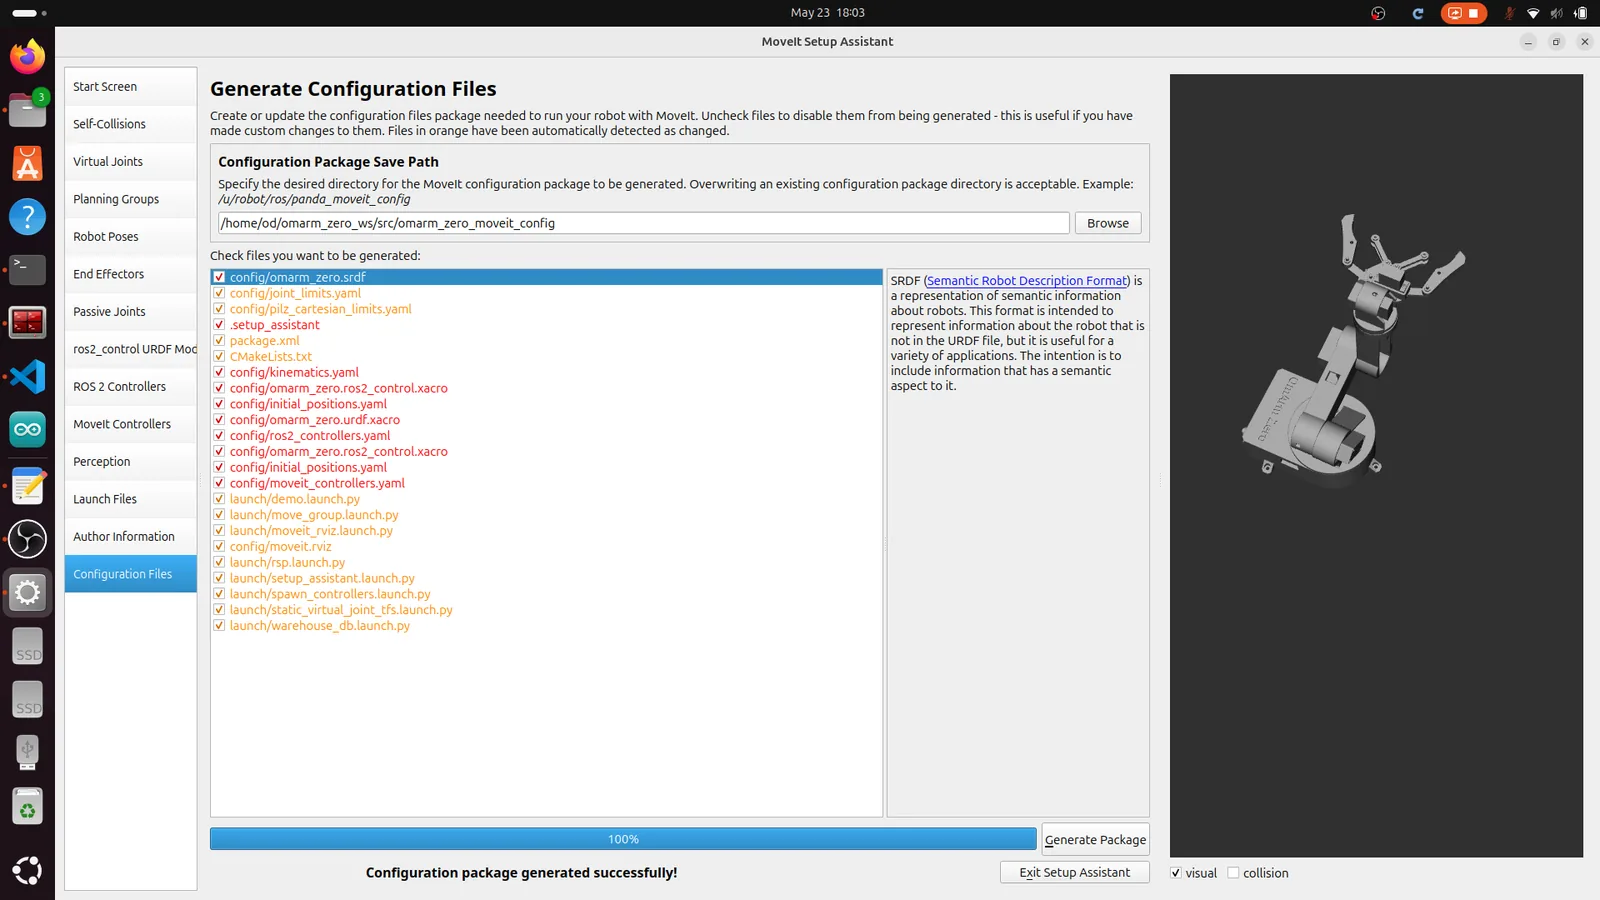
Click Configuration Files and set the output path:
~/omarm_zero_ws/src/omarm_zero_moveit_config
Click Generate Package. The assistant creates the omarm_zero_moveit_config package with all config files, launch files and the CMakeLists.txt. A green “Configuration package generated successfully!” message appears at the bottom.
Rebuild the workspace (colcon is the ROS 2 build tool):
cd ~/omarm_zero_ws
colcon build
source install/setup.bash
6. Understanding the config files
The Setup Assistant generated the files below. You will edit them when planning or execution fails.
SRDF: the semantic robot description
The SRDF (omarm_zero.srdf) is the companion of the URDF. The URDF describes the physical structure: links, joints, geometry. The SRDF describes the meaning on top of it: which groups exist, which collision pairs to ignore, which named poses are available.
<robot name="omarm_zero">
  <!-- Fixed to the world -->
  <virtual_joint name="world_joint" type="fixed"
                 parent_frame="world" child_link="base_link" />

  <!-- Arm: kinematic chain from base to gripper mount -->
  <group name="arm">
    <chain base_link="base_link" tip_link="gripper_base_1" />
  </group>

  <!-- Gripper: two finger joints -->
  <group name="gripper">
    <joint name="Revolute 6" />
    <joint name="Revolute 7" />
  </group>

  <!-- Gripper is the end effector of the arm -->
  <end_effector name="gripper_eef" parent_link="gripper_base_1"
                group="gripper" parent_group="arm" />

  <!-- Named poses -->
  <group_state name="home" group="arm">
    <joint name="Revolute 1" value="0.8" />
    <joint name="Revolute 2" value="-0.8" />
    <joint name="Revolute 3" value="-1.2" />
    <joint name="Revolute 4" value="-0.8" />
    <joint name="Revolute 5" value="-2.6" />
  </group_state>

  <!-- Collision pairs that can never collide -->
  <disable_collisions link1="base_link" link2="base_link_upper_1"
                      reason="Adjacent" />
  <!-- ... 9 more pairs ... -->
</robot>
kinematics.yaml
Defines the IK solver for each planning group. The arm group gets KDL. The gripper needs no IK solver, because you command it by joint values (open/closed), not by pose.
joint_limits.yaml
Overrides or extends the joint limits from the URDF. MoveIt uses them during planning to keep trajectories within safe bounds.
joint_limits:
  "Revolute 1":
    has_position_limits: true
    min_position: -0.0005    # epsilon below 0
    max_position: 3.14       # pi
    max_velocity: 0.2        # rad/s
    max_acceleration: 0.6    # rad/s^2
  "Revolute 2":
    min_position: -3.14      # -pi
    max_position: 0.0005     # epsilon above 0
    max_velocity: 0.2
    max_acceleration: 0.6
  # ... same pattern for Revolute 3-5
  "Revolute 6":
    min_position: -1.6       # covers open (-1.57) and closed (1.57)
    max_position: 1.6
    max_velocity: 4.0        # gripper: full servo speed
    max_acceleration: 8.0
The epsilon values (a tiny margin of 0.0005 rad) at the boundaries keep the planner from getting stuck exactly at a joint limit, which causes numerical problems. I lost an afternoon to this: without the epsilon, the solver sometimes failed at the boundaries and gave no useful error message.
Why are Revolute 2 to 5 limited to [-pi, 0] while Revolute 1 is [0, pi]? This comes from the joint axis definitions in the URDF and from how the arm was modeled in Fusion 360. The joint axes point in different directions, so the positive rotation direction varies.
ompl_planning.yaml
Configures the motion planning algorithms. Three planners are available for the arm:
planner_configs:
  RRTConnectkConfigDefault:
    type: geometric::RRTConnect    # default, fast, bidirectional
  RRTstarkConfigDefault:
    type: geometric::RRTstar       # optimal but slower
  PRMkConfigDefault:
    type: geometric::PRM           # probabilistic roadmap

arm:
  planner_configs:
    - RRTConnectkConfigDefault
    - RRTstarkConfigDefault
    - PRMkConfigDefault
RRTConnect (section 3) is the default: fast, but the path is not the shortest.
RRTstar finds shorter paths but takes more time. Use it when path quality matters more than planning speed.
PRM (probabilistic roadmap) builds a roadmap of the joint space: a network of collision-free arm configurations and the connections between them. By default MoveIt builds a new roadmap for every request. With multi_query_planning_enabled: true, it keeps the roadmap, and later requests in the same environment are faster.
7. Controller configuration
Two config files handle controllers: ros2_controllers.yaml for the ros2_control controllers themselves, and moveit_controllers.yaml for MoveIt’s interface to them. ros2_control is the ROS 2 framework that connects controllers to hardware, or to a simulation, through a hardware interface.
ros2_controllers.yaml
controller_manager:
  ros__parameters:
    update_rate: 100   # Hz

    joint_state_broadcaster:
      type: joint_state_broadcaster/JointStateBroadcaster

    joint_trajectory_controller:
      type: joint_trajectory_controller/JointTrajectoryController

joint_trajectory_controller:
  ros__parameters:
    joints:
      - "Revolute 1"
      - "Revolute 2"
      - "Revolute 3"
      - "Revolute 4"
      - "Revolute 5"
      - "Revolute 6"
      - "Revolute 7"
    command_interfaces:
      - position
    state_interfaces:
      - position
      - velocity
    allow_partial_joints_goal: true
The controller_manager loads two controllers, the joint_state_broadcaster and the joint_trajectory_controller (not the arm/gripper split from Step 9).
Joint State Broadcaster reads joint positions and velocities from the hardware interface and publishes them on /joint_states. Every node that needs the current arm configuration (RViz, MoveIt, TF2) subscribes to this topic. TF2 is the ROS 2 library that manages the TF tree from section 2.
Joint Trajectory Controller receives JointTrajectory messages and interpolates between waypoints at 100 Hz, sending position commands to the hardware interface. allow_partial_joints_goal: true means you can send a trajectory for the arm alone (5 joints) without the gripper joints.
moveit_controllers.yaml
moveit_simple_controller_manager:
  controller_names:
    - joint_trajectory_controller

  joint_trajectory_controller:
    type: FollowJointTrajectory
    action_ns: follow_joint_trajectory
    default: true
    joints:
      - "Revolute 1"
      - "Revolute 2"
      - "Revolute 3"
      - "Revolute 4"
      - "Revolute 5"
      - "Revolute 6"
      - "Revolute 7"
This tells MoveIt how to reach the controller. MoveIt sends a FollowJointTrajectory action goal to /joint_trajectory_controller/follow_joint_trajectory. The controller executes the trajectory and sends back a result (success or failure).

8. Gripper and mimic joints
The OmArm Zero gripper has two fingers driven by one SG90 servo through a pair of printed gears. In the URDF they are Revolute 6 (left finger) and Revolute 7 (right finger), and you never want to move them independently. Mechanically, the second finger mirrors the first through the gears. In software, both finger joints get the same value, for example 1.57 rad for “closed”, instead of a URDF <mimic> tag (a mimic joint copies another joint’s angle, optionally scaled). In the SRDF, both joints are in the “gripper” planning group.
In Part 2, I built a gripper_mimic_bridge node that copies each Revolute 6 command to Revolute 7; the mirrored joint axis turns the second finger the other way. For MoveIt, the setup is simpler: the named poses “open” and “closed” specify both joints, and the trajectory controller moves them together.
<!-- Both fingers get the same value -->
<group_state name="closed" group="gripper">
  <joint name="Revolute 6" value="1.57" />
  <joint name="Revolute 7" value="1.57" />
</group_state>
Why not a URDF mimic joint? Gazebo and ros2_control handle mimic joints differently across versions. I tried one first and gave up after two days of debugging. Commanding both joints directly is more reliable and easier to troubleshoot.
9. MoveIt demo: mock hardware
The MoveIt demo launches the full planning pipeline with mock hardware: no Gazebo, no real robot. The mock hardware has no motors; it reports every commanded position back as the current position. This is the fastest way to verify your MoveIt configuration.
Launch the demo
cd ~/omarm_zero_ws
source install/setup.bash
ros2 launch omarm_zero_moveit_config demo.launch.py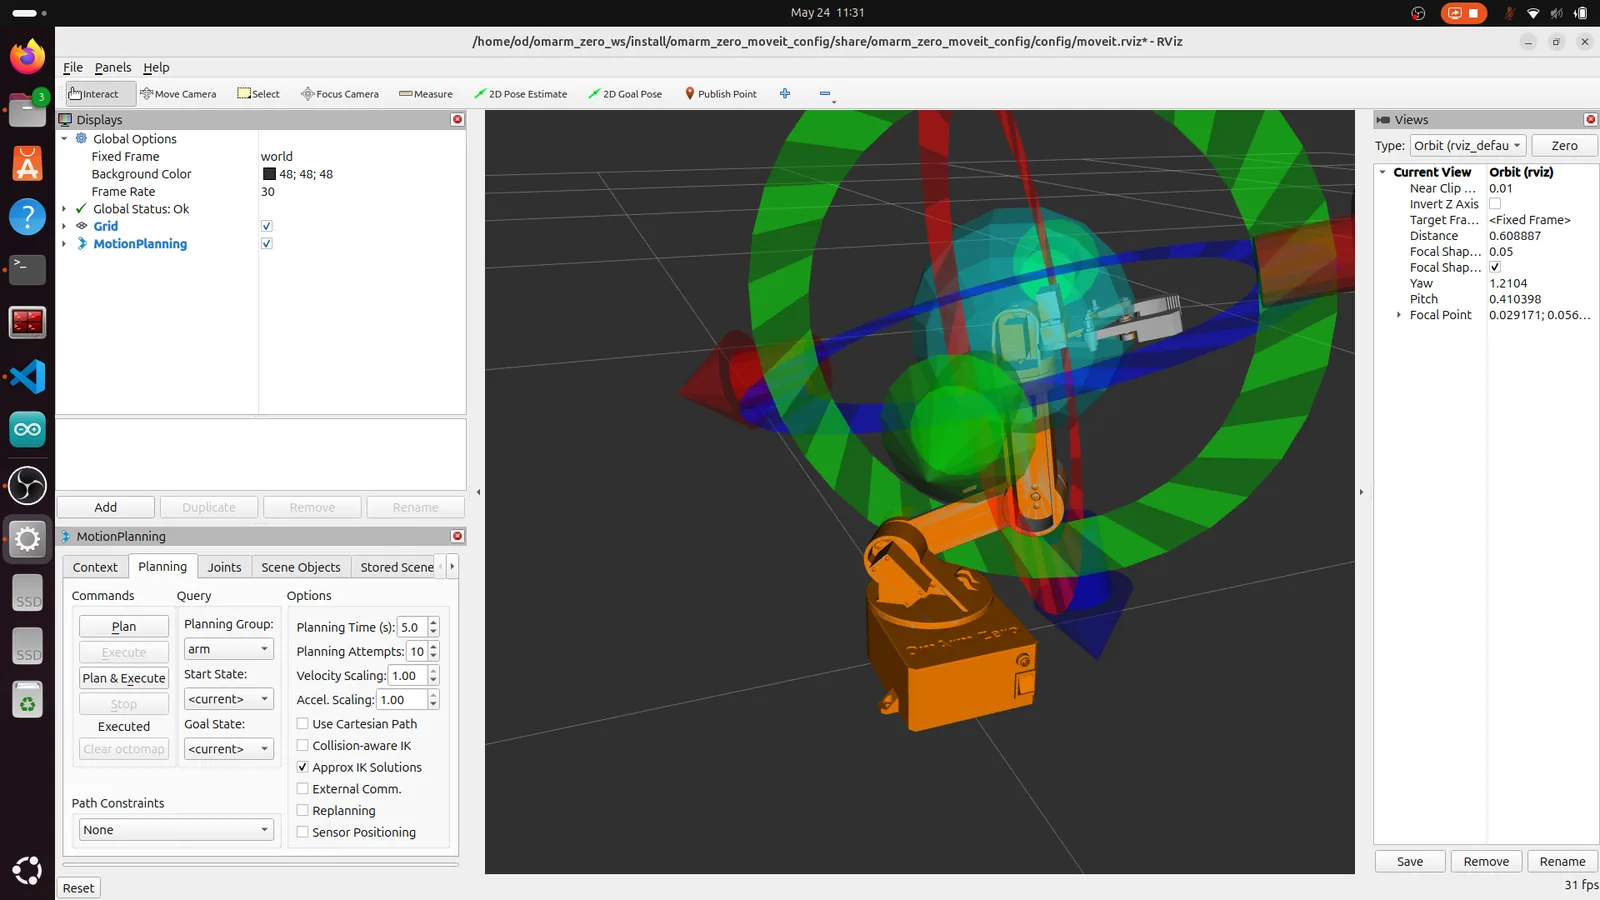
What demo.launch.py does
demo.launch.py loads the URDF and then replaces its hardware plugin. The URDF specifies gz_ros2_control/GazeboSimSystem (for Gazebo). The demo swaps it for mock_components/GenericSystem, a simulated hardware interface built into ros2_control. No Gazebo needed.
The launch sequence is ordered with event handlers (rules in the launch file that react to events such as a process starting or exiting):
1. robot_state_publisher     (loads URDF, publishes TF)
2. ros2_control_node         (manages hardware interface)
3. joint_state_broadcaster   (waits for ros2_control, then publishes /joint_states)
4. joint_trajectory_controller (waits for JSB, then accepts trajectories)
5. move_group + RViz         (waits for controller, then starts planning)
Each step waits for the previous one to finish before starting. This prevents a race condition: two processes starting in random order, for example MoveIt planning before the controller exists.
Your first motion plan
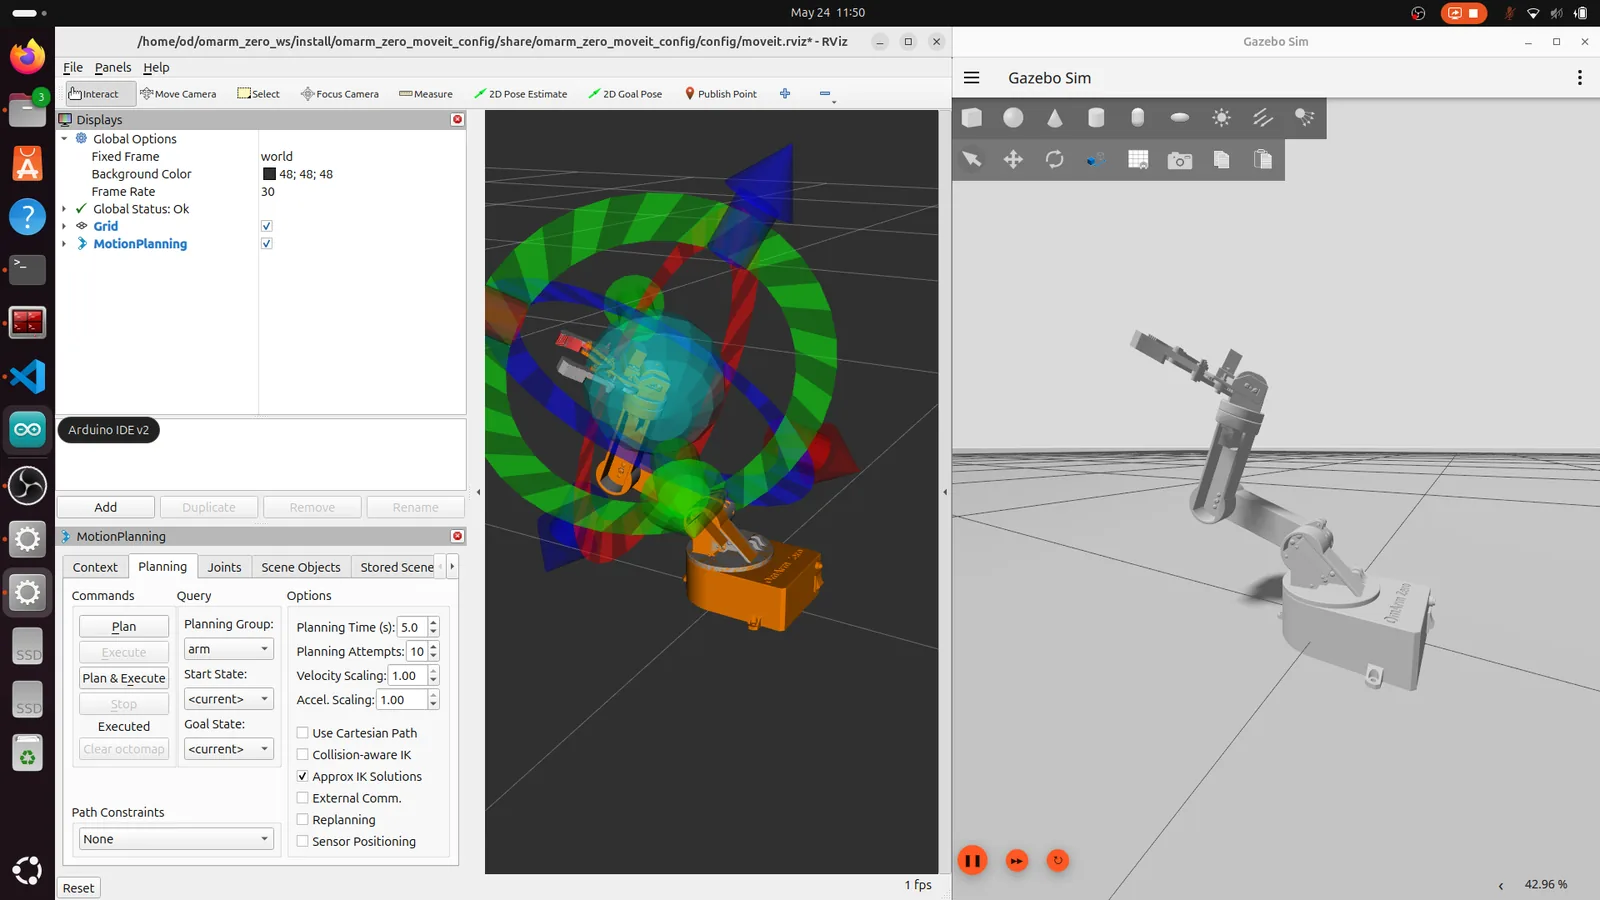
In RViz, you see the robot with an interactive marker (a draggable handle) on the gripper. The orange arm is the goal state. After Plan, RViz animates the planned path with a translucent purple arm.
- Drag the marker on the gripper to a new position.
- In the MotionPlanning panel, click Plan.
- Watch the animated path.
- Click Execute. The mock arm moves along the planned trajectory in RViz, without any physics simulation.
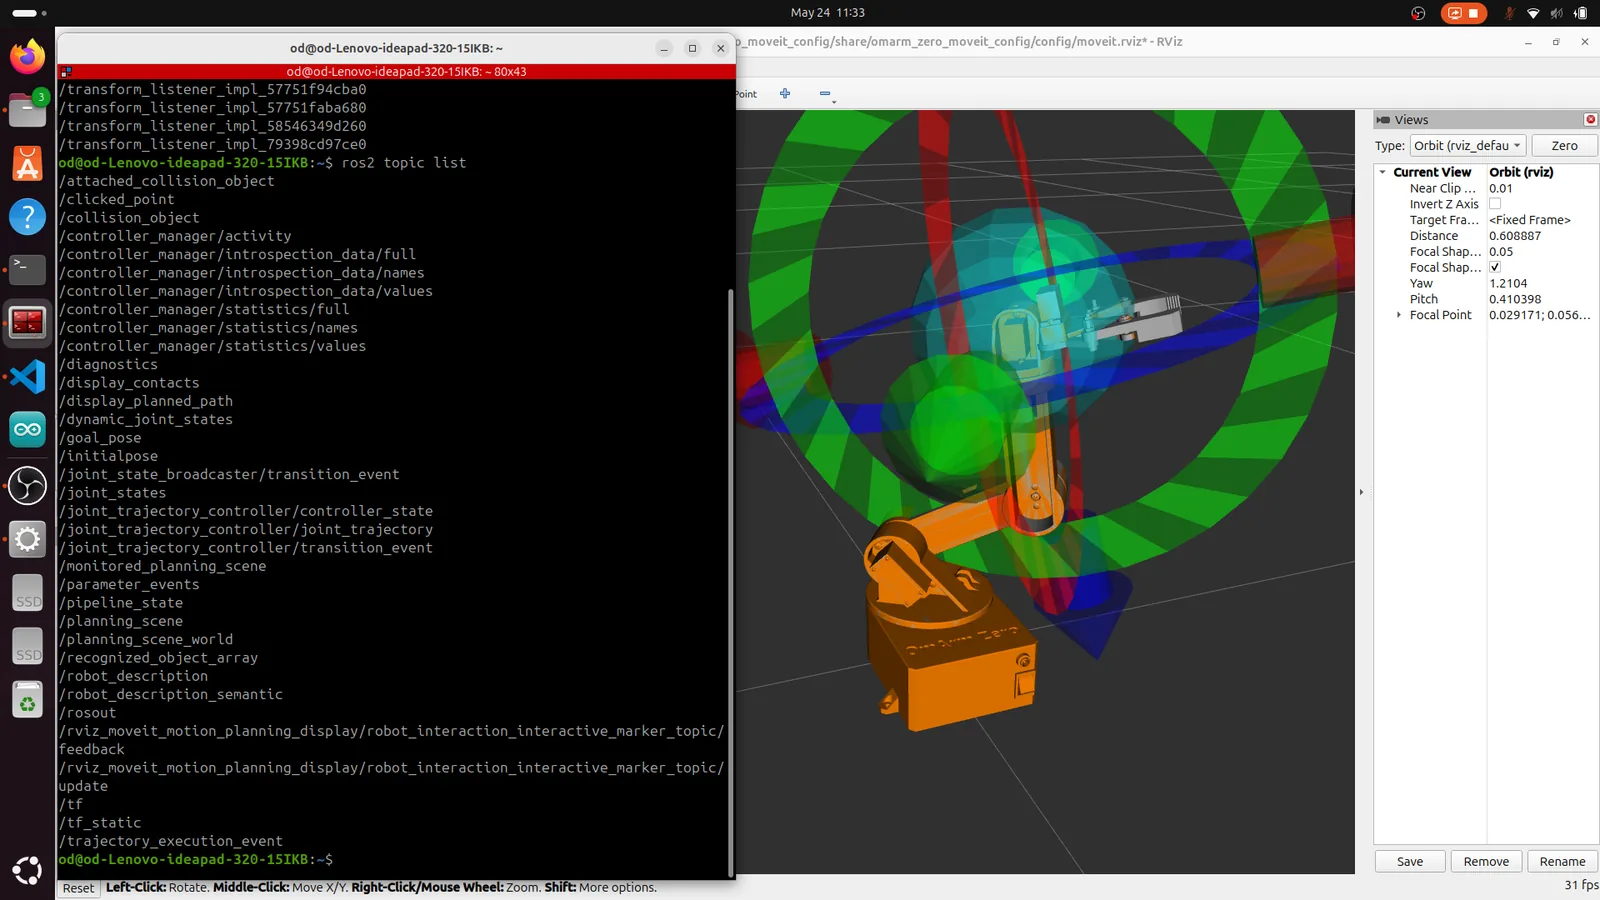
Try the named poses
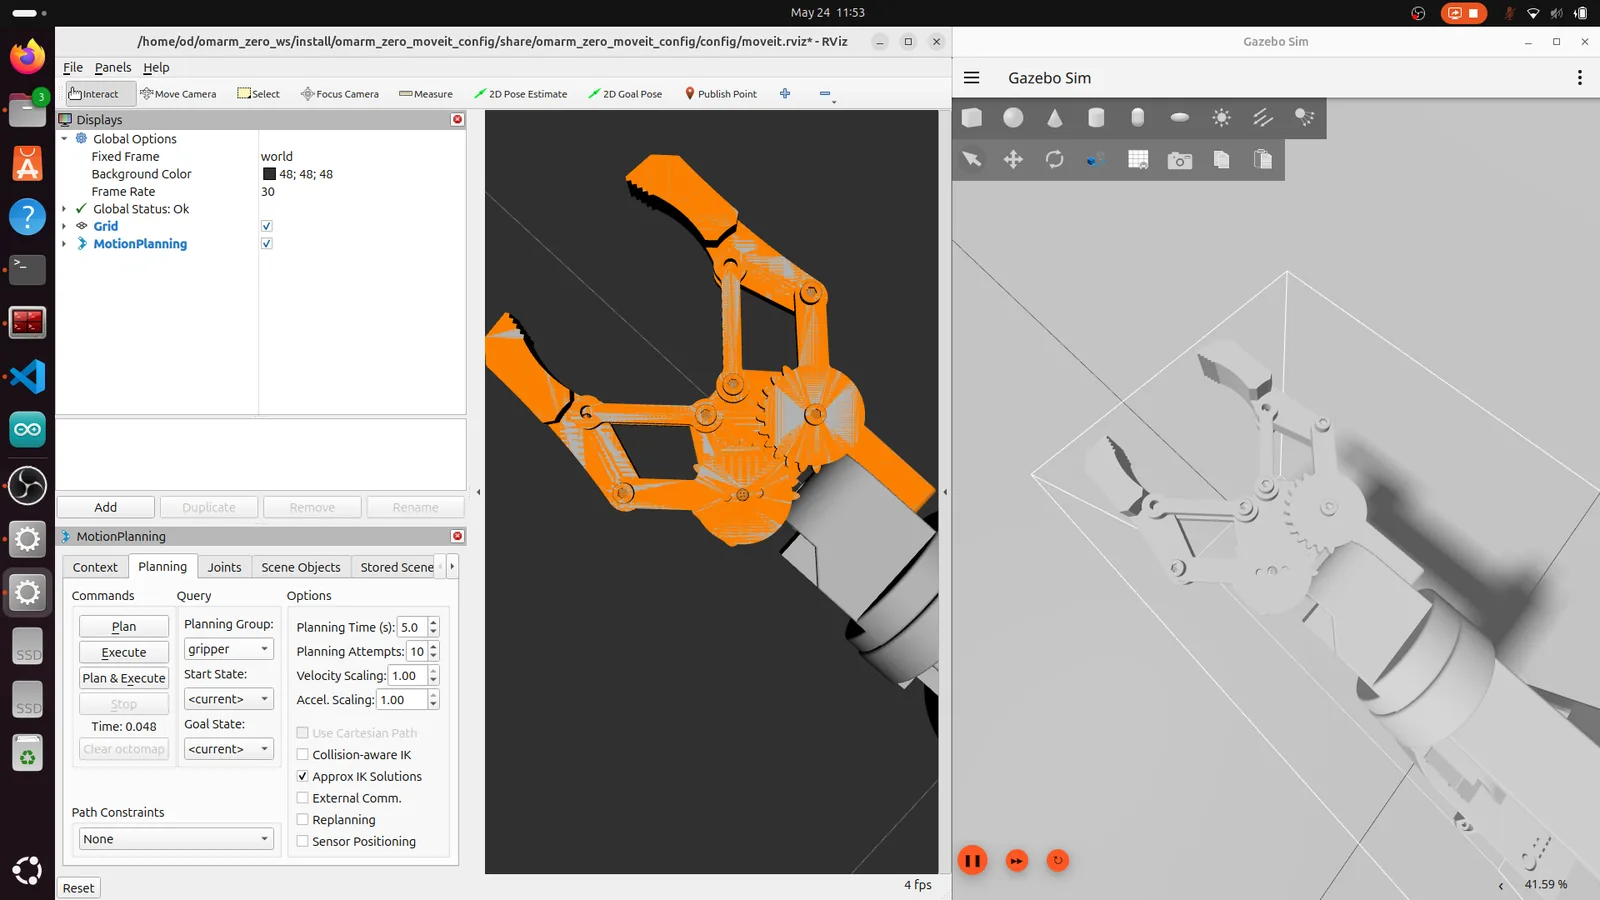
In the MotionPlanning panel under Planning, open the “Goal State” dropdown. Select home, then Plan & Execute. Switch to the “gripper” planning group and try open and closed.
Inspect the ROS 2 graph
Open a new terminal and run:
ros2 node list
ros2 topic list
rqt_graph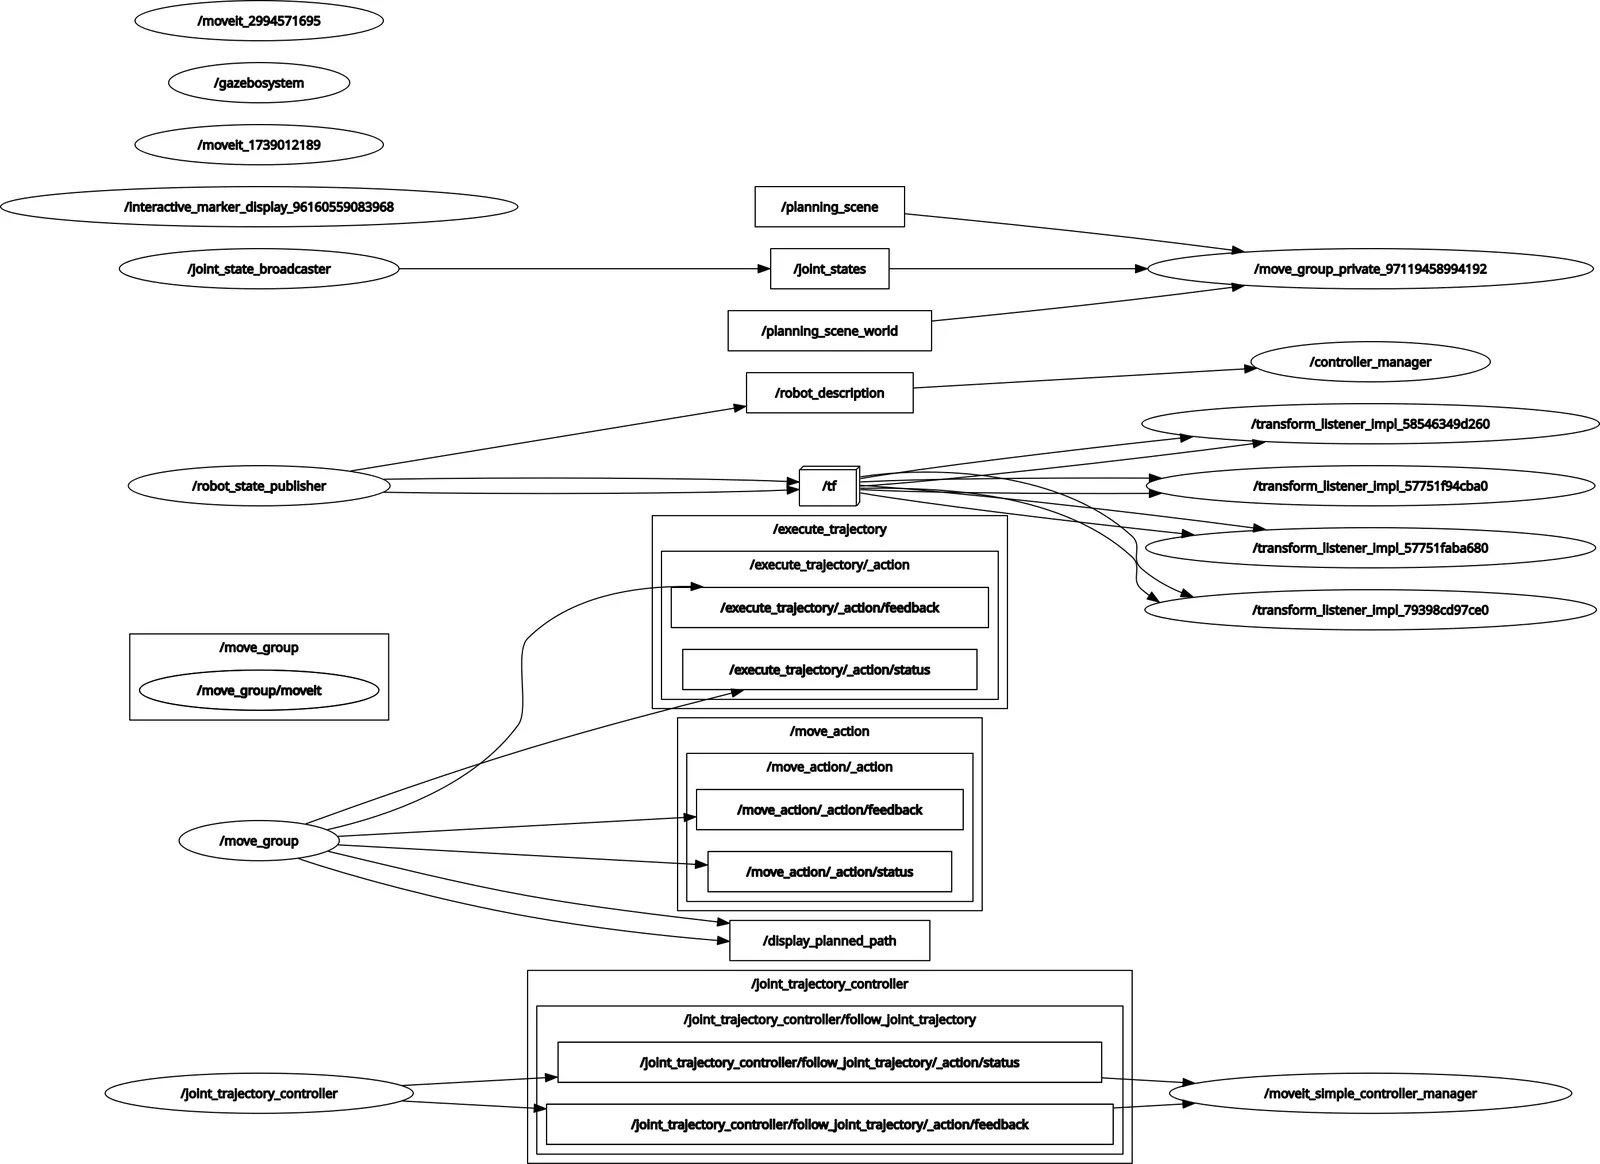
The graph shows how the nodes connect:
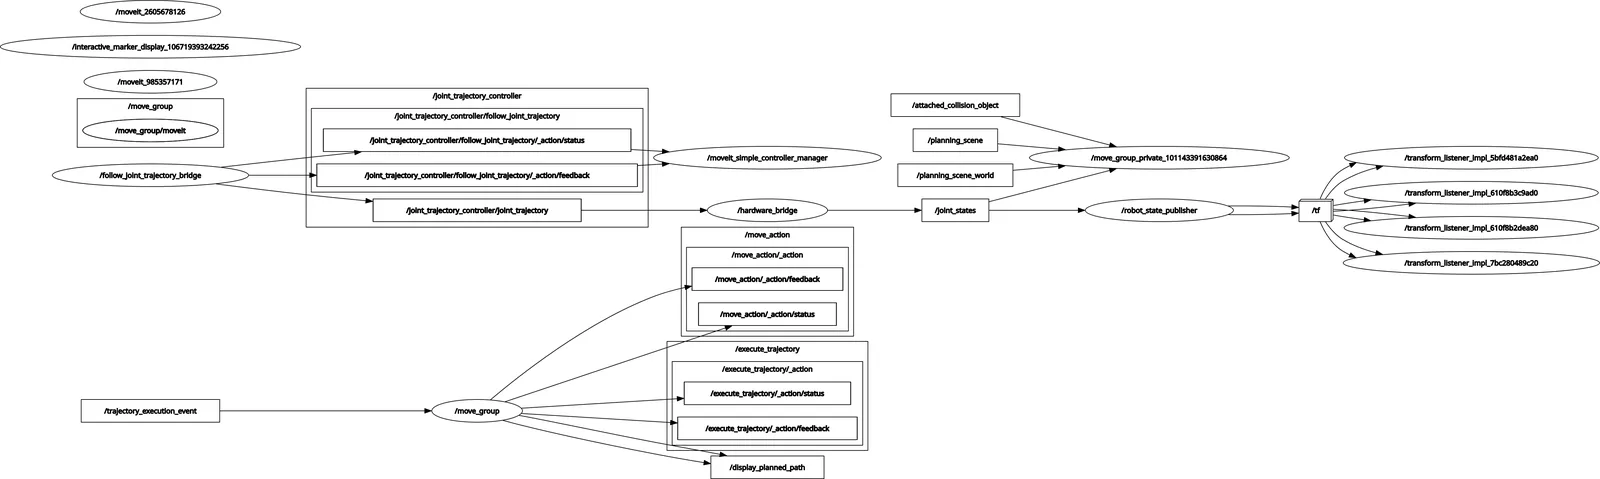
- move_group sends trajectories to joint_trajectory_controller.
- joint_trajectory_controller reads the joint states through ros2_control_node.
- joint_state_broadcaster publishes /joint_states.
- robot_state_publisher subscribes to /joint_states and publishes /tf.
- rviz2 subscribes to /tf, /joint_states and the planning scene.
10. MoveIt + Gazebo simulation
The demo uses mock hardware. For physics (gravity, inertia, contact), launch MoveIt on top of the Gazebo simulation from Part 2.
Launch MoveIt with Gazebo
ros2 launch omarm_zero_moveit_config gazebo_moveit.launch.py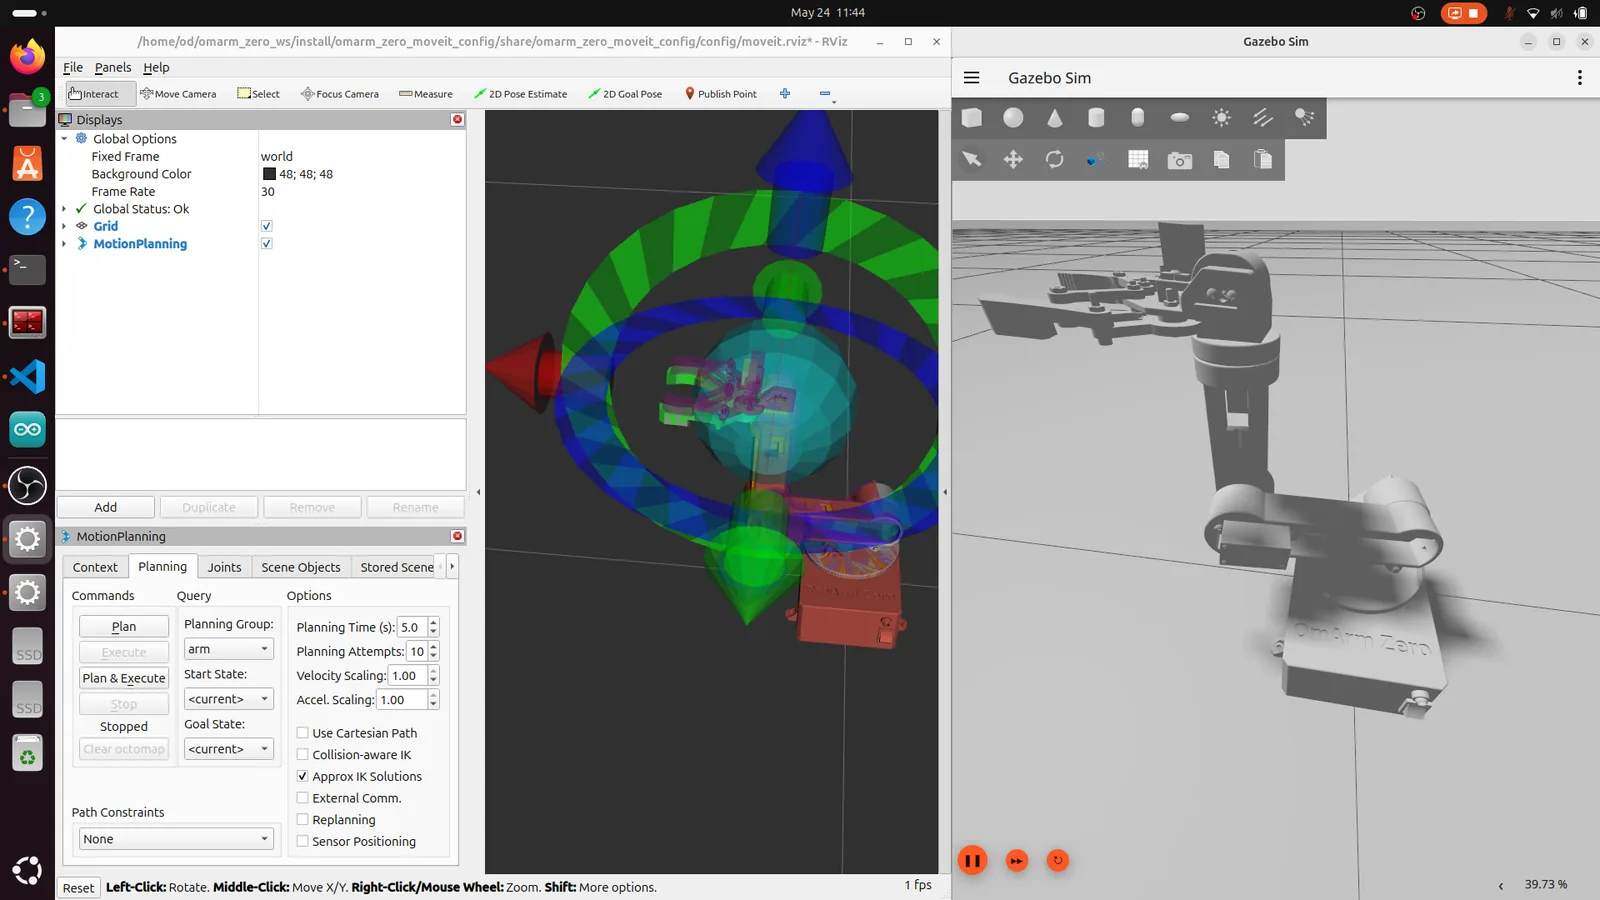
This launch file starts three processes in sequence:
- t = 0 s: the Gazebo simulation (from omarm_zero_description/gazebo.launch.py).
- t = 4 s: move_group with use_sim_time: true (move_group uses Gazebo’s simulation clock instead of the PC clock).
- t = 8 s: RViz with the MoveIt plugin.
The delays give Gazebo time to spawn the robot before MoveIt connects. On a slower PC, increase them: they are the two TimerAction periods (start delays) in gazebo_moveit.launch.py.
Differences from the demo
The difference is physics. In the demo, the mock arm follows the plan exactly. In Gazebo the arm has mass and inertia, and the controller has to hold it against gravity while it follows the planned trajectory. Plan a large motion and watch the arm follow the trajectory in the Gazebo window.
If you disable the controllers, the arm collapses under its own weight. The JointTrajectoryController holds the position even when no trajectory is running.
Plan and execute in Gazebo
Plan and execute as in the demo (section 9). The arm moves in RViz and in Gazebo at the same time.
Switch to the gripper planning group to test open and close. Select “closed” or “open” as the goal state and execute.
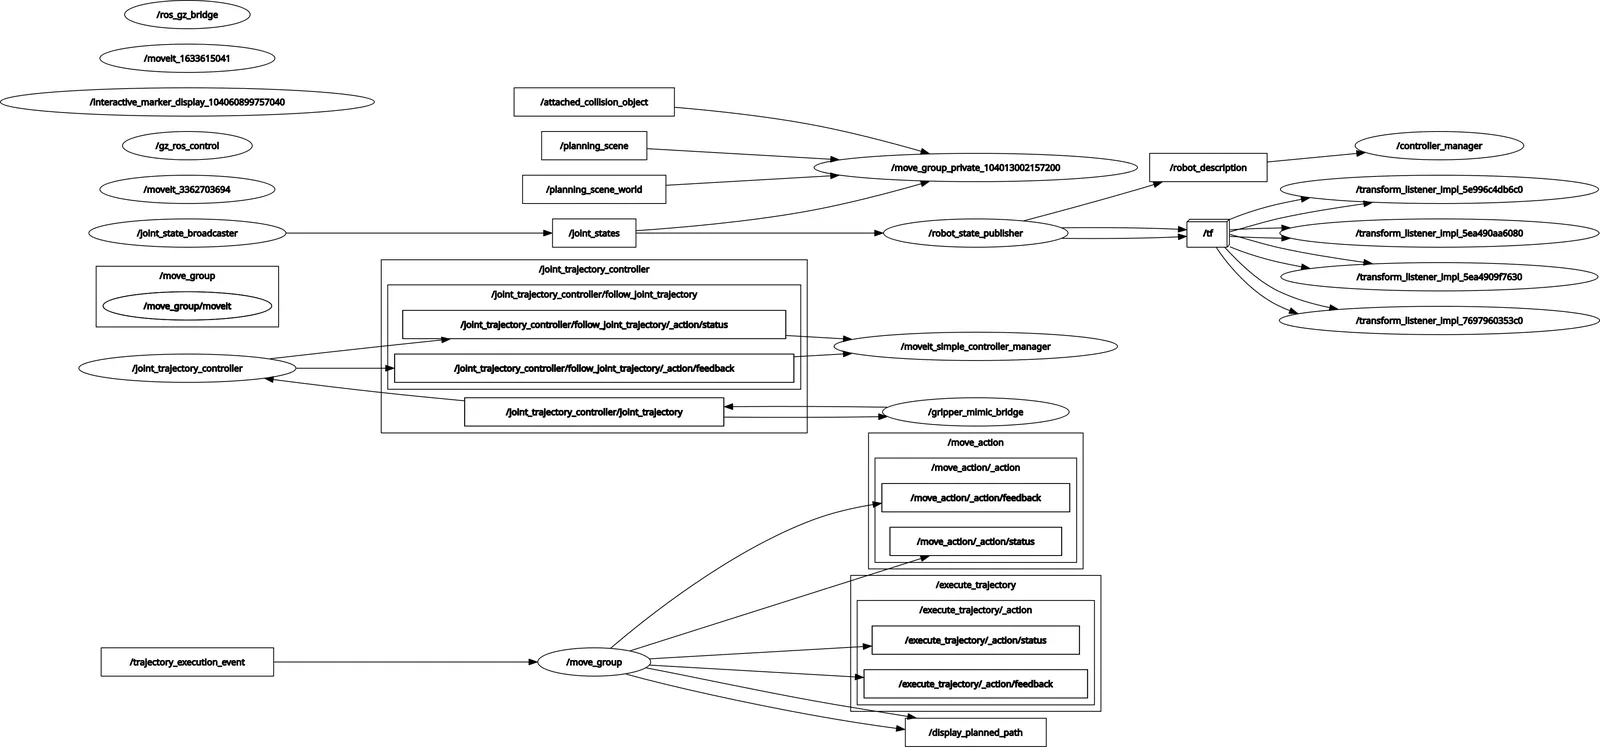
The ROS 2 graph with Gazebo is larger than the demo’s. The ros_gz_bridge node passes messages between Gazebo and ROS 2, and gz_ros2_control manages the simulated hardware interface.
11. MoveIt Python API: scripting motion
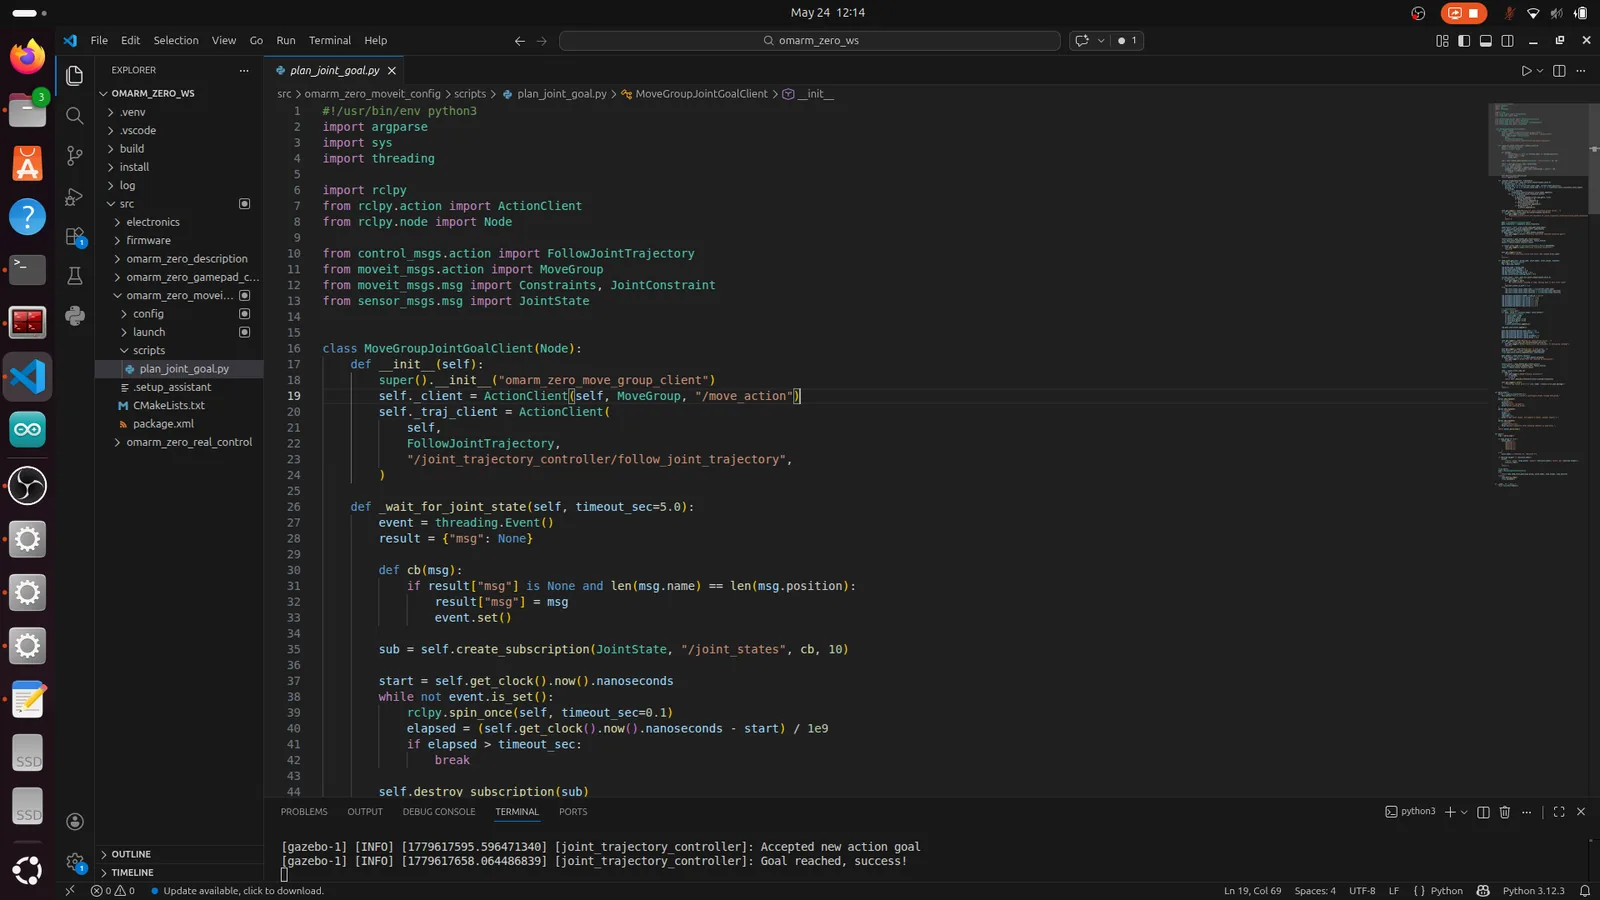
RViz is for testing by hand. For automation, you send goals from code. The plan_joint_goal.py script in the omarm_zero_moveit_config package shows how.
Usage
# Plan only (don't execute)
ros2 run omarm_zero_moveit_config plan_joint_goal.py \
    --group arm --target 1.0 -1.0 -1.5 -0.8 -2.0

# Plan and execute
ros2 run omarm_zero_moveit_config plan_joint_goal.py \
    --group arm --target 1.0 -1.0 -1.5 -0.8 -2.0 --execute

# Close the gripper
ros2 run omarm_zero_moveit_config plan_joint_goal.py \
    --group gripper --target 1.57 1.57 --execute

# Open the gripper
ros2 run omarm_zero_moveit_config plan_joint_goal.py \
    --group gripper --target -1.57 -1.57 --execute
The arm group expects 5 values (Revolute 1 to 5), the gripper group 2 (Revolute 6 and 7).
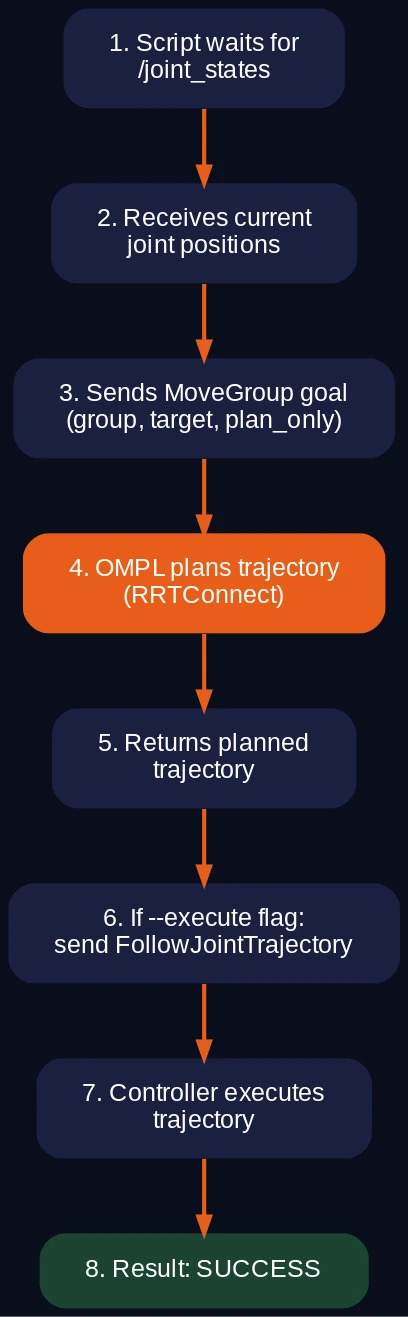
How it works
The script uses the MoveGroup action, MoveIt’s main interface:
1. Wait for /joint_states to get the current arm configuration
2. Build a MoveGroup goal with:
   - Planning group name ("arm" or "gripper")
   - Current state as start state
   - Target joint values as goal constraints
   - Planning parameters (attempts, time, velocity scaling)
3. Send goal to /move_action (MoveGroup action server)
4. MoveIt plans the trajectory (plan_only: true)
5. If --execute: send the planned trajectory to
   /joint_trajectory_controller/follow_joint_trajectory
6. Wait for execution result
Key parameters in the script
req.num_planning_attempts = 5          # try 5 times if planning fails
req.allowed_planning_time = 8.0        # seconds
req.max_velocity_scaling_factor = 0.2  # 20% of max joint velocity
req.max_acceleration_scaling_factor = 0.2
The scaling factors limit the planned trajectory to 20% of the velocity and acceleration limits in joint_limits.yaml. In the demo and in Gazebo, the controller follows this slower timing. On the real arm, the scaling factors change the planned duration, and the bridge waits that long before it reports success (section 12). The servo speed itself comes from the firmware SPEED setting (section 14).
Extending the script
plan_joint_goal.py sends joint-space goals. For Cartesian goals (move the gripper to an X, Y, Z position), you send a pose goal through the same MoveGroup action; Part 4’s pick-and-place script does that. Alternatives are the moveit_py Python API and the MoveGroupInterface C++ API. The pattern stays the same: goal, plan, execute.
12. Bridge architecture: MoveIt to real hardware
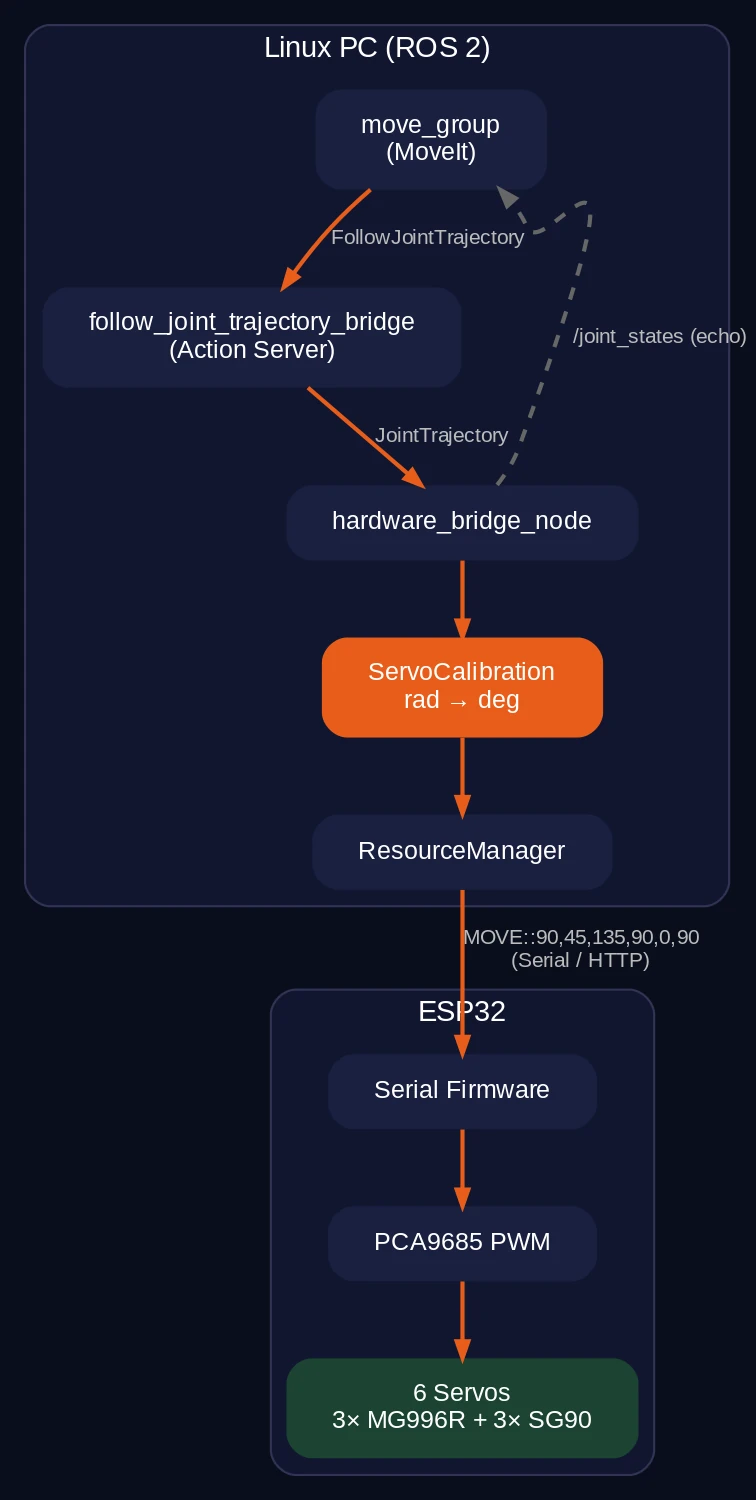
A trajectory planned by MoveIt on the Linux PC still has to reach the servos on the ESP32. The standard ROS 2 approach is a ros2_control hardware interface: a C++ plugin compiled into a library, with a lot of fixed setup code. For hobby servos on a serial link, the OmArm Zero uses a simpler Python bridge that gives MoveIt the same FollowJointTrajectory action as a JointTrajectoryController, without ros2_control.
Working this out took me a week, and the answer was simpler than I expected.
The Python bridge:
- works identically from MoveIt’s perspective (same action interface);
- is easier to modify and debug (Python, not C++);
- handles the ESP32’s command protocol directly (serial strings, HTTP JSON).
The trade-off: no real-time guarantees and no position feedback. The hobby servos have no encoders (sensors that measure the real shaft angle), so a C++ interface would not provide feedback either.
The bridge nodes
Two Python nodes replace the ros2_control stack for real hardware.
follow_joint_trajectory_bridge is an action server with the same interface as a JointTrajectoryController. MoveIt sends FollowJointTrajectory goals to it. The bridge accepts the goal, publishes the trajectory on a topic, waits for the planned duration and then reports success. It does not check where the servos are, so MoveIt also reports success when a joint is blocked or the link to the ESP32 is lost; hardware_bridge_node then only logs a warning.
MoveIt → FollowJointTrajectory action goal
       → follow_joint_trajectory_bridge (action server)
       → publishes JointTrajectory on /joint_trajectory_controller/joint_trajectory
hardware_bridge_node subscribes to the trajectory topic, takes only the last waypoint, converts the joint angles from radians to servo degrees, and sends a MOVE command to the ESP32. The firmware then moves each servo toward its target in small steps. The real arm reaches the planned goal but does not follow the planned path in between. Without obstacles this is usually harmless. With obstacles in the planning scene, the collision check covers the plan, not the real motion.
/joint_trajectory_controller/joint_trajectory
       → hardware_bridge_node
       → ServoCalibration: radians → degrees
       → ResourceManager: "MOVE:90,45,135,90,0,90"
       → ESP32 (serial or HTTP)
The hardware bridge also publishes an echo state on /joint_states at 50 Hz. This is open-loop: it publishes what it commanded, not what the servos did. The servos have no encoders, so the real position cannot be read back.
Transport options
The ResourceManager (the step in the diagram above that sends the MOVE string to the ESP32) supports two transports:
Serial: sends MOVE:a1,a2,a3,a4,a5,a6\n at 115200 baud (bits per second) to /dev/ttyUSB0. The ESP32 reads the string, parses the six angles and passes them to the PCA9685, a 16-channel servo driver board.
HTTP: posts the JSON {“cmd”: “MOVE:a1,a2,a3,a4,a5,a6”} to /api/command on the ESP32, at the address set as http.host in hardware.yaml. HTTP needs a firmware with a WiFi access point, because omarm_zero_ros2_serial.ino has no WiFi. Flash the web firmware OmArmZero_LittleFS.ino from src/firmware/ in the workspace. Its access point uses the ESP32 default address 192.168.4.1, the preset http.host in hardware.yaml, and its HOME moves all servos to 90° like the serial firmware. The Part 1 package firmware uses 10.10.10.1 and homes to 0°, so use it only after setting http.host to 10.10.10.1. Connect the PC to the OmArmZero WiFi network first. Choose HTTP when a USB cable between the PC and the ESP32 is inconvenient.
# Launch with serial transport (default)
ros2 launch omarm_zero_moveit_config real_moveit.launch.py transport:=serial

# Launch with HTTP transport
ros2 launch omarm_zero_moveit_config real_moveit.launch.py transport:=http
13. Servo calibration
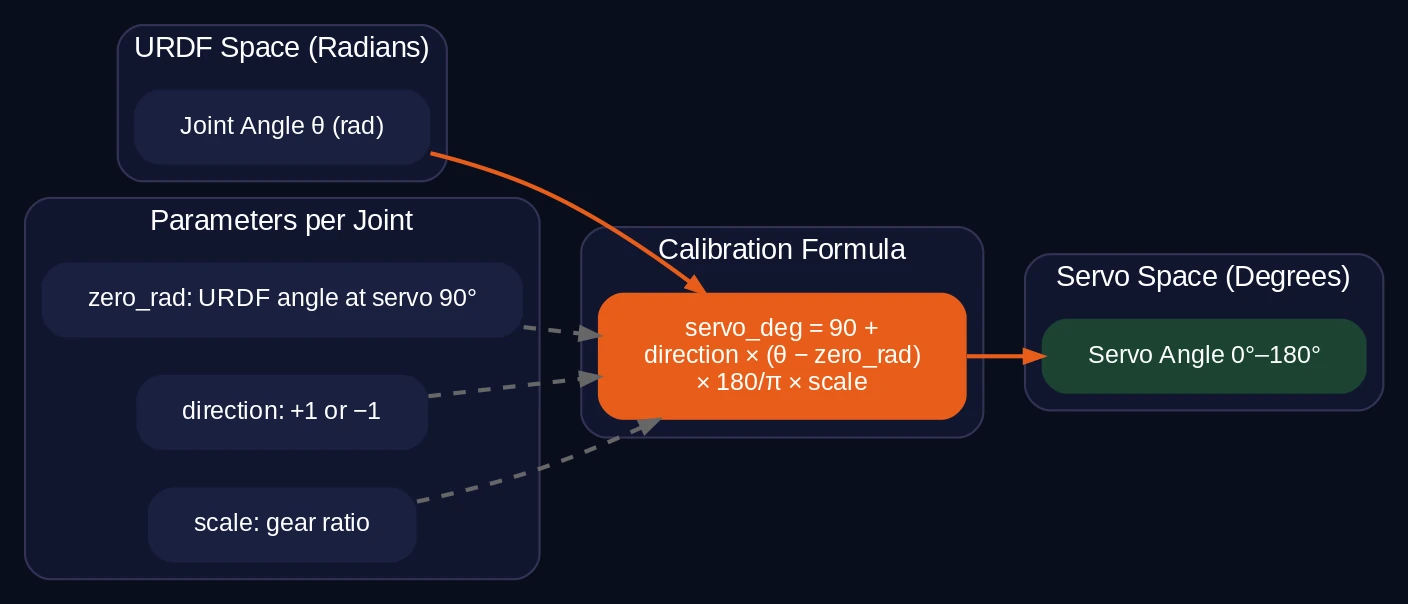
The bridge converts joint angles from radians (MoveIt) to servo degrees (ESP32). The conversion needs calibration because the servo’s center position does not match the URDF zero position.
The calibration formula
servo_deg = 90 + direction * (joint_rad - zero_rad) * (180/pi) * scale
Each joint has three calibration parameters, and the result is clamped.
| Parameter | Meaning |
|---|---|
| zero_rad | The URDF joint angle at which the servo sits at its 90° center position |
| direction | +1 or -1, because some servos are mounted backwards |
| scale | Usually 1.0, but can compensate for gear ratios |
| Clamping | The output is limited to 0° to 180° |
Default calibration values
# hardware.yaml, servo_calibration (lists in short form)
# one entry per servo: J1 to J6 = Revolute 1 to 6
servo_calibration:
  zero_rad:  [1.57, -1.57, -1.57, -1.57, -1.57, 0.0]  # J1 pi/2, J2-J5 -pi/2, J6 0
  direction: [1, 1, 1, 1, 1, -1]                     # J6: gripper servo is mirrored
  scale:     [1.0, 1.0, 1.0, 1.0, 1.0, 1.0]
  servo_min_deg: [0, 0, 0, 0, 0, 0]
  servo_max_deg: [180, 180, 180, 180, 180, 180]
Revolute 7 has no entry because it has no servo of its own. The PCA9685 channels are not in hardware.yaml: the firmware maps J1 to J6 to channels 0, 3, 4, 7, 8 and 11, the wiring from Part 1. The gaps keep the servo cables from bunching up on one side of the board.
Why zero_rad matters
In the URDF, the zero position of each joint depends on how the CAD model was assembled. Revolute 1 (base rotation) moves from 0 to pi in the URDF. The middle of that range, pi/2, points the arm straight ahead, which matches the servo’s 90° center. So zero_rad = pi/2.
Revolute 2 to 5 move from -pi to 0. Their middle, -pi/2, maps to the servo’s 90° center, so zero_rad = -pi/2.
The gripper (J6) uses zero_rad = 0 and direction -1. Open (-1.57 rad) gives 90 + 90 = 180°, and closed (1.57 rad) gives 90 – 90 = 0°.
Adjusting calibration
If the real arm does not match the RViz view:
- Launch real_moveit.launch.py.
- Set the arm to the “home” pose in RViz.
- Compare the real arm with RViz.
- If a joint is offset, adjust its zero_rad in hardware.yaml.
- Restart the launch file.
Small offsets (under 5°) are normal because of servo tolerances and the fit of the 3D-printed parts. On my arm, only the gripper servo turns the opposite way to the RViz model, which is why J6 has direction -1.
14. Real robot launch: everything together
MoveIt plans a trajectory on your PC, the bridge converts it to servo commands, and the real arm moves.
Prerequisites
- ESP32 connected via USB (or WiFi for HTTP transport).
- ESP32 flashed with the omarm_zero_ros2_serial.ino firmware (for HTTP: a firmware with a WiFi access point, see section 12).
- Servos powered from a separate 5 V supply rated for at least 10 A (see Part 1), never from USB.
Flash the firmware
Open omarm_zero_ros2_serial.ino in the Arduino IDE. It is under src/firmware/ in the workspace and under firmware/ros2_serial/ on GitHub. Select the ESP32 Dev Module board as in Part 1 and upload. The firmware accepts these commands over serial at 115200 baud:
STATUS          → returns JSON with current servo positions
HOME            → all servos to 90 degrees
ZERO            → all servos to 0 degrees
MOVE:a1,...,a6  → set target angles (0-180)
SPEED:n         → max. step per 80 ms in degrees (1-20)
SPEED:n sets the largest step a servo takes per 80 ms update. A value of 1 is the slowest (12.5°/s), 20 the fastest (250°/s), and the firmware starts at 5 (62.5°/s). HOME puts every joint at the middle of its range, where the servo sits at 90° (zero_rad, section 13). It is not the MoveIt “home” pose from Step 5.
Test the connection:
# Check the serial port
ls /dev/ttyUSB*

# Send a test command (install screen if needed)
screen /dev/ttyUSB0 115200
# Type: STATUS
# Expected: {"status":"ok","pos":[...]} with six servo angles
# Exit screen: Ctrl-A, then K, then Y
Launch MoveIt with real hardware
ros2 launch omarm_zero_moveit_config real_moveit.launch.py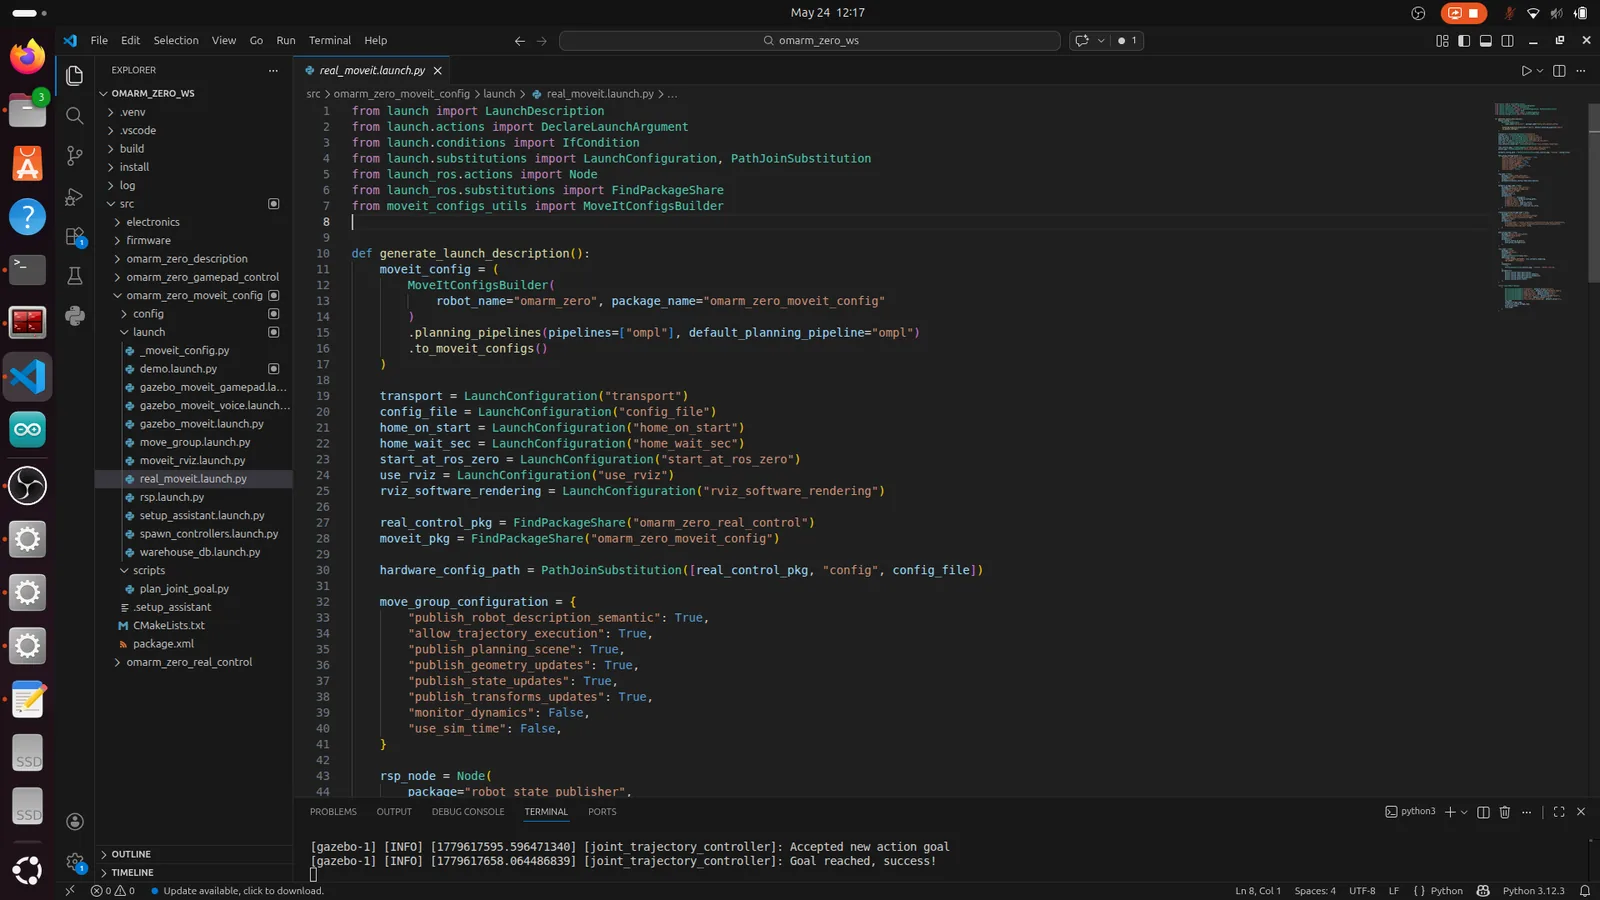
The launch file starts:
- robot_state_publisher (URDF to TF).
- hardware_bridge_node (serial or HTTP bridge to the ESP32).
- follow_joint_trajectory_bridge (action server for MoveIt).
- move_group (MoveIt planning).
- rviz2 (visualization).
If home_on_start is true (default), the arm moves to the firmware HOME pose (all servos at 90°) right after startup, so keep hands and objects out of its reach. Wait for it to settle before planning. The bridge still assumes 0 rad on every joint until the first arm motion, so plan an arm goal such as “home” first. A gripper-only command before that reuses the stored 0 rad values and sends J1 to 0° and J2 to J5 to 180°.
In rqt_graph, the two bridge nodes from section 12 take the place of the controller manager and its controllers.
Plan and execute on the real arm
Plan and execute as in the demo (section 9). The first time this worked on the real arm, I stared at it for ten seconds.
The omarm_zero_ros2_serial firmware steps the servos every 80 ms; the Part 1 web firmware used 20 ms. The arm moves in small steps toward the last waypoint and does not follow the trajectory timing (section 12).
Launch parameters
# All available parameters
ros2 launch omarm_zero_moveit_config real_moveit.launch.py \
    transport:=serial \          # serial or http
    config_file:=hardware.yaml \ # calibration config
    home_on_start:=true \        # move to home on startup
    home_wait_sec:=1.5 \         # wait time after homing
    start_at_ros_zero:=false \   # start at ROS zero instead of home
    use_rviz:=true               # launch RViz
Keep start_at_ros_zero at false. It sends 0 rad on every joint at startup, which puts J1 at 0° and J2 to J5 at 180°: the ends of the servo range, where the servos stall.
Using the Python API with real hardware
plan_joint_goal.py works unchanged with real hardware:
# Move the real arm to a target
ros2 run omarm_zero_moveit_config plan_joint_goal.py \
    --group arm --target 1.2 -0.5 -1.0 -1.5 -2.0 --execute

# Open the gripper
ros2 run omarm_zero_moveit_config plan_joint_goal.py \
    --group gripper --target -1.57 -1.57 --execute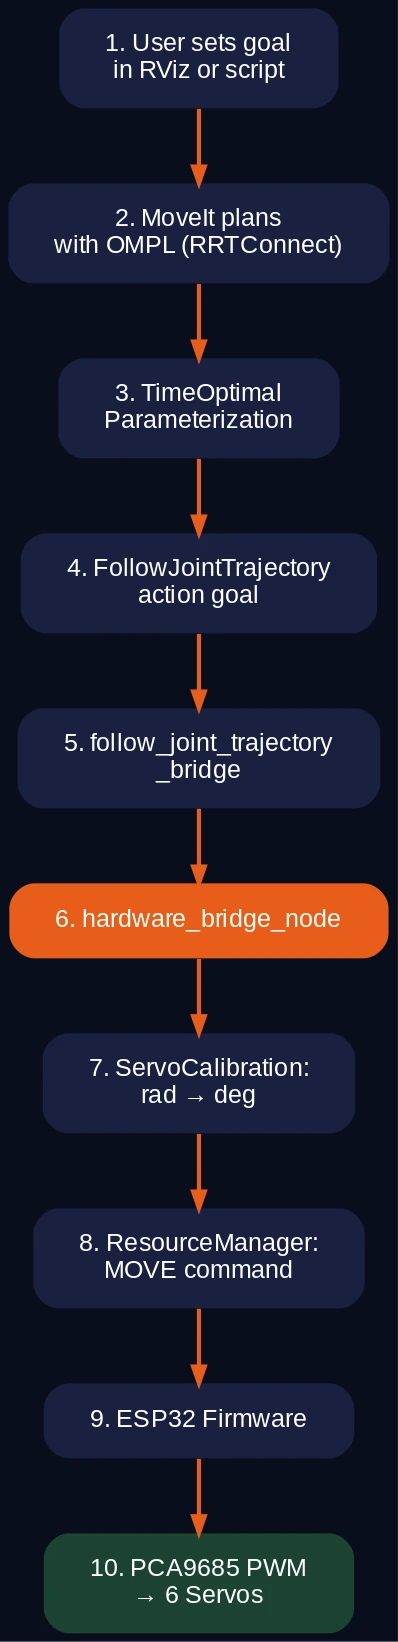
Troubleshooting
Arm does not move: Check ls /dev/ttyUSB*. Try screen /dev/ttyUSB0 115200 and send STATUS. If there is no response, check the USB cable and the ESP32 power.
Arm moves in the wrong direction: Flip direction in hardware.yaml for the affected joint, from 1 to -1 or back.
Arm position does not match RViz: Adjust zero_rad for the mismatched joint. Small offsets are normal.
Planning fails: Check the terminal output. Common causes: the goal is outside the joint limits, the arm would collide with itself, or the solver finds no solution within the timeout. Check that the limits in joint_limits.yaml match the physical arm’s range. If the goal is near a joint limit, the planner may not find a valid path.
Jerky motion: In simulation, reduce max_velocity_scaling_factor in the planning request; the default 0.2 (20%) should be smooth. On the real arm, the step size per 80 ms comes from the firmware SPEED value (section 14), not from the scaling factor.
MoveIt Setup Assistant crashes: Check that the URDF loads cleanly with check_urdf. If the URDF uses Xacro includes, run xacro first and pass the generated URDF to the assistant.
Controller not found (demo or Gazebo): Run ros2 control list_controllers. If the list is empty, the controller manager has not started; check the launch file and the ros2_control parameters. With real hardware there is no controller manager; run ros2 action list and check that /joint_trajectory_controller/follow_joint_trajectory exists (provided by follow_joint_trajectory_bridge).
Frequently asked questions
Do I need a fast computer for MoveIt 2? No. I made the screen recordings for this post on my Lenovo IdeaPad 320 laptop. In them, MoveIt planned arm moves in 0.04 to 0.14 s while Gazebo was running. Gazebo is the heavy part: with it running, RViz dropped from about 30 to 3 or 4 frames per second, and the simulation ran at about 40% of real time. Part 2 recommends at least 8 GB RAM.
Can I use this with a different robot arm? Yes, with your own URDF and calibration parameters. The MoveIt configuration (Setup Assistant, controllers, launch files) follows the same pattern for any robot. The hardware bridge is specific to the ESP32 and the PCA9685 servo driver, but you can adapt it to other microcontrollers.
What comes next
In Part 4, a camera detects objects, and the pick-and-place script sends each object’s position to MoveIt as a pose goal.
Resources
Video tutorial: Watch on YouTube