
ملخص سريع
شرح آلية عمل مستشعر المسافة بالموجات فوق الصوتية HC-SR04 وكيفية توصيله بلوحة أردوينو. يتضمن الشرح مبدأ قياس الإشارة المحفزة، ومخططات التوصيل، وشفرة أردوينو باستخدام كلٍ من دالة pulseIn() ومكتبة NewPing، بالإضافة إلى كيفية عرض قراءات المسافة على شاشة المراقبة التسلسلية. المدى: من 2 سم إلى 400 سم.
The HC-SR04 is probably the first distance sensor most people try with Arduino, and for good reason — it is cheap, simple to wire, and works well enough for most hobby projects. It measures distance using ultrasonic sound waves, so there is no physical contact needed. This tutorial walks you through how the HC-SR04 actually works, how to wire it up, how to write the Arduino code, and how to show distance readings on the Serial Monitor and an optional I2C LCD. By the end, you should be comfortable enough to drop this sensor into whatever you are building next.
ما يغطيه هذا الدرس التعليمي
Here is what you will learn:
- How ultrasonic distance sensing works, including the time-of-flight principle and the distance formula.
- Wiring the HC-SR04 to an Arduino Uno with a breadboard and jumper wires.
- Writing and uploading Arduino code that reads distance and prints it to the Serial Monitor.
- Optionally connecting an I2C LCD display to show distance readings without a computer.
- Troubleshooting common problems like wrong readings, zero values, and wiring mistakes.
- The limits of ultrasonic sensing and how to get the best accuracy.
كيف تعمل تقنية استشعار المسافة بالموجات فوق الصوتية
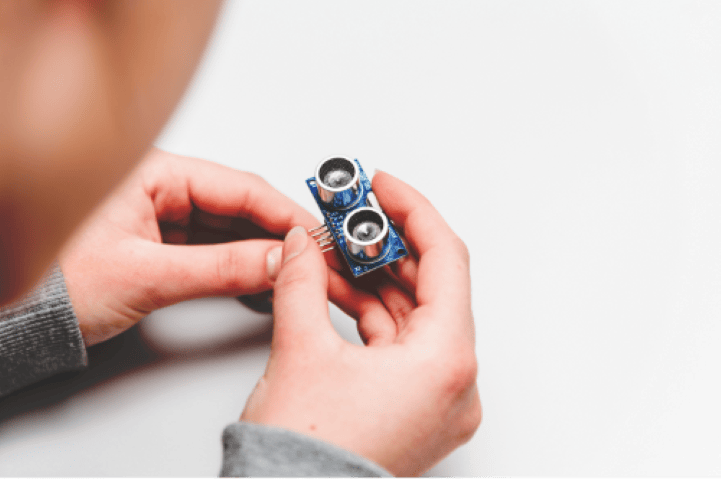
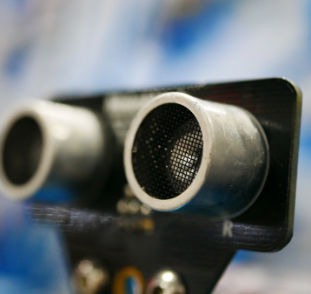
An ultrasonic sensor measures distance by sending out a short burst of high-frequency sound and listening for the echo that bounces back. In fact, it is the same idea as echolocation in bats. The HC-SR04 has two cylindrical transducers on its front face: the transmitter (marked T) and the receiver (marked R).
مبدأ زمن الرحلة
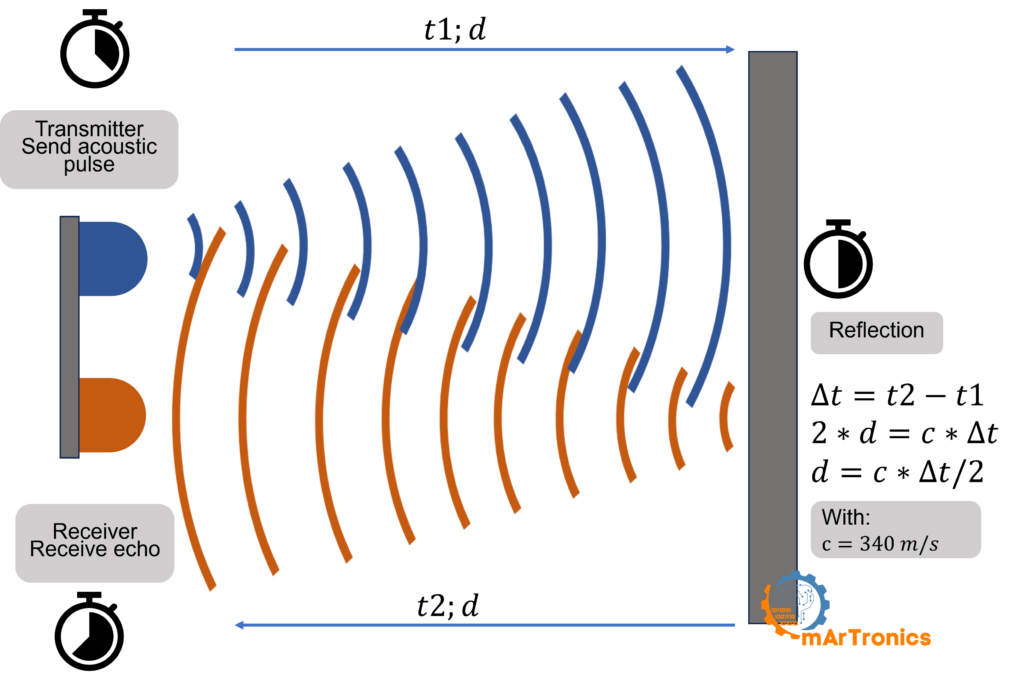
When you trigger the sensor, the transmitter sends a burst of ultrasonic pulses at about 40 kHz, well above human hearing range. These sound waves travel outward in a cone-shaped pattern. When they hit a solid object, they bounce back toward the sensor, and the receiver picks them up as an echo. The sensor then measures the total time between sending the pulse and getting the echo back. This is called the time of flight.
صيغة المسافة
Because the sound travels to the object and back, it covers the distance twice. To get the one-way distance, you use this formula:
المسافة = (الزمن × سرعة الصوت) / 2
At room temperature (around 20 degrees C), sound travels at about 343 meters per second, or 0.0343 cm per microsecond. Since the Arduino measures the echo time in microseconds, the formula you will use in code is:
المسافة (سم) = المدة (ميكروثانية) × 0.0343 / 2
The division by 2 matters because the sound wave makes a round trip. If you skip it, you get double the real distance. The speed of sound also changes a bit with temperature and humidity, so readings might drift a few millimeters in extreme conditions.
الرسوم المتحركة التفاعلية: كيف يعمل الاستشعار بالموجات فوق الصوتية
انقر إرسال إشارة تنبيه واسحب مسافة العائق قم بتمرير شريط التمرير لمعرفة كيف يقيس جهاز HC-SR04 المسافة في الوقت الفعلي.
مواصفات HC-SR04
Before wiring anything up, first here are the specs you should know about the HC-SR04.
| المعلمة | قيمة |
|---|---|
| جهد التشغيل | 5 فولت تيار مستمر |
| التيار التشغيلي | 15 مللي أمبير |
| نطاق القياس | من 2 سم إلى 400 سم |
| قياس الزاوية | حوالي 15 درجة |
| التردد فوق الصوتي | 40 كيلو هرتز |
| عرض نبضة التشغيل | الحد الأدنى 10 دولارات أمريكية |
| دقة | حوالي +/- 3 مم |
| دبابيس التوصيل | VCC، Trig، Echo، GND |
المكونات المطلوبة
To get started, gather the parts listed below. The LCD and its adapter are optional — you only need those for the display upgrade section later.
| عنصر | غاية | مطلوب؟ | ملحوظات |
|---|---|---|---|
| أردوينو أونو | لوحة تحكم دقيقة تقوم بتشغيل الكود وقراءة بيانات المستشعر | نعم | أي لوحة متوافقة مع أردوينو ستفي بالغرض. تعرّف على المزيد حول أردوينو |
| مستشعر الموجات فوق الصوتية HC-SR04 | يقيس المسافة باستخدام الموجات الصوتية فوق الصوتية | نعم | وحدة ذات أربعة أطراف: VCC، Trig، Echo، GND |
| لوح التجارب | يوفر منصة بدون لحام لإجراء التوصيلات | نعم | لوح تقطيع الخبز نصف الحجم يكفي |
| أسلاك توصيل (ذكر-إلى-ذكر) | يقوم بتوصيل المستشعر بلوحة أردوينو عبر لوحة التجارب | نعم | يلزم 4 أسلاك على الأقل |
| كابل USB (من النوع A إلى النوع B) | يقوم جهاز أردوينو بتوصيل جهاز الكمبيوتر الخاص بك لتحميل التعليمات البرمجية وإخراج البيانات عبر المنفذ التسلسلي | نعم | يأتي مع معظم مجموعات أردوينو |
| شاشة LCD HD44780 16×2 مع محول I2C | يعرض قراءات المسافة دون الحاجة إلى جهاز كمبيوتر | خياري | مطلوب فقط لقسم ترقية شاشة LCD |
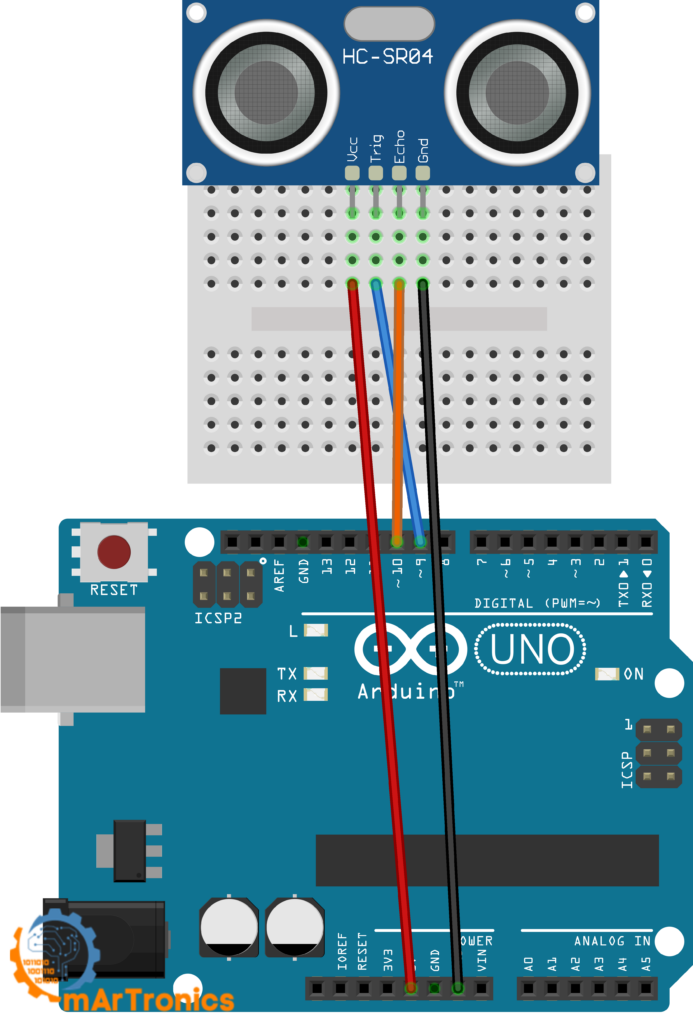
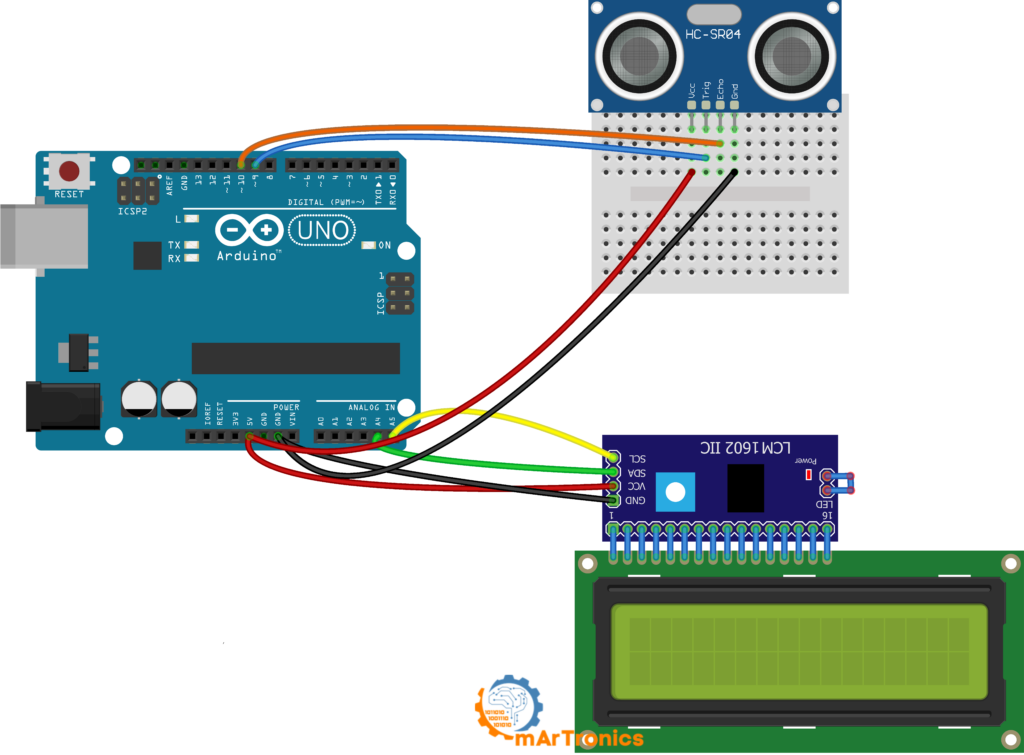
توصيل HC-SR04 بـ Arduino
توصيل جهاز HC-SR04 بـ أردوينو is straightforward. The sensor has four pins, and each one connects directly to the Arduino. Use the wiring table below and also make sure everything is seated firmly on your breadboard before uploading any code.
| دبوس HC-SR04 | دبوس أردوينو | وصف |
|---|---|---|
| VCC | 5 فولت | يزود المستشعر بالطاقة (يجب أن يكون 5 فولت) |
| علم حساب المثلثات | الرقم السري الرقمي 9 | يستقبل إشارة التشغيل من أردوينو |
| صدى | الرقم السري الرقمي 10 | يرسل نبضة الصدى إلى أردوينو |
| أرضي | أرضي | أرضية مشتركة (يجب أن تكون مشتركة مع أرضي أردوينو) |
مهم: The Arduino and the HC-SR04 must share a common ground. If you forget GND, the sensor will not give you any readings. Double-check this connection if you see 0 cm or no output.
كود مستشعر الموجات فوق الصوتية لأردوينو
With the wiring done, upload this sketch to your Arduino. It triggers the HC-SR04, reads the echo time, calculates distance in centimeters, and prints the result to the Serial Monitor. New to Arduino code? Our دليل أساسيات برمجة أردوينو covers IDE setup and sketch structure.
/** * المؤلف: عمر درايدريا * التاريخ: 2024/05/07 * يقيس هذا الكود المسافة باستخدام مستشعر فوق صوتي * ويخرج النتيجة عبر اتصال تسلسلي. */ #define TRIG_PIN 9 // دبوس التشغيل لمستشعر الموجات فوق الصوتية #define ECHO_PIN 10 // دبوس الصدى لمستشعر الموجات فوق الصوتية void setup() { pinMode(TRIG_PIN, OUTPUT); pinMode(ECHO_PIN, INPUT); Serial.begin(9600); } void loop() { long duration, distance; digitalWrite(TRIG_PIN, LOW); delayMicroseconds(2); digitalWrite(TRIG_PIN, HIGH); delayMicroseconds(10); digitalWrite(TRIG_PIN, LOW); duration = pulseIn(ECHO_PIN, HIGH); distance = duration * 0.034 / 2; Serial.print("المسافة (سم): "); Serial.println(distance); delay(1000); }
شرح الكود: سطرًا بسطر
Below is a breakdown of what each part of the code does, so you can modify it later or track down bugs.
#define TRIG_PIN 9 and ECHO_PIN 10 give human-readable names to the digital pin numbers. In other words, pin 9 controls the trigger, and pin 10 listens for the echo. You can change these to any available digital pins, as long as you also update the wiring.
pinMode(TRIG_PIN, OUTPUT) sets pin 9 as an output. This is because the Arduino needs to send a signal to the sensor to start a measurement.
pinMode(ECHO_PIN, INPUT) sets pin 10 as an input. This is because the Arduino needs to receive the echo signal coming back from the sensor.
Serial.begin(9600) opens serial communication at 9600 baud so the Arduino can send distance readings to your computer. Open the Serial Monitor in the Arduino IDE (Tools then Serial Monitor) to see them.
تسلسل التفعيل: The Arduino pulls the trigger pin LOW, waits 2 microseconds for a clean start, pulls it HIGH for exactly 10 microseconds, then drops it LOW again. That 10-microsecond HIGH pulse tells the HC-SR04 to fire its ultrasonic burst.
Reading the echo and calculating distance
pulseIn(ECHO_PIN, HIGH) is a built-in Arduino function that waits for the echo pin to go HIGH, then measures how long it stays HIGH (in microseconds). That duration is the round-trip time for the sound wave. If no echo comes back within about 1 second, pulseIn returns 0.
المسافة = المدة * 0.034 / 2 converts the echo time to a distance in centimeters. Here, 0.034 is the speed of sound in cm per microsecond (343 m/s converted). Dividing by 2 accounts for the round trip.
Serial.println(distance) then prints the distance followed by a new line, so each reading shows up on its own row in the Serial Monitor.
تأخير (1000) pauses for one second before the next measurement. You can lower this for faster updates, but you should keep at least 30 ms between readings so the sensor can settle and old echoes do not interfere.
الاختبار باستخدام شاشة التسلسل
After uploading, open the Serial Monitor (Ctrl+Shift+M, or Tools then Serial Monitor). Then set the baud rate to 9600 in the bottom-right corner. Point the sensor at a flat surface like a wall or a book and slowly move it closer and farther away. You should see the distance update every second. If you get 0 or wildly jumping numbers, check the wiring section and the troubleshooting section below.
ترقية اختيارية: عرض المسافة على شاشة LCD بتقنية I2C
If the Serial Monitor version works, you can take it a step further by adding an HD44780 16×2 LCD display with an I2C serial adapter. As a result, your Arduino can show distance readings on a physical screen, so you do not need a computer attached anymore. This section is optional and builds on the same wiring from the previous section.
جدول توصيلات شاشة LCD
Keep the HC-SR04 connected as before (Trig on pin 9, Echo on pin 10, VCC to 5 V, GND to GND). Then add the LCD connections below.
| دبوس شاشة LCD I2C | دبوس أردوينو | وصف |
|---|---|---|
| VCC | 5 فولت | يزود وحدة شاشة LCD بالطاقة |
| أرضي | أرضي | أرضية مشتركة |
| السبتيين | A4 | خط بيانات I2C |
| SCL | A5 | خط ساعة I2C |
ملاحظة حول عناوين I2C: Most I2C LCD modules default to address 0x27, but some use 0x3F. If your LCD stays blank after uploading, first try changing the address in the code, or alternatively run an I2C scanner sketch to find the right one.
كود أردوينو لشاشة LCD باستخدام مكتبة NewPing
This sketch uses two libraries: نيو بينغ for ultrasonic sensor readings and LiquidCrystal_I2C for controlling the LCD over I2C. First install both through the Arduino Library Manager (Sketch then Include Library then Manage Libraries) before uploading. NewPing handles the trigger and echo timing for you, so you do not need to write the low-level pulse code yourself. It also has built-in noise filtering and timeout management.
/** * المؤلف: عمر درايدريا * التاريخ: 2024/05/07 * يقيس هذا الكود المسافة باستخدام مستشعر فوق صوتي * ويعرض النتيجة على شاشة LCD. */ #include #include #define TRIGGER_PIN 9 #define ECHO_PIN 10 #define MAX_DISTANCE 200 LiquidCrystal_I2C lcd(0x27, 16, 2); NewPing sonar(TRIGGER_PIN, ECHO_PIN, MAX_DISTANCE); void setup() { lcd.init(); lcd.backlight(); lcd.clear(); lcd.setCursor(0, 0); lcd.print("المسافة:"); } void loop() { delay(50); int distance = sonar.ping_cm(); lcd.setCursor(0, 1); if (distance > 0) { lcd.print(distance); lcd.print(" سم "); } else { lcd.print("خارج النطاق "); } }
The I2C adapter is nice because it cuts the wire count way down compared to running an LCD in parallel mode, and it frees up digital pins for other sensors or actuators. If you want another project that uses an I2C LCD, check out our مشروع قفل باب بكلمة مرور باستخدام أردوينو.
الدقة والقيود وأفضل الممارسات
The HC-SR04 works well for hobby and educational projects, but it does have physical limits that matter. Knowing these will save you from confusing readings.
المدى الأدنى (المنطقة العمياء): The HC-SR04 cannot measure objects closer than about 2 cm. At that distance, the outgoing pulse and the returning echo overlap, and the receiver cannot tell them apart.
الأسطح الناعمة والمائلة: Ultrasonic waves reflect best off hard, flat surfaces facing the sensor head-on. For instance, soft materials like fabric, foam, or fur absorb much of the sound energy. Curved or angled surfaces can deflect the echo away from the receiver entirely.
مخروط الكشف الضيق: Additionally, the HC-SR04 has a measuring angle of only about 15 degrees. Consequently, anything outside that cone will not be detected, so keep this in mind when you mount the sensor.
العوامل البيئية: The speed of sound changes with air temperature and humidity. For example, at 0 degrees C, sound travels at about 331 m/s, while at 30 degrees C it is closer to 349 m/s. For most indoor projects at room temperature, 343 m/s is close enough.
قراءات صاخبة أو متذبذبة: Stray echoes, nearby objects, or electrical noise can cause occasional spikes or dips. Because of this, a practical fix is to take multiple readings and average them.
ارتفاع التركيب والمحاذاة: Mount the sensor so that its transducers face the target area directly. Because of this, even a slight tilt can cause echoes to miss the receiver. On mobile robots, make sure the sensor is mounted rigidly and does not vibrate during movement.
استكشاف الأخطاء وإصلاحها في جهاز HC-SR04
If the sensor is not giving you the results you expect, run through these common issues before assuming the hardware is bad.
قراءة 0 سم دائمًا: This usually means the echo pin is not getting a signal. First, make sure the echo wire goes to the correct pin (pin 10 in this tutorial). Then verify that the sensor GND is connected to the Arduino GND.
قراءة المسافة القصوى دائمًا: If the sensor keeps returning its maximum value, the echo is probably getting lost. This often happens when the sensor faces open space with nothing in range, or when the target surface absorbs or deflects the sound.
قيم القفز العشوائية: In most cases, unstable readings come from loose wiring, bad breadboard contacts, or interference from other ultrasonic sources. To fix this, press all wires firmly into the breadboard. If readings still jump, try adding a small delay between measurements or averaging multiple readings.
مشاكل في الكود والتكوين
لا يوجد أي إخراج تسلسلي على الإطلاق: Check that you selected the correct board and port in the Arduino IDE under Tools, and that the Serial Monitor baud rate matches the value in your code (9600).
تعيين رقم التعريف الشخصي (PIN) بشكل خاطئ في الكود: If you wired Trig and Echo to different pins than 9 and 10, then update the #define lines at the top of the sketch to match.
عدم كفاية الطاقة أو الأسلاك غير المحكمة: The HC-SR04 needs a stable 5 V supply. For example, if you are running many components off the Arduino 5V pin, the voltage might sag below what the sensor needs.
شاشة LCD لا تعرض النص: If the screen stays blank after you finish the LCD section, check the I2C address first. Try 0x3F instead of 0x27 in the code. Also check that you connected SDA to A4 and SCL to A5. Also adjust the contrast potentiometer on the back of the I2C adapter.
الأسئلة الشائعة (FAQ)
يستطيع جهاز HC-SR04 قياس المسافات حتى 400 سم تقريبًا (4 أمتار). مع ذلك، عمليًا، تميل القراءات التي تتجاوز 200 إلى 300 سم إلى أن تصبح أقل دقة، خاصة في البيئات التي تتداخل فيها أصداء الموجات أو على أسطح الأهداف الرخوة.
صُممت لوحة HC-SR04 من قِبل الشركة المصنعة للعمل بجهد 5 فولت. يُخرج طرف الصدى جهد 5 فولت، مما قد يُتلف اللوحات التي تعمل بجهد 3.3 فولت. لذا، يُنصح باستخدام مُقسّم جهد على طرف الصدى أو اختيار نسخة HC-SR04P التي تدعم نطاق جهد من 3.3 فولت إلى 5 فولت.
A reading of 0 cm usually means the sensor did not receive an echo. The most common causes are a missing GND connection, the wrong echo pin in the code, or the object being too close (under 2 cm).
يتمتع جهاز HC-SR04 بدقة تقارب ±3 مم في الظروف المثالية. أما في الاستخدام العملي، فيُتوقع أن تكون الدقة حوالي ±1 سم، وذلك بحسب سطح الهدف والبيئة المحيطة.
نعم، يمكنك توصيل عدة مستشعرات HC-SR04 بمنافذ رقمية مختلفة على لوحة أردوينو. مع ذلك، قم بتشغيلها واحدًا تلو الآخر مع تأخير قصير بين القراءات لتجنب التداخل الصوتي.
NewPing is an open-source library that handles trigger and echo timing for you, supports multiple sensors, and includes timeout and median filtering.
Take multiple readings and average them. NewPing has a built-in median filter (ping_median()) that handles this automatically.
Common projects include obstacle-avoiding robots, ultrasonic radar, parking sensors, liquid level monitors, and security systems.
No. The HC-SR04 is not waterproof. For underwater use, you need a dedicated waterproof ultrasonic transducer.
The HC-SR04P works on 3.3 V to 5 V, so you can use it with 3.3 V boards like the ESP32 without a level shifter. The standard HC-SR04 needs 5 V.
ماذا نبني بعد ذلك؟
As a next step, try mounting the sensor on a servo motor and building an رادار فوق صوتي يعمل بنظام أردوينو that sweeps and maps the area around it. Or you could drop it into an سيارة روبوتية تتجنب العوائق that drives around objects on its own. If you have not worked with servo motors yet, our دليل التحكم في محركات المؤازرة باستخدام أردوينو will get you up to speed.
خاتمة
The HC-SR04 is a great beginner sensor because it pulls together wiring, timing, and serial output in one small project. At this point, you know how the sensor works, how to wire it, how to read distance in code, and how to display results on a screen. If something goes wrong, the troubleshooting section above will point you in the right direction. From here, you can plug this sensor into just about anything. For more Arduino projects and tutorials, check out أومارترونيكس.
رأي واحد حول “Arduino Ultrasonic Distance Sensor: HC-SR04 Tutorial with Wiring and Code”