Table of Contents
TogglePrinciples of DC Motor Control
We will learn how the L298N Dual H-Bridge motor driver and the Motor Shield work in this detailed lesson. In robotics and automation projects, these parts are needed to handle DC motors. We will talk about how they work, how to wire them, and how to program them with Arduino, giving examples and code.

DC motors are important parts of a lot of electrical projects. They turn electrical energy into mechanical motion, which makes them useful for everything from simple toys to complicated robots. For exact movements, you need to be able to control the motors’ direction and speed. Motor drivers like the L298N Dual H-Bridge and the Arduino Motor Shield make this possible.
H-Bridge Motor Driver
An H-Bridge is a circuit configuration that allows a voltage to be applied across a load (such as a motor) in either direction. This capability is essential for reversing the direction of the motor.
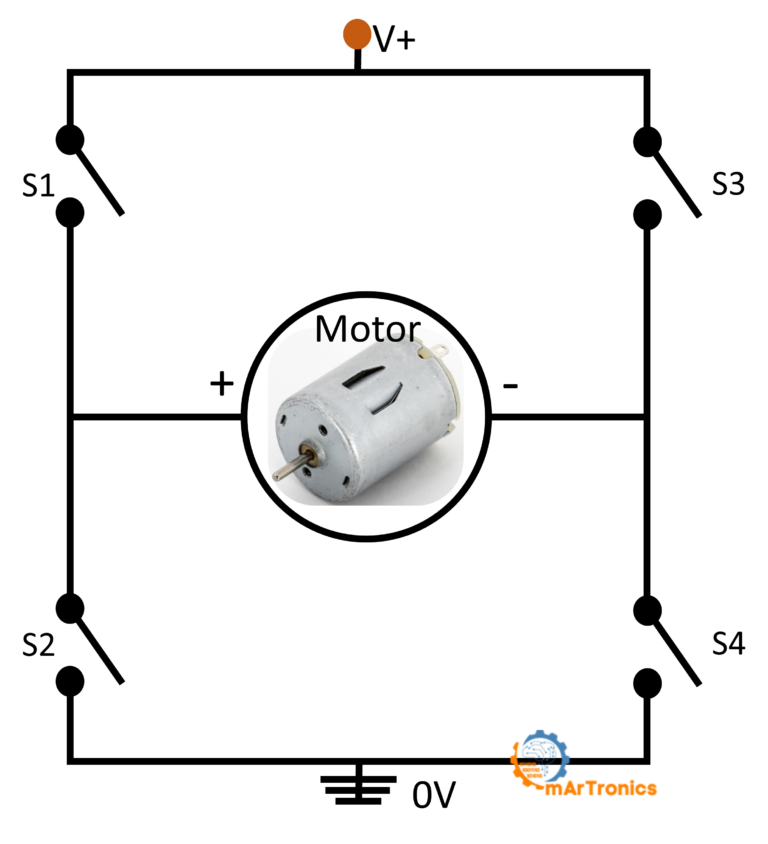
How it works:
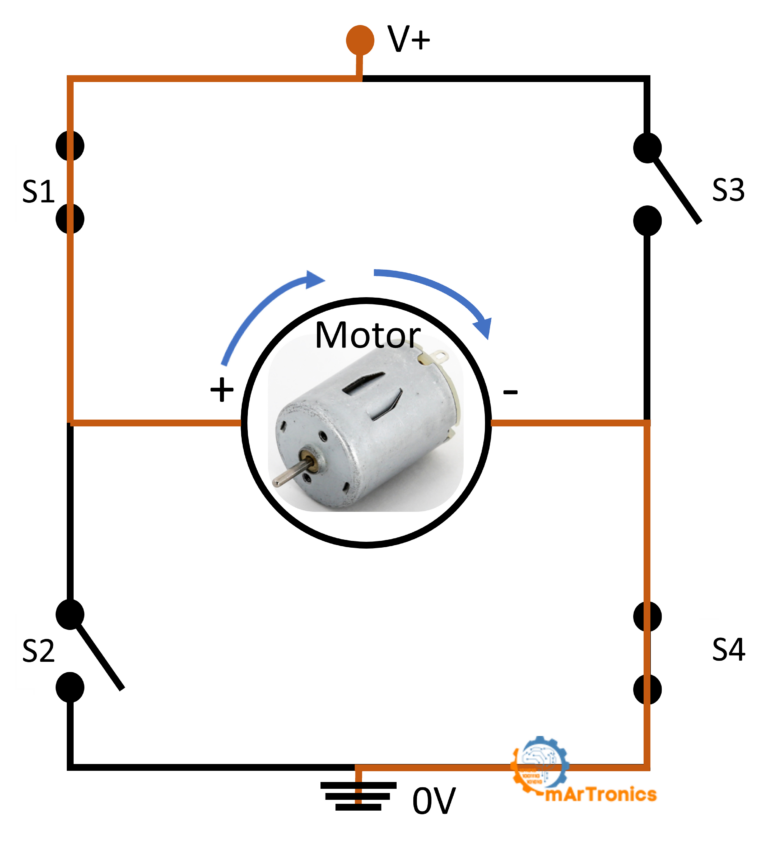
- Forward Direction: When switches S1 and S4 are closed (and S2 and S3 are open), current flows from the power supply through the motor, causing it to spin in one direction.
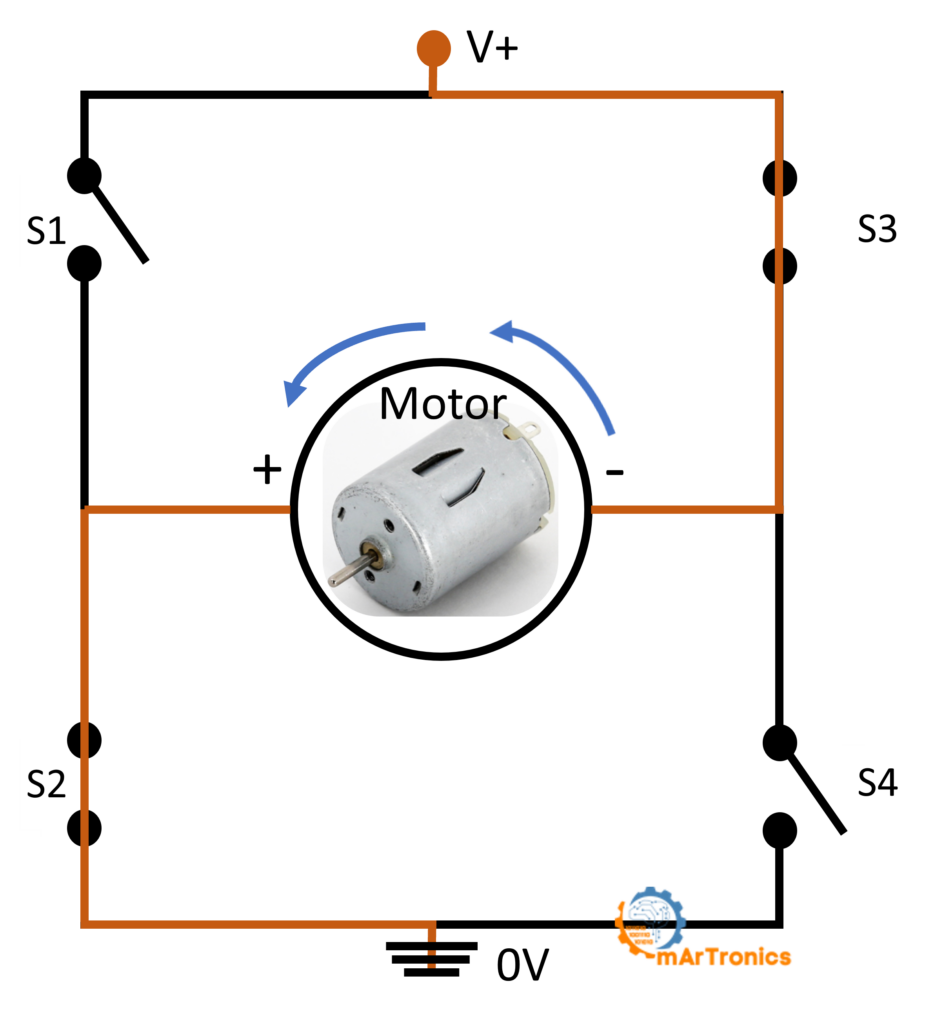
- Reverse Direction: When switches S2 and S3 are closed (and S1 and S4 are open), current flows in the opposite direction, causing the motor to spin in the opposite direction.
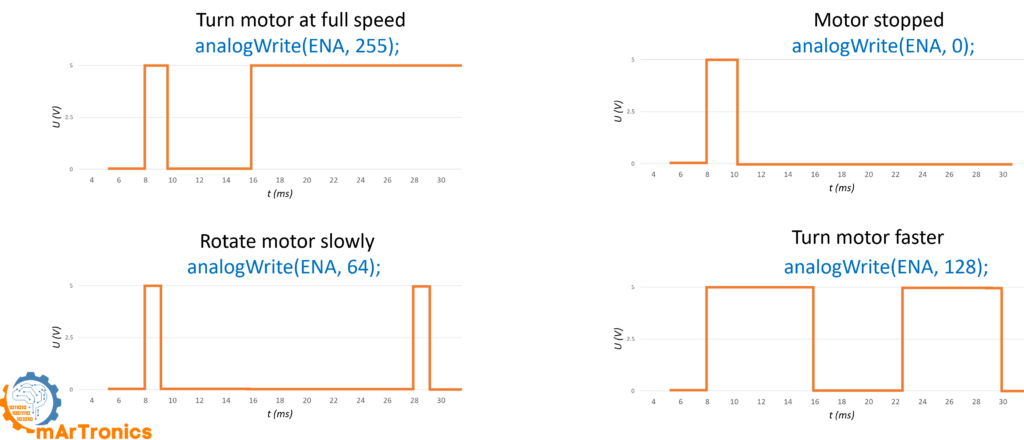
Speed Control: By using Pulse Width Modulation (PWM), the motor speed can be controlled. PWM rapidly switches the motor on and off, varying the width of the on-time pulses to control the average voltage and, thus, the motor speed.
L298N Dual H-Bridge Motor Driver
The L298N Dual H-Bridge motor driver is a versatile and popular choice for controlling two DC motors. It allows for independent control of the speed and direction of each motor.
Key Features:
- Controls two DC motors
- Handles high currents (up to 2A per channel)
- Uses PWM for speed control

Connections:
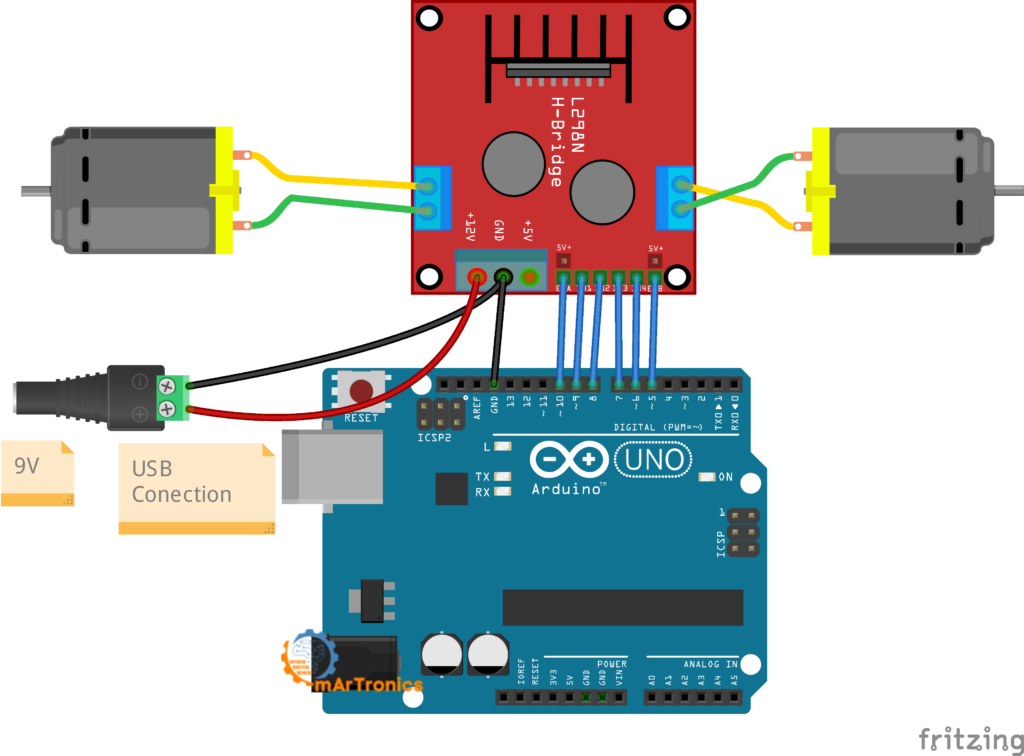
- Input Pins (IN1, IN2, IN3, IN4): Control the direction of the motors.
- Enable Pins (ENA, ENB): Control the speed via PWM signals.
- Motor Power (VCC): Connects to the motor power supply.
- Ground (GND): Common ground for the circuit.
Basic Wiring:
- Connect IN1, IN2, IN3, and IN4 to Arduino digital pins.
- Connect ENA and ENB to Arduino PWM pins.
- Connect VCC to the motor power supply (typically 5-12V).
- Connect GND to the Arduino ground.
Programming the Arduino
Once everything is connected, you’ll need to program the Arduino to control the motor.
/**
 * Author: Omar Draidrya
 * Date: 2024/06/07
 * This code controls the forward and backward movement of a motor using an H-bridge.
 */

#define IN1 9  // Motor 1 control pin 1
#define IN2 8  // Motor 1 control pin 2
#define IN3 7  // Motor 2 control pin 1
#define IN4 6  // Motor 2 control pin 2
#define ENA 10 // Motor 1 speed control
#define ENB 5  // Motor 2 speed control

void setup() {
    // Set all the motor control pins to outputs
    pinMode(IN1, OUTPUT);
    pinMode(IN2, OUTPUT);
    pinMode(IN3, OUTPUT);
    pinMode(IN4, OUTPUT);
    pinMode(ENA, OUTPUT);
    pinMode(ENB, OUTPUT);

    // Initialize all the control pins to LOW
    digitalWrite(IN1, LOW);
    digitalWrite(IN2, LOW);
    digitalWrite(IN3, LOW);
    digitalWrite(IN4, LOW);
}

void loop() {
    // Move forward
    digitalWrite(IN1, HIGH); // Set motor 1 forward
    digitalWrite(IN2, LOW);
    digitalWrite(IN3, HIGH); // Set motor 2 forward
    digitalWrite(IN4, LOW);
    analogWrite(ENA, 128);   // Set motor 1 speed
    analogWrite(ENB, 128);   // Set motor 2 speed
    delay(2000);             // Move forward for 2 seconds

    // Stop
    digitalWrite(IN1, LOW);
    digitalWrite(IN2, LOW);
    digitalWrite(IN3, LOW);
    digitalWrite(IN4, LOW);
    delay(2000);             // Stop for 2 seconds

    // Move backward
    digitalWrite(IN1, LOW);
    digitalWrite(IN2, HIGH); // Set motor 1 backward
    digitalWrite(IN3, LOW);
    digitalWrite(IN4, HIGH); // Set motor 2 backward
    analogWrite(ENA, 128);   // Set motor 1 speed
    analogWrite(ENB, 128);   // Set motor 2 speed
    delay(2000);             // Move backward for 2 seconds

    // Stop
    digitalWrite(IN1, LOW);
    digitalWrite(IN2, LOW);
    digitalWrite(IN3, LOW);
    digitalWrite(IN4, LOW);
    delay(1000);             // Stop for 1 second
}
Arduino Motor Shield
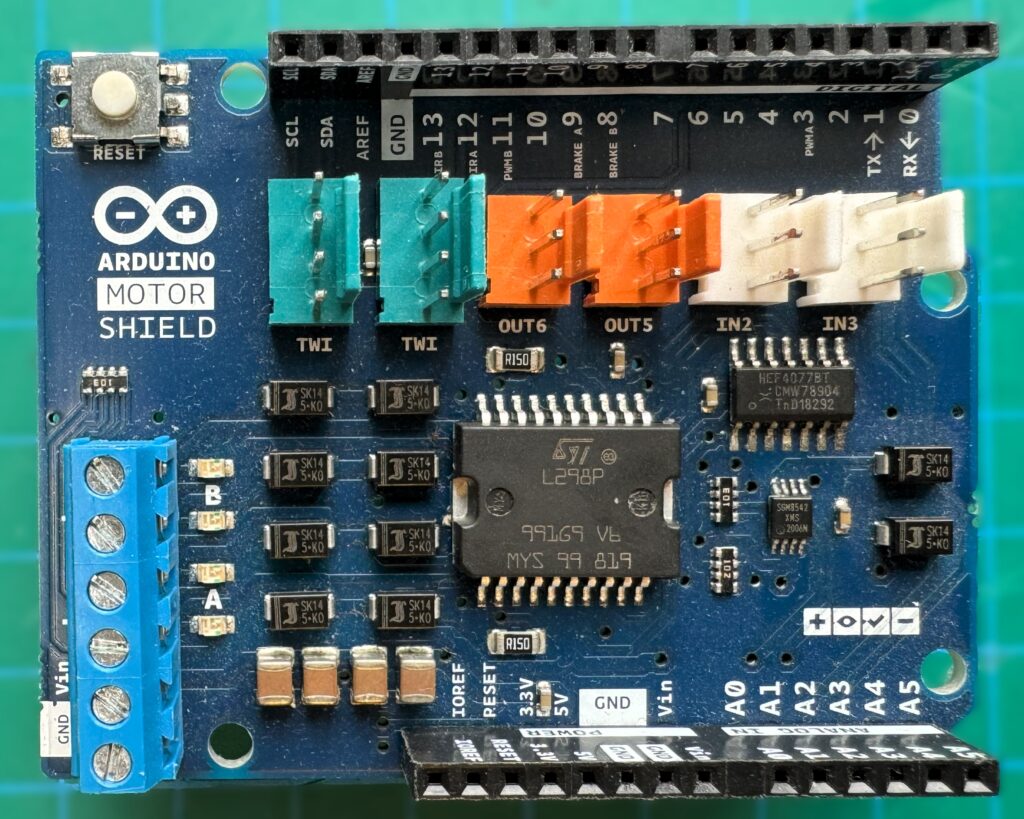
The Arduino Motor Shield simplifies motor control with a plug-and-play approach, providing an easy interface for connecting DC motors to your Arduino.
Key Features:
- Controls two DC motors or one stepper motor
- Handles high currents (up to 2A per channel)
- Supports PWM for speed control
Connections:
- Motor Terminals (A+, A-, B+, B-): Connects to the motor wires.
- Power Supply (Vin, GND): External power supply for the motors.
- Control Pins (DIR A, DIR B, PWM A, PWM B): Control motor direction and speed.
Basic Wiring:
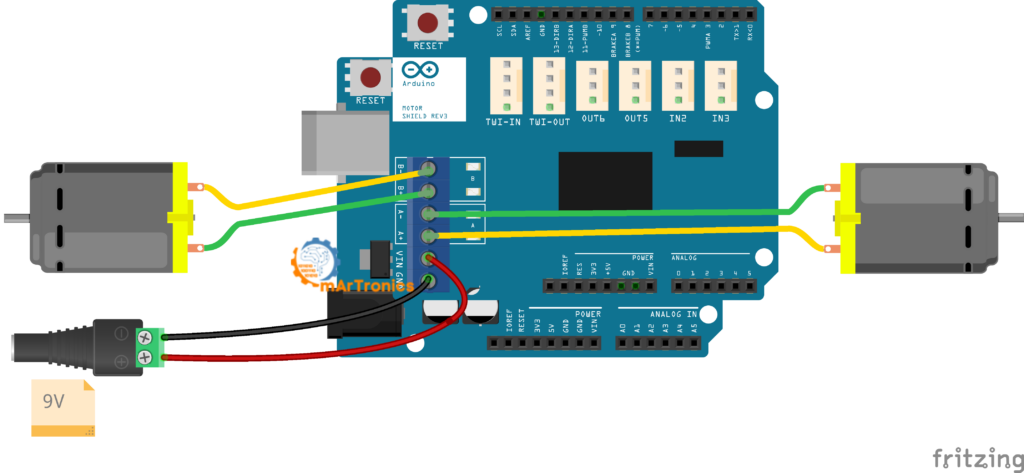
- Attach the motor shield to the Arduino.
- Connect the motors to terminals A+ and A- for Motor A, B+ and B- for Motor B.
- Connect an external power supply to Vin and GND.
Programming the Arduino
/**
 * Author: Omar Draidrya
 * Date: 2024/06/07
 * This code controls the forward and backward movement of a motor using an H-bridge.
 */

#define DIR_A 12  // Motor A direction control
#define DIR_B 13  // Motor B direction control
#define PWM_A 3   // Motor A speed control
#define PWM_B 11  // Motor B speed control

void setup() {
    // Set all the motor control pins to outputs
    pinMode(DIR_A, OUTPUT);
    pinMode(DIR_B, OUTPUT);
    pinMode(PWM_A, OUTPUT);
    pinMode(PWM_B, OUTPUT);
}

void loop() {
    // Move forward
    digitalWrite(DIR_A, HIGH); // Set motor A forward
    digitalWrite(DIR_B, HIGH); // Set motor B forward
    analogWrite(PWM_A, 255);   // Set motor A speed to maximum
    analogWrite(PWM_B, 255);   // Set motor B speed to maximum
    delay(2000);               // Move forward for 2 seconds

    // Stop
    analogWrite(PWM_A, 0);     // Stop motor A
    analogWrite(PWM_B, 0);     // Stop motor B
    delay(1000);               // Stop for 1 second

    // Move backward
    digitalWrite(DIR_A, LOW);  // Set motor A backward
    digitalWrite(DIR_B, LOW);  // Set motor B backward
    analogWrite(PWM_A, 255);   // Set motor A speed to maximum
    analogWrite(PWM_B, 255);   // Set motor B speed to maximum
    delay(2000);               // Move backward for 2 seconds

    // Turn left
    digitalWrite(DIR_A, LOW);  // Set motor A backward
    digitalWrite(DIR_B, HIGH); // Set motor B forward
    analogWrite(PWM_A, 255);   // Set motor A speed to maximum
    analogWrite(PWM_B, 255);   // Set motor B speed to maximum
    delay(2000);               // Turn left for 2 seconds

    // Turn right
    digitalWrite(DIR_A, HIGH); // Set motor A forward
    digitalWrite(DIR_B, LOW);  // Set motor B backward
    analogWrite(PWM_A, 255);   // Set motor A speed to maximum
    analogWrite(PWM_B, 255);   // Set motor B speed to maximum
    delay(2000);               // Turn right for 2 seconds
}
ARD SHD L293D Motor Shield
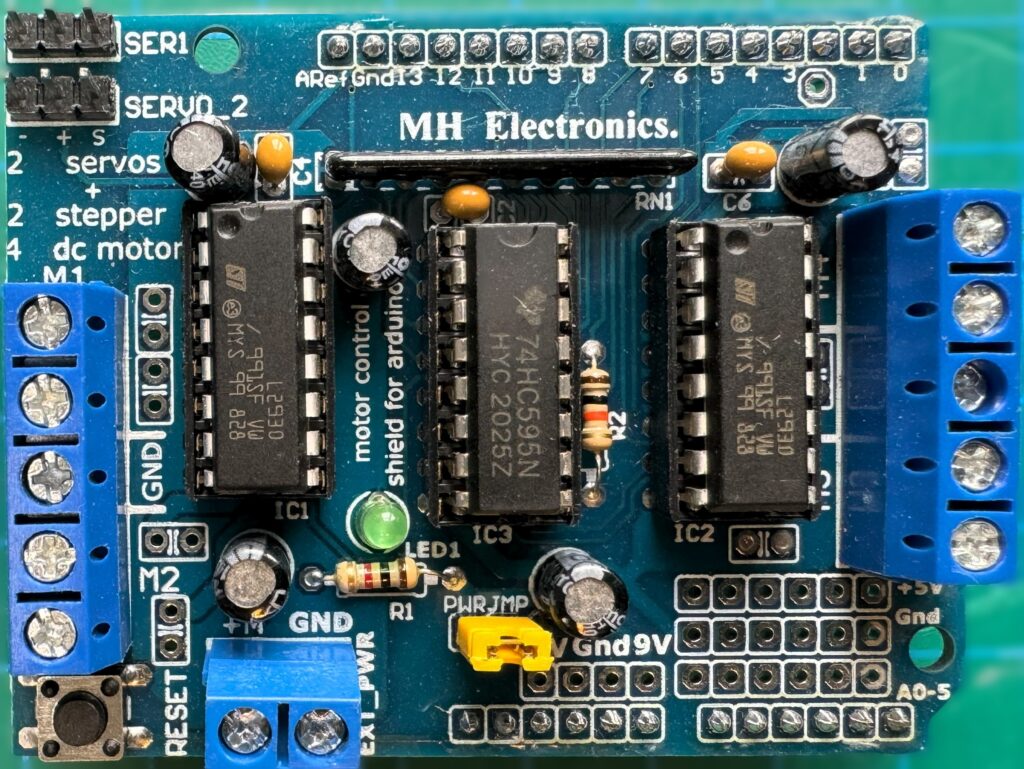
The ARD SHD L293D motor shield simplifies motor control with a straightforward interface for connecting and controlling DC motors with your Arduino. It utilizes the L293D chip, which can handle high voltage and current, making it suitable for larger motors.
Key Features:
- Controls up to four DC motors or two stepper motors
- Provides 0.6A continuous current per channel (1.2A peak)
- Supports motor voltages from 4.5V to 25V
- Integrated thermal protection
Connections:
- Motor Terminals (M1, M2, M3, M4): Connect the motor wires to these terminals.
- Power Supply (Vin, GND): External power supply for the motors.
- Control Pins: Internally mapped to Arduino pins.
Basic Wiring:
- Attach the motor shield to the Arduino.
- Connect the motors to terminals M1 and M2 for Motor A, M3 and M4 for Motor B.
- Connect an external power supply to Vin and GND.
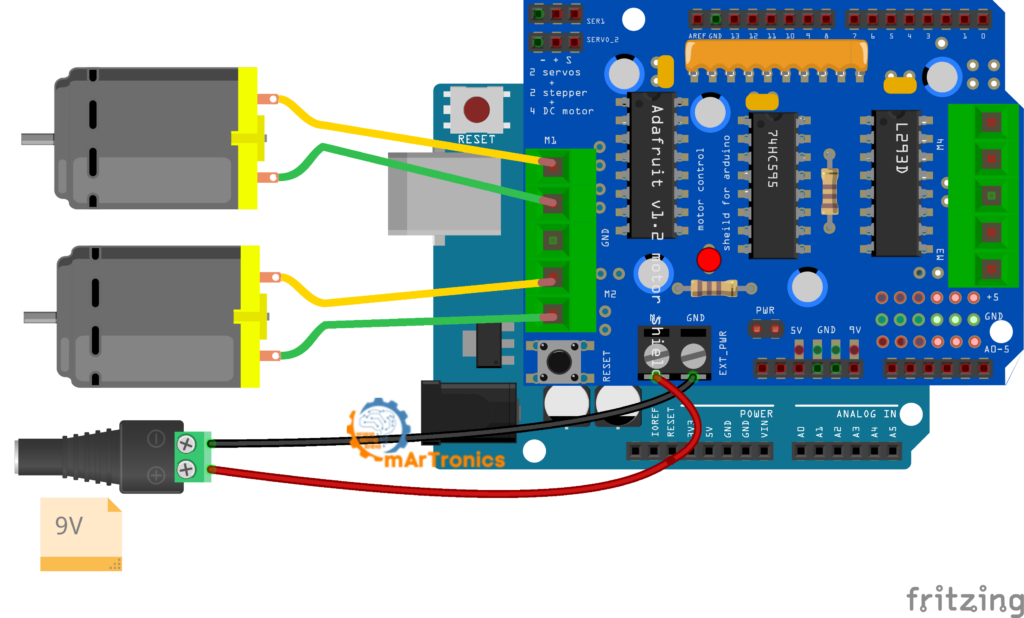
Programming the Arduino
Here’s how to program the ARD SHD L293D motor shield using the Adafruit Motor Shield library. This library provides an easy way to control the motors.
Install the Adafruit Motor Shield Library
- Open the Arduino IDE.
- Go to Sketch > Include Library > Manage Libraries.
- Search for “Adafruit Motor Shield” and install it.
/**
 * Author: Omar Draidrya
 * Date: 2024/06/07
 * This code controls the forward and backward movement of two DC motors using the Adafruit Motor Shield.
 */

#include <AFMotor.h>

// Create motor objects for two DC motors
AF_DCMotor motor1(1); // Motor on M1
AF_DCMotor motor2(2); // Motor on M2

void setup() {
    // Set the speed of the motors (0-255)
    motor1.setSpeed(200);
    motor2.setSpeed(200);
}

void loop() {
    // Move forward
    motor1.run(FORWARD); // Set motor1 to move forward
    motor2.run(FORWARD); // Set motor2 to move forward
    delay(2000);         // Move forward for 2 seconds

    // Stop
    motor1.run(RELEASE); // Stop motor1
    motor2.run(RELEASE); // Stop motor2
    delay(1000);         // Stop for 1 second

    // Move backward
    motor1.run(BACKWARD); // Set motor1 to move backward
    motor2.run(BACKWARD); // Set motor2 to move backward
    delay(2000);          // Move backward for 2 seconds

    // Stop
    motor1.run(RELEASE); // Stop motor1
    motor2.run(RELEASE); // Stop motor2
    delay(1000);         // Stop for 1 second
}
Testing the Motor Drivers
Upload the sample code to your Arduino, connect the motors and power source, and watch how the motors work to test these setups. You can change the motor’s speed by changing the PWM numbers in the code. To stop the motor from turning, you can switch the direction control pins.
Conclusion
When you use the Arduino Motor Shield and the L298N Dual H-Bridge motor driver together, you can handle DC motors in a number of different ways. If you understand these drivers, it will be easy to have precise motor control whether you’re making robots or other automated systems. Try out the model codes that are given and make changes to them to fit your needs.


Pingback: Building an Obstacle-Avoiding Robot Car | بناء سيارة روبوت تتجنب العوائق
Pingback: Bluetooth-Controlled Car with Arduino - OmArTronics
Pingback: Advanced Autonomous and Bluetooth-Controlled Car with Arduino